WEB端直传媒体存储流程优化实践
更新时间 2024-10-31 15:40:47
最近更新时间: 2024-10-31 15:40:47
介绍WEB端直传媒体存储流程优化实践。
优化实践
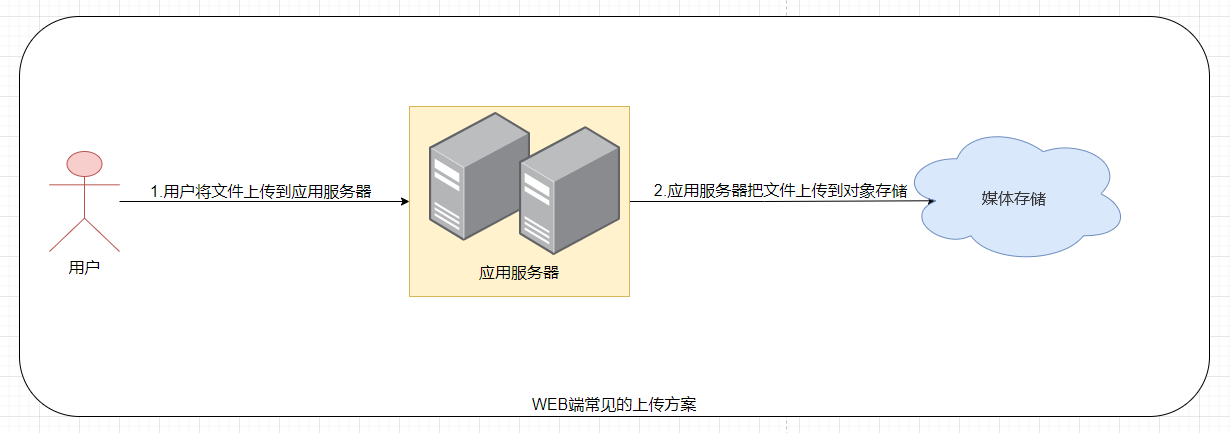
在WEB端需要将用户的数据上传到媒体存储,常见的方法通常是让用户通过浏览器先上传文件到用户的应用服务器,然后应用服务器再上传到媒体存储。这种方案上传的中转数据需要经过用户应用服务器,传输效率低,同时在多任务上传的过程,无疑会增加应用服务器的压力。具体的上传流程如下图:

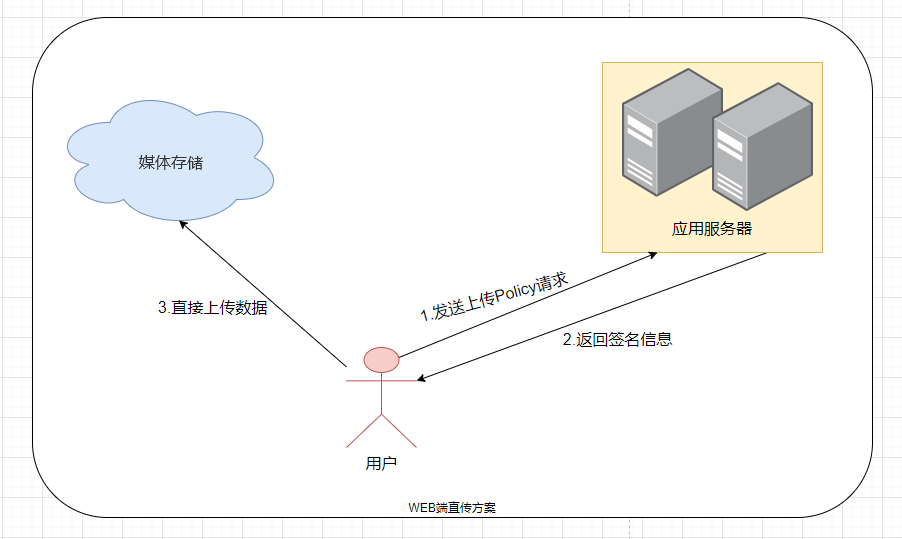
本文将介绍另外一种方案,通过在WEB端直接调用PostObject接口,将用户的文件对象直传给天翼云媒体存储。这种方案,具有传输效率高,降低用户应用服务器压力等优点。
WEB端直传媒体存储流程如下图:

在WEB端直传,我们主要基于媒体存储的post接口,用表单上传的方式,将对象上传到指定的桶里面,所以在上传之前,我们需要先创建桶。同时上传的对象文件,最大不能超过5GB。
利用post接口进行表单直传的详细具体步骤:
1.将post上传接口中基于表单上传需要发送的Policy信息,发送给应用服务器。我们假设发送给应用服务器的Policy信息,如下:
{"expiration":"2023-12-28T00:00:00Z","conditions":[{"bucket":"openapi-hp-test"},{"key":"post_dog.png"}]}
2.应用服务器收到Policy信息后,对其进行签名,然后返回给用户。
应用服务器,我们可以采用Java,Python,GoLang等语言进行开发,计算post上传的签名信息。
我们假设后端应用服务器是python开发的,使用v2签名,示例代码如下:
import base64
import hmac
import hashlib
import binascii

def sign2(key, msg):
    return hmac.new(bytes(key, encoding='utf-8'), msg.encode("utf-8"), hashlib.sha1).digest()


def getSignatureKey2(key, encodepolicy):
    signaturebyte = sign2(key, encodepolicy)
    return binascii.b2a_base64(signaturebyte)

if __name__ == "__main__":
    SK = 'xxxxx'
    bucketName = 'xx'
    objectKey = 'xx'
    expirationTime = "2023-12-28T00:00:00Z"
    policy = "{\"expiration\": \"%s\"," \
             "\"conditions\": [" \
             "{\"bucket\": \"%s\" }," \
             "{\"key\":\"%s\"}" \
             "]}" % (expirationTime, bucketName, objectKey)
    print(f"policy:{policy}")
    encodePolicy = bytes.decode(base64.b64encode(policy.encode('utf-8')))
    print(f"encodePolicy:{encodePolicy}")
     #计算签名
    signature = getSignatureKey2(SK,encodePolicy)
    print(f"signature:{signature}")
如果使用v4签名,请参考SDK和Demo相关代码: SDK概览
3.准备表单HTML页面。
表单HTML页面代码示例如下:
<html>
<head>
<meta http-equiv="Content-Type" content="text/html; charset=UTF-8" />
</head>
<body>

<form action="http://bucket_name.domain.ctyun.cn/" method="post" enctype="multipart/form-data">
key
<!-- Object name -->
<input type="text" name="key" value="object-key" />

<!-- Base64 code of the policy -->
<input type="hidden" name="Policy" value="*** your policy ***" />
<!-- AK -->
<input type="hidden" name="AWSAccessKeyId" value="*** your Access Key ***"/>
<!-- Signature information -->
<input type="hidden" name="signature" value="*** your signature ***"/>

<input name="file" type="file" />
<input name="submit" value="Upload" type="submit" />
</form>
</body>
</html>
注意:
(1)html表单中的Policy值需要为base64编码后的值。
(2) html表单中的signature值为你应用服务器的返回的签名结果。
4.选择你需要上传的本地文件,然后进行表单上传。
常见问题
- 跨域问题:当出现跨域问题的时候,请参考跨域资源共享对其进行配置。
- 参考post接口API相关文档描述,如果桶为public-read-write,那么Policy可以为空。桶权限非public-read-write时,Policy不能为空,其值在鉴权时需要用到。如果Policy为空,那么AWSAccessKeyId和signature都可以为空,如果Policy不为空,那么就需要同时填入AWSAccessKeyId和signature字段。
- 为避免造成AK/SK泄露,不建议直接在WEB端签名,可在后端直接计算预签名URL,然后前端使用预签名URL授权访问媒体存储。
- 这里以应用服务器使用python计算预签名URL,前端使用临时URL访问媒体存储为例。
- 利用python在应用服务端计算预签名URL:
import botocore.config import botocore.session import botocore.signers def generate_putobject_presigned_url(access_key, secret_key, end_point, bucket,key,region): config = botocore.config.Config(signature_version='s3v4') session = botocore.session.get_session() s3_client = session.create_client( 's3', aws_access_key_id=access_key, aws_secret_access_key=secret_key, endpoint_url=end_point, region_name=region, config=config) expiration_time = 3600 # URL 过期时间(单位:秒) # 构建上传预签名 URL 的请求参数 params = { 'Bucket': bucket, 'Key': key, 'ContentType': 'text/plain' # 替换为你要上传的文件的 MIME 类型 } presigned_url = s3_client.generate_presigned_url( ClientMethod='put_object', Params=params, ExpiresIn=expiration_time) print(f"presigned_url:{presigned_url}") if __name__ == '__main__': AK = 'xxx' SK = 'xxx' bucketName = 'hp-test' objectKey = 'post_dog.png' endpoint = 'http://domain.ctyun.cn' region='ap-east-1' generate_putobject_presigned_url(AK,SK,endpoint,bucketName,objectKey,region) - WEB端上传的时候,URL使用从应用服务器获取到的预签名URL:
<html>
  <head>
    <title>使用 PUT 请求上传文件内容</title>
  </head>
  <body>
    <h1>使用 PUT 请求上传文件内容</h1>
    <input type="file" id="fileInput" />
    <button onclick="uploadFile()">上传文件</button>

    <script>
      function uploadFile() {
        var fileInput = document.getElementById('fileInput');

        if (fileInput.files.length === 0) {
          alert('请选择要上传的文件');
          return;
        }

        var file = fileInput.files[0];
        var xhr = new XMLHttpRequest();
        xhr.open('PUT', '/xxxx', true);  // 替换成实际的上传 URL
        //要上传的文件的 MIME 类型,需要与生成预签名的时候一致
        xhr.setRequestHeader('Content-Type', file.type);  // 设置请求头的 Content-Type

        xhr.onload = function() {
          if (xhr.status === 200) {
            alert('文件上传成功');
          } else {
            alert('文件上传失败');
          }
        };
        xhr.send(file);
      }
    </script>
  </body>
</html>
