基本概念
主从复制原理
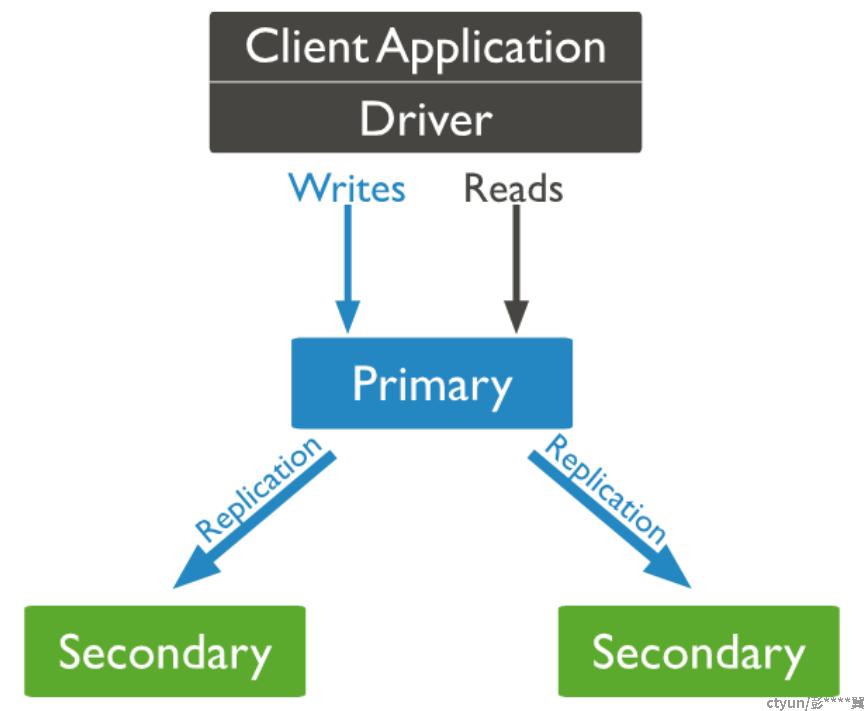
MongoDB 使用类 raft 协议实现多副本的数据一致性。多个副本组成一个副本集,用户可以通过客户端或者驱动程序直接访问副本集,或者通过 mongos 访问副本集。如下图所示:

副本集内部采用类 raft 算法来选主,通过 oplog 同步数据。
读写分离和 readPreference
MongoDB 默认读写操作都在 primary 节点上执行,但是也提供了接口进行读写请求分离,充分发挥系统的整体性能。其中,读写分离的关键在于设置请求的 readPreference, 这个参数表示了用户希望读取哪种节点。目前可配置的 readPreference 模式有以下5种:
- primary:默认模式,所有读操作在当前主节点上执行。
- primaryPreferred: 优先主节点,如果主节点不能正常提供服务则选择从节点。
- secondary: 所有读操作到从节点上执行。
- secondaryPreferred: 优先到从节点执行,如果没有合适的从节点,则到主节点执行。
- nearest: 不区分主从节点,而是按照网络距离选择节点。
除了模式选择之外,readPreference 还可以指定 3 个选项:
- tag set: 用户可以给副本集中的节点添加标签(tag),然后在 readPreference 中指定 tag set list 划定可读的节点范围。例如 [ { "region": "South", "datacenter": "A" }, { } ] 会优先选择 region 为 South 且 datacenter 为 A 的节点,除非副本集中没有这样的节点,则再用 {} 空规则匹配任意可用的节点。 tag set 选项可以和 primaryPreferred/secondary/secondaryPreferred/nearest 搭配使用。
- maxStalenessSeconds:当读取到从节点时,最大能够容忍该从节点的主从延迟大小。由于 mongos 和 driver 对副本集主从延迟的探测周期不太频繁,因此这个值的衡量标准比较粗,官方建议设置为 90s 或者更大的值。如果设置为 90s, 则不会读取到主从延迟超过 90s 的从节点。如果副本集目前主节点不可用,则这个配置比较的是最新的从节点和当前从节点的延迟大小。需要注意的是,maxStalenessSeconds 这里比较的时间是主从节点同步延迟,而前面说的 nearest 模式是 client/mongos 到各个 mongod 节点的网络距离,2 者并不相同。maxStalenessSeconds 选项可以和 primaryPreferred/secondary/secondaryPreferred/nearest 搭配使用。该选项只支持 3.4 及以上版本。
- hedged reads: 开启这个选项时,mongos 会将读请求发到符合条件的 2 个副本中,并将先响应的结果返回。该选项只支持 4.4 及以上版本的分片集群。
使用场景
没有哪种 readPreference 设置能够完美满足所有的业务需求。一般都需要根据自身的业务场景来指定,常见的参考因素有:
- 强一致性。如果需要保证强一致性,业务需要设置 readPreference 为 primary,并且设置 WriteConcern majority 和 readConcern majority. 个人认为进行这项设置之后,MongoDB 的读写行为和原生 raft 一样了,可以避免主从延迟、故障切换、数据回滚等因素带来的一致性风险。
- 弱化一致性,增强可用性。业务可以设置 primaryPreferred,这样在主节点故障的时候还能正常服务,但是需要承担一定的一致性风险。如果追求更高的可用性,也可以考虑 secondary/secondaryPreferred/nearest 模式。
- 追求最低延迟。可以设置 nearest,在这种模式下,client/mongos 会统计到每个节点的网络距离,并将 [最近距离,最近距离+15ms] 条件内的节点作为备选节点。
- 读指定区域的节点。一般应用于多地域多 AZ 部署的情况,可以配合 tag set list 使用。比如 readPref('nearest', [ { 'dc': 'east' } ]) 表示读取东部地域的就近节点。
初次接触 readPreference 时,可能会存在一些误解:
- 错误认为 nearest 只会访问网络距离最近的那 1 个节点。事实上,client/mongos 会对节点的网络距离进行探测后排序,选取 [最近距离,最近距离+15ms] 范围内的1 个或者多个节点。
- 错误认为 secondary/secondaryPreferred 是最均衡的模式。“主负责写,从负责读” 看起来合理,其实要注意的是从节点也会拉取 oplog 进行回放,也会承担同样的写压力。
原理分析
对于分片集群,mongos 负责转发读请求到对应的 mongod 节点。对于副本集,则是由 client/driver 负责转发读请求到合适的 mongod 节点。因此,readPreference 的处理逻辑主要包含在 mongos 内核代码以及各个编程语言的 driver 代码中。
下面通过 mongos 内核代码分析(4.0.3版本),以及 mongo-go-driver 代码分析(1.0.0),来看看 readPreference 的处理流程,主要包含节点选择逻辑,以及节点属性的探测逻辑。
备注:更高版本的内核和 driver 对一些细节和代码文件进行了调整,比如 isMaster 命令改成了 Hello,返回字段中的 master 名称改成了 primary 等。但是原理上都是相同的。
mongos内核代码分析
节点状态信息采集
每个 mongos 节点都维护一个 ReplicaSetMonitor 探测并维护每个 shard 的拓扑信息,默认每隔 30 秒进行一次周期性探测。另外,为了避免探测周期太长导致维护的拓扑信息存在过期数据的问题,在 mongos 根据 readPreference 选择节点时,如果没有合适的节点也会主动触发探测 。探测的实现方式是向 mongod 节点发送 isMaster 命令,获取节点的状态、配置以及网络距离信息:
try {
    ScopedDbConnection conn(targetURI, socketTimeoutSecs);
    bool ignoredOutParam = false;
    Timer timer;    // 开始计时
    BSONObj reply;
    conn->isMaster(ignoredOutParam, &reply);  // 发送 isMaster 命令获取节点的状态和tag 配置
    isMasterReplyStatus = reply;
    pingMicros = timer.micros();  // 统计本次 isMaster 命令耗时,作为网络距离!
    conn.done();
} catch (const DBException& ex) {
    isMasterReplyStatus = ex.toStatus();
}
每个 mongod 节点返回的 isMaster 信息,包含的内容如下:
std::string setName;
bool isMaster;
bool secondary;
bool hidden;
int configVersion{};
OID electionId;                     // Set if this isMaster reply is from the primary
HostAndPort primary;                // empty if not present
std::set<HostAndPort> normalHosts;  // both "hosts" and "passives"
BSONObj tags;     // 包含的 tag set, 可以和 readPreference 中的 tag set list 比对来选择节点
int minWireVersion{};
int maxWireVersion{};

// remaining fields aren't in isMaster reply, but are known to caller.
HostAndPort host;
int64_t latencyMicros;  // ignored if negative, 网络距离
Date_t lastWriteDate{};
repl::OpTime opTime{};
其中网络距离 latencyMicros 会根据本次 isMaster 命令执行时间,并结合上一次 isMaster 命令执行时间进行平滑后取值,防止网络抖动带来的震荡。
if (reply.latencyMicros >= 0) {
    if (latencyMicros == unknownLatency) {
        latencyMicros = reply.latencyMicros;  //第一次更新,直接赋值
    } else {
        // update latency with smoothed moving average (1/4th the delta)
        //根据当前延迟和历史统计,进行平滑更新
        latencyMicros += (reply.latencyMicros - latencyMicros) / 4;
    }
}
节点选择逻辑
节点选择逻辑可以参考 SetState::getMatchingHost 方法的实现,在节点选择逻辑中,对 readPreference 的模式,tag 以及maxStalenessSeconds 都进行了处理。
比如 nearest 模式的节点选择逻辑如下:
std::sort(matchingNodes.begin(), matchingNodes.end(), compareLatencies);  // 先按照网路距离进行升序排序
for (size_t i = 1; i < matchingNodes.size(); i++) {
    int64_t distance =  // 依次计算每个节点相对于最近距离的差值
        matchingNodes[i]->latencyMicros - matchingNodes[0]->latencyMicros;
    if (distance >= latencyThresholdMicros) {  // 如果差值超过了设定的阈值,则排除该节点
        // this node and all remaining ones are too far away
        matchingNodes.erase(matchingNodes.begin() + i, matchingNodes.end());
        break;
    }
}
其中 latencyThresholdMicros 默认是 15ms,如果有一个节点的延迟比最近节点的延迟还要大15ms,则认为这个节点不应该被nearest策略选中。但是15ms并不是对每一个业务都合理。如果业务对延迟非常敏感,可以根据自己的需要来进行设置方法是在mongos配置文件中添加下面配置选项:
replication:
   localPingThresholdMs: <int>
驱动代码分析
节点状态信息采集
官方go driver 每隔10秒会通过 isMaster命令采集自己到mongod节点的网络延迟状况,参考 Server::heartbeat 代码:
now := time.Now()    // 开始统计耗时
// 去对应的节点上执行isMaster命令
isMasterCmd := &command.IsMaster{Compressors: s.cfg.compressionOpts}
isMaster, err := isMasterCmd.RoundTrip(ctx, conn)
...
delay := time.Since(now)    // 得到耗时统计
desc = description.NewServer(s.address, isMaster).SetAverageRTT(s.updateAverageRTT(delay))    // 进行平滑统计
采集完成后,会结合历史数据进行平滑统计,如下:
func (s *Server) updateAverageRTT(delay time.Duration) time.Duration {
    if !s.averageRTTSet {
        s.averageRTT = delay    // 如果是第一次统计,则直接赋值
    } else {
        alpha := 0.2
        // 进行平滑处理,新数据和历史数据的比重为 1 : 4
        s.averageRTT = time.Duration(alpha*float64(delay) + (1-alpha)*float64(s.averageRTT))
    }
    return s.averageRTT
}
节点选择逻辑
以find命令为例,go driver会生成一个 复合选择器,复合选择器会依次执行各项选择算法,得到一个候选节点列表:
readSelect := description.CompositeSelector([]description.ServerSelector{  // 复合选择器
    description.ReadPrefSelector(rp),   // 1.根据readPreference设置,选择主从节点
    description.LatencySelector(db.client.localThreshold),  //2.根据延迟选择最优节点
})
以 nearest 模式为例,对于节点延迟的选择主要依赖于 LatencySelector。大致流程为:统计到所有节点的最小延迟min-->计算延迟满足标准:min+15ms(默认)-->返回所有满足延迟标准的节点列表。核心代码如下:
func (ls *latencySelector) SelectServer(t Topology, candidates []Server) ([]Server, error) {
	if ls.latency < 0 {
		return candidates, nil
	}

	switch len(candidates) {
	case 0, 1:
		return candidates, nil
	default:
		min := time.Duration(math.MaxInt64)
		for _, candidate := range candidates {
			if candidate.AverageRTTSet {  // 计算所有候选节点的最小延迟
				if candidate.AverageRTT < min {
					min = candidate.AverageRTT
				}
			}
		}

		if min == math.MaxInt64 {
			return candidates, nil
		}
      // 用最小延迟加阈值配置(默认15ms)作为最大容忍延迟
		max := min + ls.latency

		var result []Server
		for _, candidate := range candidates {
			if candidate.AverageRTTSet {
				if candidate.AverageRTT <= max {
                 // 返回所有符合延迟标准(最大容忍延迟)的节点
					result = append(result, candidate)
				}
			}
		}

		return result, nil
	}
}
最后根据选择得到的候选列表,随机返回一个正常节点作为目标节点。核心代码如下:
for {
    // 根据前面介绍的“复合选择器”,得到候选节点列表
    suitable, err := t.selectServer(ctx, sub.C, ss, ssTimeoutCh)
    if err != nil {
        return nil, err
    }

    // 随机选择一个作为目标节点
    selected := suitable[rand.Intn(len(suitable))]
    selectedS, err := t.FindServer(selected)
    switch {
    case err != nil:
        return nil, err
    case selectedS != nil:
        return selectedS, nil
    default:
        // We don't have an actual server for the provided description.
        // This could happen for a number of reasons, including that the
        // server has since stopped being a part of this topology, or that
        // the server selector returned no suitable servers.
    }
}
关于上述 15ms 的默认配置,官方go driver也提供了设置接口。对于延迟敏感的业务,可以通过这个接口配置ClientOptions,降低阈值。
总结
MongoDB 通过 readPrefence 的5种模式和 3 个配置选项,可以灵活地实现读写请求分离。用户在使用 readPreference 时也需要明确带来的风险,根据自身业务特点,在一致性、可用性、延迟等方面进行权衡。