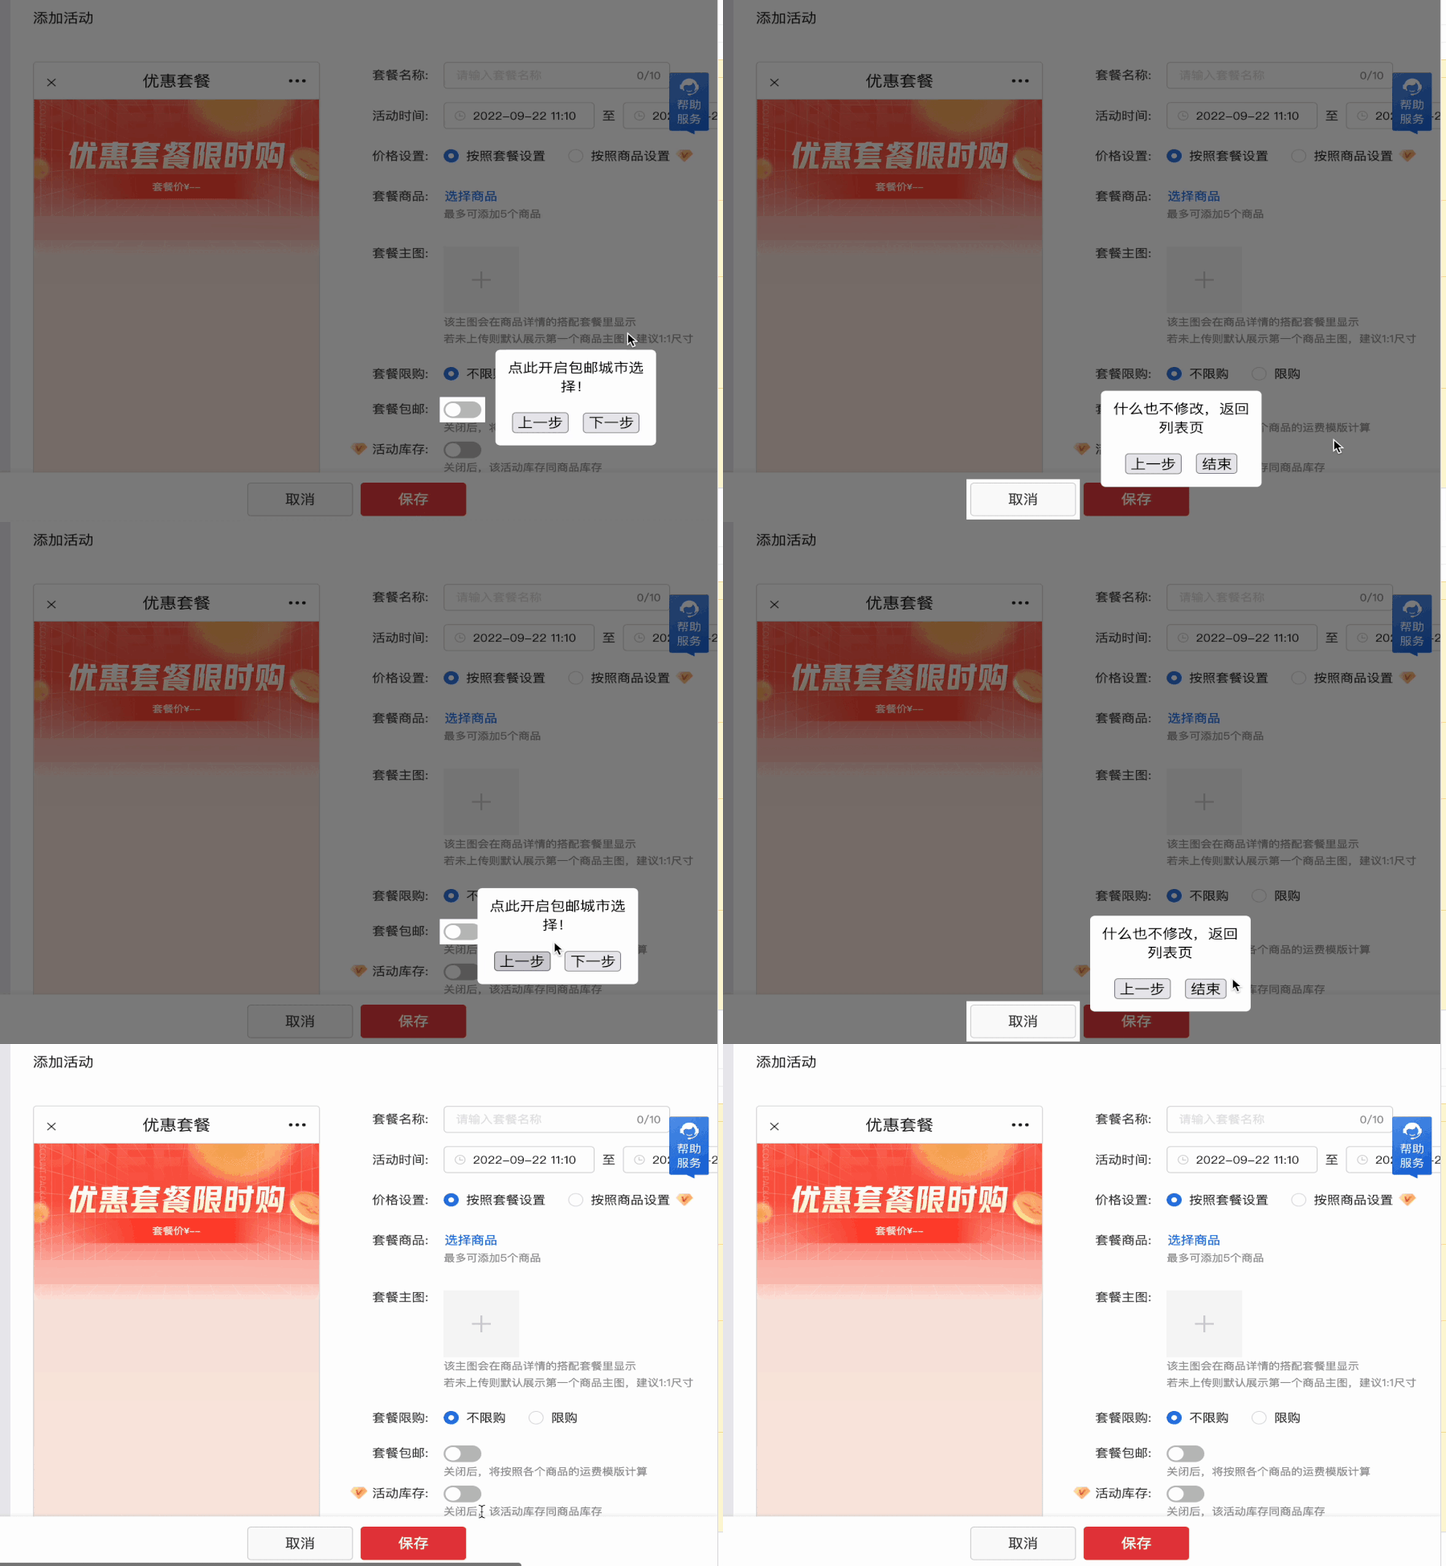
说来惭愧,一直到产品要加一个单独引导页的需求,我才仿佛第一次了解般细想这个功能。因为我发现,对这个“引导页”,我第一时间也是迷茫的,有些按钮询问了产品才知道是干啥用的。
当用户遇到和这个时候类似的场景发生时,“引导操作”的重要性就凸显出来了!
前端并不能代表用户,但前端也是用户。
(本文的代码和效果截图将采用定制封装之前的初版代码,如果有需要可以自取并定制化修改)
基于此,我封装了一个“引导操作”组件,传入「唯一的」id / class 和展示引导文案列表,即可产生效果。就像这样:

除此之外,图中高亮的按钮是可以操作的 —— 这就要考虑是否能操作?操作的时候是否需要“认为用户不需要引导”,直接取消“引导操作”?
但这不重要,本文只讨论弹窗中的一些“特殊点”。
刚开始选择实现方式时,有两种方案摆在我面前:
- cloneNode + position + transition
- z-index + position + transition
第一种方式,保证了元素的“独立性”,但是缺失了元素的“可交互性”。但这不是最重要的,每次的clone会带来繁琐的操作,我们应该避免它!
所以笔者采用了第二种方式:
<template>
    <div>
        <div v-if="show" ref="guideModalRef" class="guide-modal">
            <div ref="guideBoxRef" class="guide-box">
                <div>{{ message }}</div>
                <button class="btn" :disabled="index === 0" @click="changeStep(true)">
                上一步
                </button>
                <button class="btn" @click="changeStep(false)">{{lastBtn}}</button>
            </div>
        </div>
    </div>
</template>

<style scoped>
  .guide-modal {
    position: fixed;
    z-index: 99999;
    left: 0;
    right: 0;
    top: 0;
    bottom: 0;
    background-color: rgba(0, 0, 0, 0.3);
  }
  .guide-box {
    width: 150px;
    min-height: 10px;
    border-radius: 5px;
    background-color: #fff;
    position: absolute;
    transition: 0.5s;
    padding: 10px;
    text-align: center;
    z-index: 99999;
  }
  .btn {
    margin: 20px 5px 5px 5px;
  }
</style>
<script>
    let preNode = null;
    export default {
        props: {
            selectors: {
                type: Array,
                default: []
            },
            close: {
                type: Boolean,
                default: false
            }
        },
        watch: {
            close: {
                handler(val) {
                    if(val) this.show = false;
                },
                immediate: true
            }
        },
        data() {
            return {
                guideModalRef: null,
                guideBoxRef: null,
                index: 0,
                show: true,
                lastBtn: "下一步",
            }
        },
        computed: {
            message() {
                return this.selectors[this.index] && this.selectors[this.index].message;
            }
        },
        mounted() {
            this.genGuide();
        },
        methods: {
            genGuide() {
                // 所有指引完毕
                if(this.index == this.selectors.length - 1) {
                    this.lastBtn = "结束";
                }else {
                    this.lastBtn = "下一步";
                }
                if (this.index > this.selectors.length - 1) {
                    this.show = false;
                    return;
                }

                // 修改上一个节点的 z-index
                if (preNode) preNode.style = `z-index: 0;`;

                // 获取目标节点信息
                const target = preNode = document.querySelector(this.selectors[this.index].selector);
                target.style = `
                    position: relative;
                    z-index: 1000;
                `;
                const { x, y, width, height } = target.getBoundingClientRect();

                // 指引相关
                if (this.$refs.guideBoxRef) {
                    const halfClientHeight = this.$refs.guideBoxRef.clientHeight / 2;
                    this.$refs.guideBoxRef.style = `
                        left:${x + width + 10}px;
                        top:${y <= halfClientHeight ? y : y - halfClientHeight + height / 2}px;
                    `;
                }
            },

            changeStep(isPre) {
                isPre ? this.index-- : this.index++;
                this.genGuide();
            },
        }
    }
</script>
我们制造了一个遮罩层以避免对其他元素产生影响。然后动态地给“被高亮”的元素一个position,和高 z-index ,让他高于遮罩层。并在一旁通过 absolute 一个弹窗显示引导信息。
然后在created中使用节流函数注册监听事件,在每次有改动的时候去重新判断位置和高亮:
created() {
    // 页面内容发生变化时,重新计算位置
    window.addEventListener("resize", () => this.onScroll());
    window.addEventListener("scroll", () => this.onScroll());
},

//在methods中:
onScroll() {
    let frame = window.requestAnimationFrame;
    if(!frame) {
        throttle(function() { //组内封装的节流函数
            this.genGuide();
        }, 16);
    } else {
        frame(this.genGuide());
    }
}
似乎结束了?
不,我发现了一件有趣的事:当目标元素的父元素 position: fixed | absolute | sticky 时,目标元素的 z-index 无法超过蒙版层。(这也是目前一些流行的引导功能库中都具有的功能缺陷)
进而笔者发现:父元素为 fixed 时,具有 relative 的子元素会“丧失”高渲染层,表现上就像一个「普通元素」 。
除此之外,transform 这些可能会改变渲染层的属性也会对元素的定位有影响!
这里放一张图,这是Safari控制台具有的一项功能,可以查看页面的层级结构:

几乎所有的相关文章都在说 relative 会如何影响到 absolute 和 fixed,但似乎笔者没有见到有反过来研究的,也可能是我阅读的少,如有见谅。
那有没有一种东西,既能铺满整个页面(充当遮罩层),又能让指定位置“空出来”?
SVG !
SVG 可编码,利用 SVG 来实现蒙版效果,并预留出目标元素的高亮区间(即 SVG 不需要绘制的部分),这样就解决了使用 z-index 可能会失效的问题。
于是笔者改写了代码:
<template>
    <div>
        <svg v-if="show" style="position: absolute;top: 0;left: 0;width: 100%;height: 100%;z-index: 9999;">
            <defs>
                <mask id="myMask">
                    <rect x="0" y="0" width="100%" height="100%" style="stroke:none; fill: #ccc"></rect>
                    <rect id="circle1" :width="tip_s_w" :height="tip_s_h" :x='tip_s_x' :y="tip_s_y" style="fill: #000" />
                </mask>
            </defs>
            <rect x="0" y="0" width="100%" height="100%" style="stroke: none; fill: rgba(0, 0, 0, 0.6); mask: url(#myMask)"></rect>
        </svg>
        <div v-if="show" ref="guideModalRef"><!--  class="guide-modal" -->
            <div ref="guideBoxRef" class="guide-box">
                <div>{{ message }}</div>
                <button class="btn" :disabled="index === 0" @click="changeStep(true)">
                上一步
                </button>
                <button class="btn" @click="changeStep(false)">{{lastBtn}}</button>
            </div>
        </div>
    </div>
</template>

<style scoped>
  .guide-box {
    width: 150px;
    min-height: 10px;
    border-radius: 5px;
    background-color: #fff;
    position: fixed;
    transition: 0.5s;
    padding: 10px;
    text-align: center;
    z-index: 99999;
  }
  .btn {
    margin: 20px 5px 5px 5px;
  }
</style>
<script>
    export default {
        props: {
            selectors: {
                type: Array,
                default: []
            },
            close: {
                type: Boolean,
                default: false
            }
        },
        watch: {
            close: {
                handler(val) {
                    if(val) this.show = false;
                },
                immediate: true
            }
        },
        data() {
            return {
                guideModalRef: null,
                guideBoxRef: null,
                index: 0,
                show: true,
                lastBtn: "下一步",
                tip_s_w: 0,
                tip_s_h: 0,
                tip_s_x: 0,
                tip_s_y: 0,
            }
        },
        computed: {
            message() {
                return this.selectors[this.index] && this.selectors[this.index].message;
            }
        },
        created() {
            document.documentElement.style.overflow = "hidden"
            // 页面内容发生变化时,重新计算位置
            window.addEventListener("resize", () => this.genGuide());
        },
        mounted() {
            this.genGuide();
        },
        beforeDestroy() {
            document.documentElement.style.overflow = "scroll";
        },
        methods: {
            genGuide() {
                // 所有指引完毕
                if(this.index == this.selectors.length - 1) {
                    this.lastBtn = "结束";
                }else {
                    this.lastBtn = "下一步";
                }
                if (this.index > this.selectors.length - 1) {
                    this.show = false;
                    document.documentElement.style.overflow = "scroll"
                    return;
                }

                // 获取目标节点信息
                const target = preNode = document.querySelector(this.selectors[this.index].selector);
                const { x, y, width, height } = target.getBoundingClientRect();

                this.tip_s_x = x;
                this.tip_s_y = y;
                this.tip_s_w = width;
                this.tip_s_h = height;

                // 指引相关
                if (this.$refs.guideBoxRef) {
                    const halfClientHeight = this.$refs.guideBoxRef.clientHeight / 2;
                    this.$refs.guideBoxRef.style = `
                        left:${x + width + 10}px;
                        top:${y <= halfClientHeight ? y : y - halfClientHeight + height / 2}px;
                    `;
                }
            },

            changeStep(isPre) {
                isPre ? this.index-- : this.index++;
                this.genGuide();
            },
        }
    }
</script>
当然,这种方法也是有遗憾的:由于这时候“高亮”也是“画”出来的,所以这时候切记不可让页面滚动 —— 页面操作是有延迟的!
然后我们加入“边界判断”。
修改genGuide函数:
genGuide() {
    // 所有指引完毕
    if(this.index == this.selectors.length - 1) {
        this.lastBtn = "结束";
    }else {
        this.lastBtn = "下一步";
    }
    if (this.index > this.selectors.length - 1) {
        this.show = false;
        document.documentElement.style.overflow = "scroll"
        return;
    }

    // 获取目标节点信息
    const target = preNode = document.querySelector(this.selectors[this.index].selector);
    const { x, y, width, height } = target.getBoundingClientRect();

    this.tip_s_x = x - 4;
    this.tip_s_y = y - 4;
    this.tip_s_w = width + 8;
    this.tip_s_h = height + 8;

    // 指引相关
    if (this.$refs.guideBoxRef) {
        const g_clientHeight = this.$refs.guideBoxRef.clientHeight;
        const g_clientWidth = this.$refs.guideBoxRef.clientWidth;
        const halfClientHeight = g_clientHeight / 2;
        let g_top = (y <= halfClientHeight ? y : y - halfClientHeight + height / 2);
        this.$refs.guideBoxRef.style = `
            left:${x + width + 14}px;
            top:${g_top}px;
        `;

        //边界判断
        if((x + width + 14 > document.documentElement.clientWidth) && (g_top + g_clientHeight <= document.documentElement.clientHeight)) {
            this.$refs.guideBoxRef.style = `
                left:${x - g_clientWidth - 14}px;
                top:${y <= halfClientHeight ? y : y - halfClientHeight + height / 2}px;
            `;
        } else if((g_top + g_clientHeight > document.documentElement.clientHeight) && (x + width + 14 <= document.documentElement.clientWidth)) {
            this.$refs.guideBoxRef.style = `
                left:${x + width + 14}px;
                top:${y - g_clientHeight + 8}px;
            `;
        } else if((x + width + 14 > document.documentElement.clientWidth) && (g_top + g_clientHeight > document.documentElement.clientHeight)) {
            this.$refs.guideBoxRef.style = `
                left:${x -g_clientWidth - 14}px;
                top:${y - g_clientHeight + 8}px;
            `;
        }
    }
},
使用时传入这样的结构即可:
[
  {
    selector: ".combo-btn-tab-s2",
    message: "当前基础版,最多选择5个商品",
  },
  {
    selector: ".combo-btn-tab-s1",
    message: "点此开启包邮城市选择!",
  },
  {
    selector: ".combo-btn-tab-s3",
    message: "什么也不修改,返回列表页",
  },
],

