封装input组件
组件参数及事件
参数支持:
| 参数名称 | 参数描述 | 参数类型 | 默认值 |
|---|---|---|---|
| placeholder | 占位符 | string | 无 |
| type | 文本框类型(text/password) | string | text |
| disabled | 禁用 | boolean | false |
| clearable | 是否显示清空按钮 | boolean | false |
| show-password | 是否显示密码切换按钮 | boolean | false |
| name | name属性 | string | 无 |
事件支持:
| 事件名称 | 事件描述 |
|---|---|
| blur | 失去焦点事件 |
| change | 内容改变事件 |
| focus | 获取焦点事件 |
基本结构
第一步:在components目录下创建一个input.vue
<template>
  <div class="g-input">
    <input type="text" class="g-input_inner">
  </div>
</template>

<script>
export default {
  name: 'GInput'
}
</script>

<style>
</style>
第二步:接着在main.js中进行全局注册

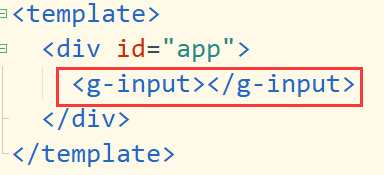
第三步:最后就是在App.vue中进行调用了

第四步:浏览器查看效果
![]()
其中input.vue组件的CSS样式如下:
.g-input {
  width: 100%;
  position: relative;
  font-size: 14px;
  display: inline-block;

  .g-input_inner {
    -webkit-appearance: none;
    background-color: #fff;
    background-image: none;
    border: 1px solid #dcdfe6;
    border-radius: 4px;
    box-sizing: border-box;
    color: #606266;
    display: inline-block;
    font-size: inherit;
    height: 40px;
    line-height: 40px;
    outline: none;
    padding: 0 15px;
    transition: border-color .2s cubic-bezier(.645, 045, .355, 1);
    width: 100%;

    &:focus {
      outline: none;
      border-color: #409eff;
    }

    // input禁用样式
    &.is-disabled {
      background-color: #f5f7fa;
      border-color: #e4e7ed;
      color: #c0c4cc;
      cursor: not-allowed;
    }
  }
}
placeholder属性
第一步:父组件传值

第二步:子组件接收值并进行校验

第三步:子组件将接收到的值绑定到g-input的属性上

第四步:浏览器查看

type属性
第一步:父组件传值

第二步:子组件接收传过来的值并进行校验

如果不是password类型,则默认为text类型。
第三步:绑定属性

去掉了默认的type="text",采用绑定的形式
第四步:浏览器查看效果

name属性
第一步:父组件传值

第二步:子组件通过props接收值,并进行校验

第三步:子组件绑定属性

disabled属性
第一步:父组件传值

第二步:子组件通过props接收值并进行校验

第三步:子组件绑定属性值

第四步:注意,还要设置当input处于disabled状态下的CSS样式

其中样式为:
// input禁用样式
&.is-disabled {
  background-color: #f5f7fa;
  border-color: #e4e7ed;
  color: #c0c4cc;
  cursor: not-allowed;
}
第五步:查看效果

v-model实现双向绑定
当我们给一个input标签进行双向数据绑定时,我们需要使用value绑定数据,再使用input事件监听标签内数据的变动,如下:
<input :value="username" @input="username=$event.target.value"/>第一步:父组件使用v-model绑定

第二步:子组件接收value值

第三步:子组件绑定属性和input事件

第四步:绑定事件回调

clearable属性和show-password属性
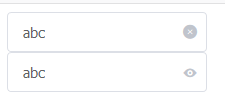
clearable允许通过叉图标清空输入框内容。
show-password允许密码框显示密码内容。
第一步:父组件传值

第二步:子组件通过props接收值

第三步:将值绑定到子组件的属性上

第四步:绑定事件

第五步:设置图标的样式
.g-input_suffix {
  .g-input_inner {
    padding-right: 30px;
  }

  .g-input_suffix {
    position: absolute;
    right: 10px;
    height: 100%;
    top: 0;
    line-height: 40px;
    text-align: center;
    color: #c0c4cc;
    transition: all .3s;
    z-index: 900;

    i {
      color: #c0c4cc;
      font-size: 14px;
      cursor: pointer;
      transition: color .2s cubic-bezier(.645, .045, .355, 1);
    }
  }
}
第六步:浏览器查看

完整代码
input.vue组件完整代码
<template>
  <div class="g-input" :class="{'g-input_suffix': showSuffix}">
    <input class="g-input_inner"
      :class="{'is-disabled': disabled}"
      :placeholder="placeholder"
      :type="showPassword ? (passwordVisible ? 'text' : 'password') : type"
      :name="name"
      :disabled="disabled"
      :value="value"
      @input="handleInput"
    >
    <span class="g-input_suffix">
      <i class="iconfont icon-cha" v-if="clearable && value" @click="clear"></i>
      <i class="iconfont icon-iconfontordinaryliulan" v-if="showPassword && type=='password'" @click="handlePassword"></i>
    </span>
  </div>
</template>

<script>
export default {
  name: 'GInput',
  props: {
    placeholder: {
      type: String,
      default: ''
    },
    type: {
      type: String,
      default: 'text'
    },
    name: {
      type: String,
      default: ''
    },
    disabled: {
      type: Boolean,
      default: false
    },
    value: {
      type: String,
      default: ''
    },
    clearable: {
      type: Boolean,
      default: false
    },
    showPassword: {
      type: Boolean,
      default: false
    }
  },
  data () {
    return {
      // 显示是否显示密码框
      passwordVisible: false
    }
  },
  computed: {
    showSuffix () {
      return this.clearable || this.showPassword
    }
  },
  methods: {
    // 绑定input事件进行回调
    handleInput (e) {
      this.$emit('input', e.target.value)
    },
    clear () {
      this.$emit('input', '')
    },
    handlePassword () {
      this.passwordVisible = !this.passwordVisible
    }
  }
}
</script>

<style lang="less" scoped="scoped">
.g-input {
  width: 100%;
  position: relative;
  font-size: 14px;
  display: inline-block;

  .g-input_inner {
    -webkit-appearance: none;
    background-color: #fff;
    background-image: none;
    border: 1px solid #dcdfe6;
    border-radius: 4px;
    box-sizing: border-box;
    color: #606266;
    display: inline-block;
    font-size: inherit;
    height: 40px;
    line-height: 40px;
    outline: none;
    padding: 0 15px;
    transition: border-color .2s cubic-bezier(.645, 045, .355, 1);
    width: 100%;

    &:focus {
      outline: none;
      border-color: #409eff;
    }

    // input禁用样式
    &.is-disabled {
      background-color: #f5f7fa;
      border-color: #e4e7ed;
      color: #c0c4cc;
      cursor: not-allowed;
    }
  }
}

.g-input_suffix {
  .g-input_inner {
    padding-right: 30px;
  }

  .g-input_suffix {
    position: absolute;
    right: 10px;
    height: 100%;
    top: 0;
    line-height: 40px;
    text-align: center;
    color: #c0c4cc;
    transition: all .3s;
    z-index: 900;

    i {
      color: #c0c4cc;
      font-size: 14px;
      cursor: pointer;
      transition: color .2s cubic-bezier(.645, .045, .355, 1);
    }
  }
}
</style>
App.vue父组件调用input组件的代码如下:
<template>
  <div id="app">
    <div>
      <g-input placeholder="请输入内容" v-model="useranem" clearable></g-input>
    </div>
    <div>
      <g-input placeholder="请输入内容" v-model="useranem" type="password" showPassword></g-input>
    </div>
  </div>
</template>

<script>
export default {
  data () {
    return {
      useranem: 'abc'
    }
  },
  methods: {

  }
}
</script>

<style lang="scss" scoped>
#app {
  .g-input {
    width: 200px;
  }
}
</style>

