在上一篇关于props的笔记中讲过,通过props传递给子组件的数据,不能被子组件修改。但实际需求中有需要子组件对数据操作。
Vue中实现方式:
- 父组件将自定义事件绑定在子组件上。
- 子组件捕获自定义事件并将数据返回给父组件。
- 父节点接受数据并进行处理。
示例
App.vue
<template>
    <div>
        <ConA @event="handleEvent"></ConA>
        <ConB :isShow="isShow"></ConB>
    </div>
</template>
<script>
import ConA from './ConA.vue';
import ConB from './ConB.vue'
export default {
    components: {
        ConA,
        ConB
    },
    data() {
        return {
            isShow: true
        }
    },
    methods: {
        handleEvent(data) {
            console.log(data)
            this.isShow = !this.isShow
        }
    }
}
</script>
ConA.vue
<template>
    <div>
        ConA
        <button @click="handleClick" >Button01</button>
    </div>
</template>
<script>
export default{
    methods:{
        handleClick(){
            this.$emit("event",'Button01 is Pressed')
        }
    }
}
</script>
ConB.vue
<template>
    <div v-show="isShow">
        ConB
    </div>
</template>
<script>
export default{
    props:{
        isShow:{
            type:Boolean,
            defaul:true
        }
    },
}
</script>
运行结果:

代码解析:
- 父组件App中定义了自定义事件event。
- ConA中使用this.$emit接收来自父组件App中的事件event。
- 父组件App接受ConA的响应并处理:1打印控制台日志Button01 is Pressed 2 处理变量isShow。
- ConB组件随着isShow的值改变而显示/隐藏
三段代码间的关系如下:

实际上时间处理的逻辑还是在父组件上,子组件的事件处理可以更简化的编写。直接使用匿名函数即可。
@click="$emit('event','Button01 is Pressed')"
ConB.vue
<template>
    <div>
        ConA
        <button @click="$emit('event','Button01 is Pressed')" >Button01</button>
    </div>
</template>
相应的也可以传递多个事件
app.vue
<template>
    <div>
        <ConA @event="handleEvent" @event2="handleEvent2"></ConA>
        <ConB :isShow="isShow"></ConB>
    </div>
</template>
<script>
import ConA from './ConA.vue';
import ConB from './ConB.vue'
export default {
    components: {
        ConA,
        ConB
    },
    data() {
        return {
            isShow: true
        }
    },
    methods: {
        handleEvent(data) {
            console.log(data)
            this.isShow = !this.isShow
        },
        handleEvent2(data) {
            console.log('handelEvent2')
            console.log(data)
        }
    }
}
</script>
ConA.vue
<template>
    <div>
        ConA
        <button @click="$emit('event','Button01 is Pressed')" >Button01</button>
        <button @click="$emit('event2','Button02 is Pressed')" >Button02</button>
    </div>
</template>
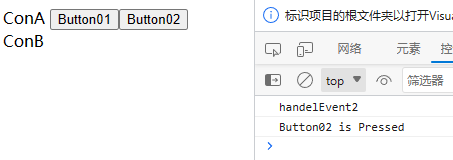
结果

父组件给子组件ConA绑了两个事件:event event2,以及两个时间相应函数。相应的子组件ConA上也添加了两个按钮来相应的事件。

