线程模型
envoy是一个多线程模型,参考官方的说法,envoy会起一个main thread主线程,主要负责做任务调度,统计汇总等。
同时envoy会根据核数起多个worker线程,主要负责具体的业务,诸如监听网络事件,进行连接管理等。
示意图如下:
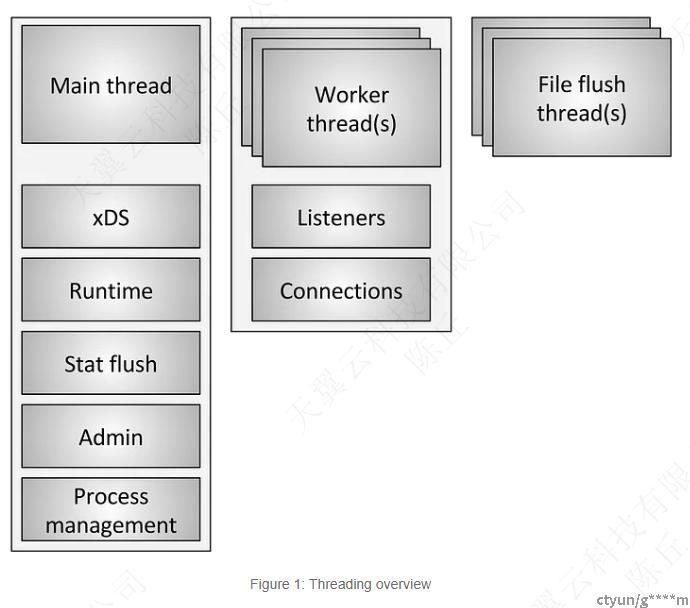
我们可以看到在这个分工下面,必然面临的一个问题就是,主线程如何跟worker线程进行内存交互。比方说主线程发现DNS或者cluster信息变化了,怎么同步到各个工作线程之中,这就涉及我们接下来要了解的TLS机制。
TLS (thread local storage) 机制
概述
首先我们来看官方给出来的图
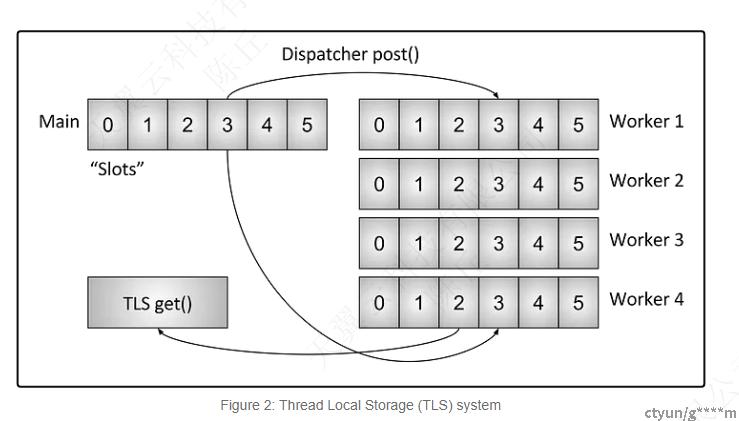
大致可以看得出来,主线程更新了内存对象之后,是会同步到worker线程的。但是具体细节如何,我们还不太清楚。在阅读官方的文档中,有这么一句话,也让我充满了疑惑:
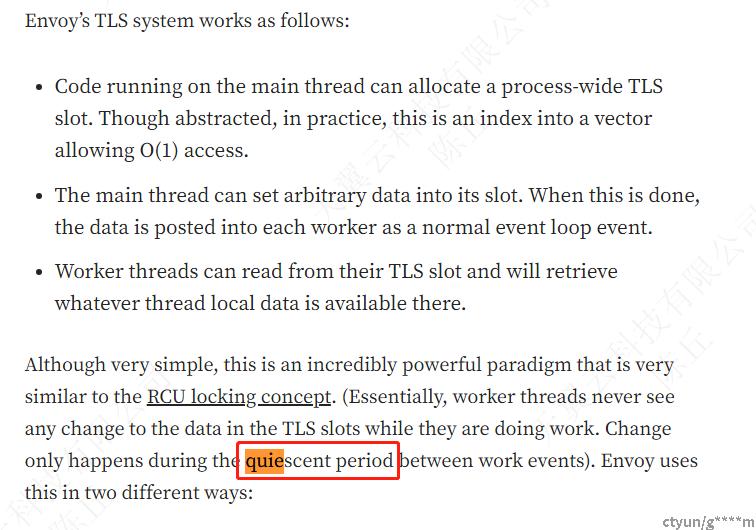
这个worker线程的静默期是怎么回事?TLS机制是异步的吗?需不需要加锁?
代码分析
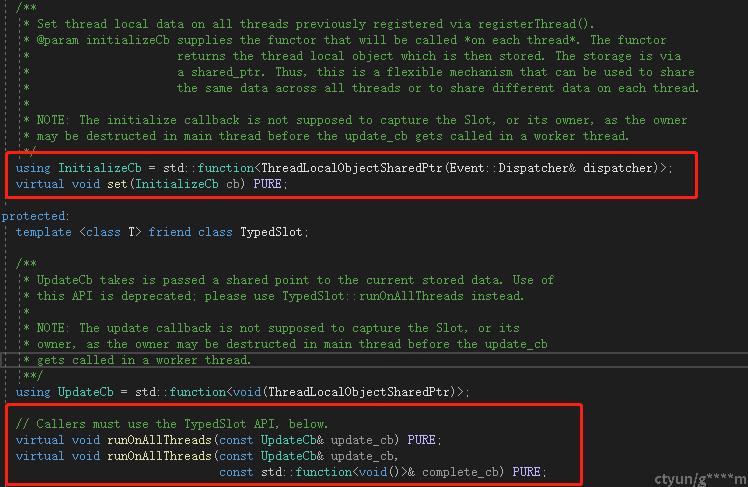
简单的看threadlocal对象会提供一个初始化的callback,在所有worker线程获取到的时候进行初始化,还有提供一个runOnAllThreads的函数,执行Update callback。
1. worker线程的注册和主线程任务派发
worker线程在启动的时候会把自己的dispatcher注册到tls管理器里面,后续主线程更新则会通过runOnAllThreads把更新函数放到每个worker dispatcher里面。
void InstanceImpl::runOnAllThreads(std::function<void()> cb) { ASSERT_IS_MAIN_OR_TEST_THREAD(); ASSERT(!shutdown_); //registered_threads_就是前面worker注册的dispatcher,这部分代码就不贴出来了 for (Event::Dispatcher& dispatcher : registered_threads_) { dispatcher.post(cb); } // Handle main thread. cb(); }
注意入参cb不是const 引用或者右值引用,所以这里的cb都是临时对象。下面的post同理。
2. worker线程处理主线程post过来的更新事件
dispatcher底层是一个eventloop,各个worker线程自己维护一个callback队列。接受主线程的post事件其实就是往队列里面加就可以了。
void DispatcherImpl::post(PostCb callback) { bool do_post; { Thread::LockGuard lock(post_lock_); do_post = post_callbacks_.empty(); post_callbacks_.push_back(std::move(callback)); } if (do_post) { post_cb_->scheduleCallbackCurrentIteration(); } }
上文说到callback作为临时对象,move调用的是移动构造函数,是可以少一次内存复制的。
scheduleCallbackCurrentIteration内部是往libevent里面插队,让libevent优先消费callback队列,只有为空的时候通知一次,因为无论如何后续消费都是消费到队列为空,无需重复通知,具体可以看下面的代码。
3. worker消费callback事件
worker启动后放一个消费任务到event里面排队。当worker处理完自己的业务后,eventloop轮到他执行消费callback队列时,会把所有的callback消费掉。
消费的函数就是前面提到的的init或者update。
消费callback队列的启动器在构造函数里面:
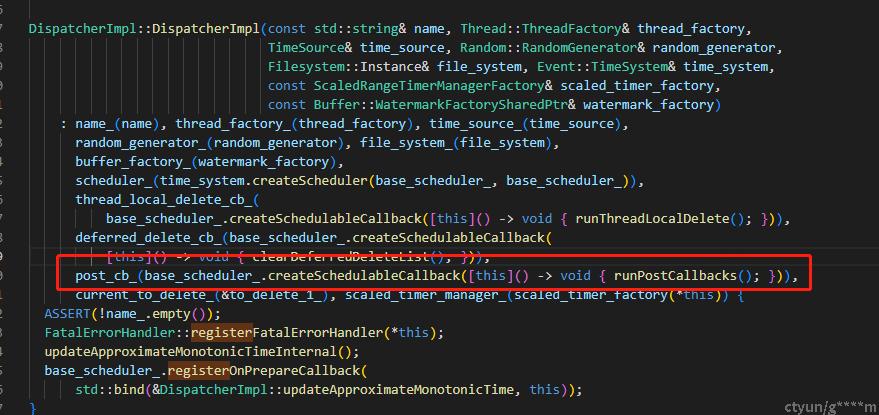
消费所有callback队列的内容
void DispatcherImpl::runPostCallbacks() { // Clear the deferred delete list before running post callbacks to reduce non-determinism in // callback processing, and more easily detect if a scheduled post callback refers to one of the // objects that is being deferred deleted. clearDeferredDeleteList(); std::list<PostCb> callbacks; { // Take ownership of the callbacks under the post_lock_. The lock must be released before // callbacks execute. Callbacks added after this transfer will re-arm post_cb_ and will execute // later in the event loop. Thread::LockGuard lock(post_lock_); callbacks = std::move(post_callbacks_); // post_callbacks_ should be empty after the move. ASSERT(post_callbacks_.empty()); } // It is important that the execution and deletion of the callback happen while post_lock_ is not // held. Either the invocation or destructor of the callback can call post() on this dispatcher. while (!callbacks.empty()) { // Touch the watchdog before executing the callback to avoid spurious watchdog miss events when // executing a long list of callbacks. touchWatchdog(); // Run the callback. callbacks.front()(); // Pop the front so that the destructor of the callback that just executed runs before the next // callback executes. callbacks.pop_front(); } }
callbacks的获取也是通过std::move,一次过获取list所有内容并把原post_callbacks_置空。
随后通过front()来消费,直到排空队列。
通过上面代码可以看出来,envoy这部分设计的很巧妙,主线程的对象复制是通过调用函数入参来产生临时对象,而dispatcher的分发和消费全部通过std::move来移交使用权,这个过程中无论编译器有没有做优化,都能保证尽量少的产生内存拷贝。
有一点点小的优化空间,push_back函数应该可以改用emplace_back,少一次移动构造函数的消耗,不过这个性能影响很小。
小结
整体步骤如下:
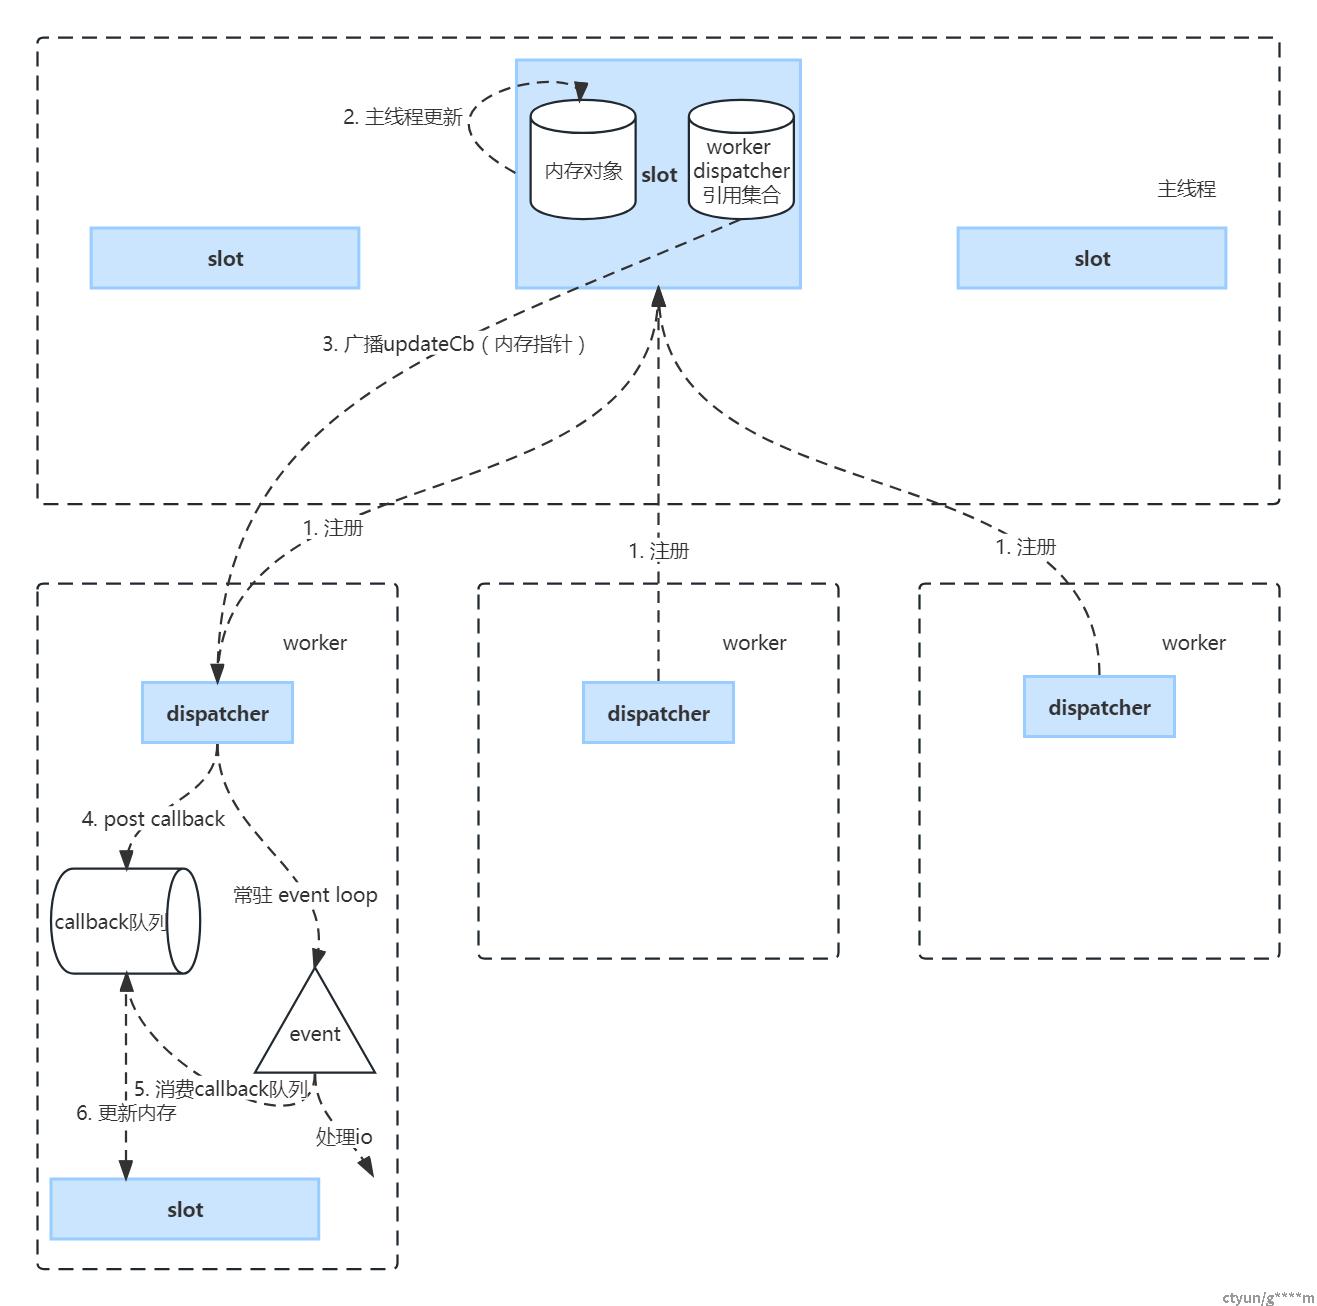
至此,我们大部分疑惑都可以解开了:
- 内存对象广播下去的是shared指针,计数归零的时候会释放内存。
- callback队列还是要加锁的,但是这个是每个线程自己与主线程的竞争。粒度小很多。
- 所谓的quiescent period就是两次业务之间eventloop的间隔,消费callback队列本身就作为一个event放进去了。
WASM机制
背景介绍
WebAssembly是一种沙盒技术,可用于扩展Istio代理(Envoy)。Proxy-Wasm沙箱API取代了Mixer作为Istio中的主要扩展机制。
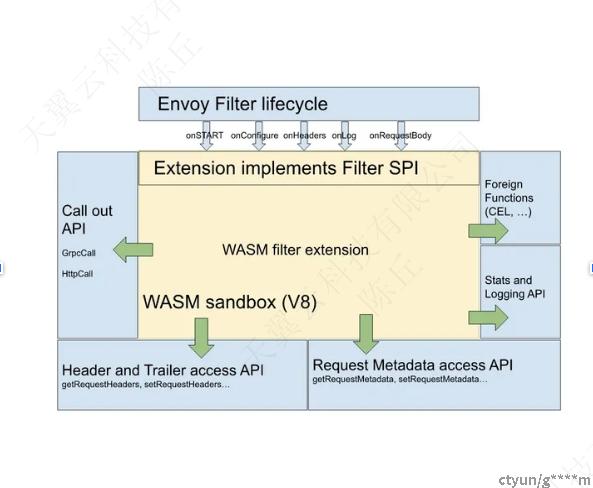
envoy的wasm机制支持我们通过其他编程语言编写插件,进行自定义的逻辑处理,并安全的调用在envoy内部。
流量标签目前就是侵入到envoy的http filter之中进行header的缓存与改写。
流程
请求 -> FilterChain ---> upstream
|----> WASM在这里,是filterChain的一部分

源码分析
wasm入口
FilterConfig::FilterConfig(const envoy::extensions::filters::http::wasm::v3::Wasm& config, Server::Configuration::FactoryContext& context) : tls_slot_(ThreadLocal::TypedSlot<Common::Wasm::PluginHandleSharedPtrThreadLocal>::makeUnique( context.threadLocal())) { const auto plugin = std::make_shared<Common::Wasm::Plugin>( config.config(), context.direction(), context.localInfo(), &context.listenerMetadata()); auto callback = [plugin, this](const Common::Wasm::WasmHandleSharedPtr& base_wasm) { // NB: the Slot set() call doesn't complete inline, so all arguments must outlive this call. tls_slot_->set([base_wasm, plugin](Event::Dispatcher& dispatcher) { return std::make_shared<PluginHandleSharedPtrThreadLocal>( Common::Wasm::getOrCreateThreadLocalPlugin(base_wasm, plugin, dispatcher)); }); }; if (!Common::Wasm::createWasm(plugin, context.scope().createScope(""), context.clusterManager(), context.initManager(), context.mainThreadDispatcher(), context.api(), context.lifecycleNotifier(), remote_data_provider_, std::move(callback))) { throw Common::Wasm::WasmException( fmt::format("Unable to create Wasm HTTP filter {}", plugin->name_)); } }
1. 创建虚拟机
createWasm 就是创建wasm虚拟机。
Common:CreateWasm代码如下:
bool createWasm(const PluginSharedPtr& plugin, const Stats::ScopeSharedPtr& scope, Upstream::ClusterManager& cluster_manager, Init::Manager& init_manager, Event::Dispatcher& dispatcher, Api::Api& api, Server::ServerLifecycleNotifier& lifecycle_notifier, Config::DataSource::RemoteAsyncDataProviderPtr& remote_data_provider, CreateWasmCallback&& cb, CreateContextFn create_root_context_for_testing) { //省略 if (vm_config.code().has_remote()) { //省略 } else if (vm_config.code().has_local()) { code = Config::DataSource::read(vm_config.code().local(), true, api); source = Config::DataSource::getPath(vm_config.code().local()) .value_or(code.empty() ? EMPTY_STRING : INLINE_STRING); } auto vm_key = proxy_wasm::makeVmKey(vm_config.vm_id(), MessageUtil::anyToBytes(vm_config.configuration()), code); auto complete_cb = [cb, vm_key, plugin, scope, &api, &cluster_manager, &dispatcher, &lifecycle_notifier, create_root_context_for_testing, &stats_handler](std::string code) -> bool { if (code.empty()) { cb(nullptr); return false; } auto config = plugin->wasmConfig(); auto wasm = proxy_wasm::createWasm( vm_key, code, plugin, getWasmHandleFactory(config, scope, api, cluster_manager, dispatcher, lifecycle_notifier), getWasmHandleCloneFactory(dispatcher, create_root_context_for_testing), config.config().vm_config().allow_precompiled()); Stats::ScopeSharedPtr create_wasm_stats_scope = stats_handler.lockAndCreateStats(scope); stats_handler.onEvent(toWasmEvent(wasm)); if (!wasm || wasm->wasm()->isFailed()) { ENVOY_LOG_TO_LOGGER(Envoy::Logger::Registry::getLog(Envoy::Logger::Id::wasm), trace, "Unable to create Wasm"); cb(nullptr); return false; } cb(std::static_pointer_cast<WasmHandle>(wasm)); return true; }; if (fetch) { //省略 } else { return complete_cb(code); } return true; }
核心代码花里胡哨一大堆,最后调用到了complete_cb,里面就2件事:
1.1. 创建vm_key
- vm_id:就是vm_config里面定义的vm_id
- vm_key:vm_id+config+code
std::string makeVmKey(std::string_view vm_id, std::string_view vm_configuration, std::string_view code) { return Sha256String({vm_id, "||", vm_configuration, "||", code}); }
1.2.调用 proxy_wasm::createWasm
proxy_wasm 是引用的一个外部项目:proxy-wasm/proxy-wasm-cpp-host/blob/master/src/wasm.cc
是真正的创建沙箱的逻辑。
std::shared_ptr<WasmHandleBase> createWasm(const std::string &vm_key, const std::string &code, const std::shared_ptr<PluginBase> &plugin, const WasmHandleFactory &factory, const WasmHandleCloneFactory &clone_factory, bool allow_precompiled) { std::shared_ptr<WasmHandleBase> wasm_handle; { std::lock_guard<std::mutex> guard(base_wasms_mutex); if (base_wasms == nullptr) { base_wasms = new std::remove_reference<decltype(*base_wasms)>::type; } auto it = base_wasms->find(vm_key); if (it != base_wasms->end()) { wasm_handle = it->second.lock(); if (!wasm_handle) { base_wasms->erase(it); } } if (!wasm_handle) { // If no cached base_wasm, creates a new base_wasm, loads the code and initializes it. wasm_handle = factory(vm_key); if (!wasm_handle) { return nullptr; } if (!wasm_handle->wasm()->load(code, allow_precompiled)) { wasm_handle->wasm()->fail(FailState::UnableToInitializeCode, "Failed to load Wasm code"); return nullptr; } if (!wasm_handle->wasm()->initialize()) { wasm_handle->wasm()->fail(FailState::UnableToInitializeCode, "Failed to initialize Wasm code"); return nullptr; } (*base_wasms)[vm_key] = wasm_handle; } } // Either creating new one or reusing the existing one, apply canary for each plugin. if (!wasm_handle->canary(plugin, clone_factory)) { return nullptr; } return wasm_handle; };
里面先是本地查找有没有对应的沙箱,没有的话调用factory新建一个,然后依次调用load,initialize等。
initialize会初始化wasm_vm_(依赖配置中的runtime,貌似现在用的是v8),然后注册一些方法,这些都是具体虚拟机映射api的动作了,暂时略过。
2. 回调cb函数
对应的就是上一段调用端的getOrCreateThreadLocalPlugin,这个后续再展开。
这里只关心callback调用时机。是在入口主线程,这个base_wasm会在callback的时候给每个子线程创建, 代码如下:
/** * Set thread local data on all threads previously registered via registerThread(). * @param initializeCb supplies the functor that will be called *on each thread*. The functor * returns the thread local object which is then stored. The storage is via * a shared_ptr. Thus, this is a flexible mechanism that can be used to share * the same data across all threads or to share different data on each thread. * * NOTE: The initialize callback is not supposed to capture the Slot, or its owner, as the owner * may be destructed in main thread before the update_cb gets called in a worker thread. */ using InitializeCb = std::function<ThreadLocalObjectSharedPtr(Event::Dispatcher& dispatcher)>; virtual void set(InitializeCb cb) PURE;
实现函数为getOrCreateThreadLocalPlugin:
PluginHandleSharedPtr getOrCreateThreadLocalPlugin(const WasmHandleSharedPtr& base_wasm, const PluginSharedPtr& plugin, Event::Dispatcher& dispatcher, CreateContextFn create_root_context_for_testing) { if (!base_wasm) { if (!plugin->fail_open_) { ENVOY_LOG_TO_LOGGER(Envoy::Logger::Registry::getLog(Envoy::Logger::Id::wasm), critical, "Plugin configured to fail closed failed to load"); } // To handle the case when failed to create VMs and fail-open/close properly, // we still create PluginHandle with null WasmBase. return std::make_shared<PluginHandle>(nullptr, plugin); } return std::static_pointer_cast<PluginHandle>(proxy_wasm::getOrCreateThreadLocalPlugin( std::static_pointer_cast<WasmHandle>(base_wasm), plugin, getWasmHandleCloneFactory(dispatcher, create_root_context_for_testing), getPluginHandleFactory())); }
这部分代码又依赖到了proxy_wasm项目
关键代码如下:
std::shared_ptr<PluginHandleBase> getOrCreateThreadLocalPlugin( const std::shared_ptr<WasmHandleBase> &base_handle, const std::shared_ptr<PluginBase> &plugin, const WasmHandleCloneFactory &clone_factory, const PluginHandleFactory &plugin_factory) { std::string key(std::string(base_handle->wasm()->vm_key()) + "||" + plugin->key()); // Get existing thread-local Plugin handle. auto it = local_plugins.find(key); if (it != local_plugins.end()) { auto plugin_handle = it->second.lock(); if (plugin_handle) { return plugin_handle; } local_plugins.erase(it); } removeStaleLocalCacheEntries(local_plugins, local_plugins_keys); // Get thread-local WasmVM. auto wasm_handle = getOrCreateThreadLocalWasm(base_handle, clone_factory); if (!wasm_handle) { return nullptr; } // Create and initialize new thread-local Plugin. auto *plugin_context = wasm_handle->wasm()->start(plugin); if (plugin_context == nullptr) { base_handle->wasm()->fail(FailState::StartFailed, "Failed to start thread-local Wasm"); return nullptr; } if (!wasm_handle->wasm()->configure(plugin_context, plugin)) { base_handle->wasm()->fail(FailState::ConfigureFailed, "Failed to configure thread-local Wasm plugin"); return nullptr; } auto plugin_handle = plugin_factory(wasm_handle, plugin); cacheLocalPlugin(key, plugin_handle); wasm_handle->wasm()->wasm_vm()->addFailCallback([key](proxy_wasm::FailState fail_state) { if (fail_state == proxy_wasm::FailState::RuntimeError) { // If VM failed, erase the entry so that: // 1) we can recreate the new thread local plugin from the same base_wasm. // 2) we wouldn't reuse the failed VM for new plugin configs accidentally. local_plugins.erase(key); }; }); return plugin_handle; }
这段代码做了几件事情:
- 按照vm_key查找本地有没有对应的plugin对象,有的话直接用。
- 没有的话调用factory函数,创建一个。
至此,基本可以搞清楚整个vm的创建过程了,主线程先创建沙箱,然后通过TLS机制给到各个worker线程再建本地对象。而这些过程中,vm_key会作为一个缓存key,多次使用同样的代码和vm_id是可以复用线程内已有的沙箱的。
小结
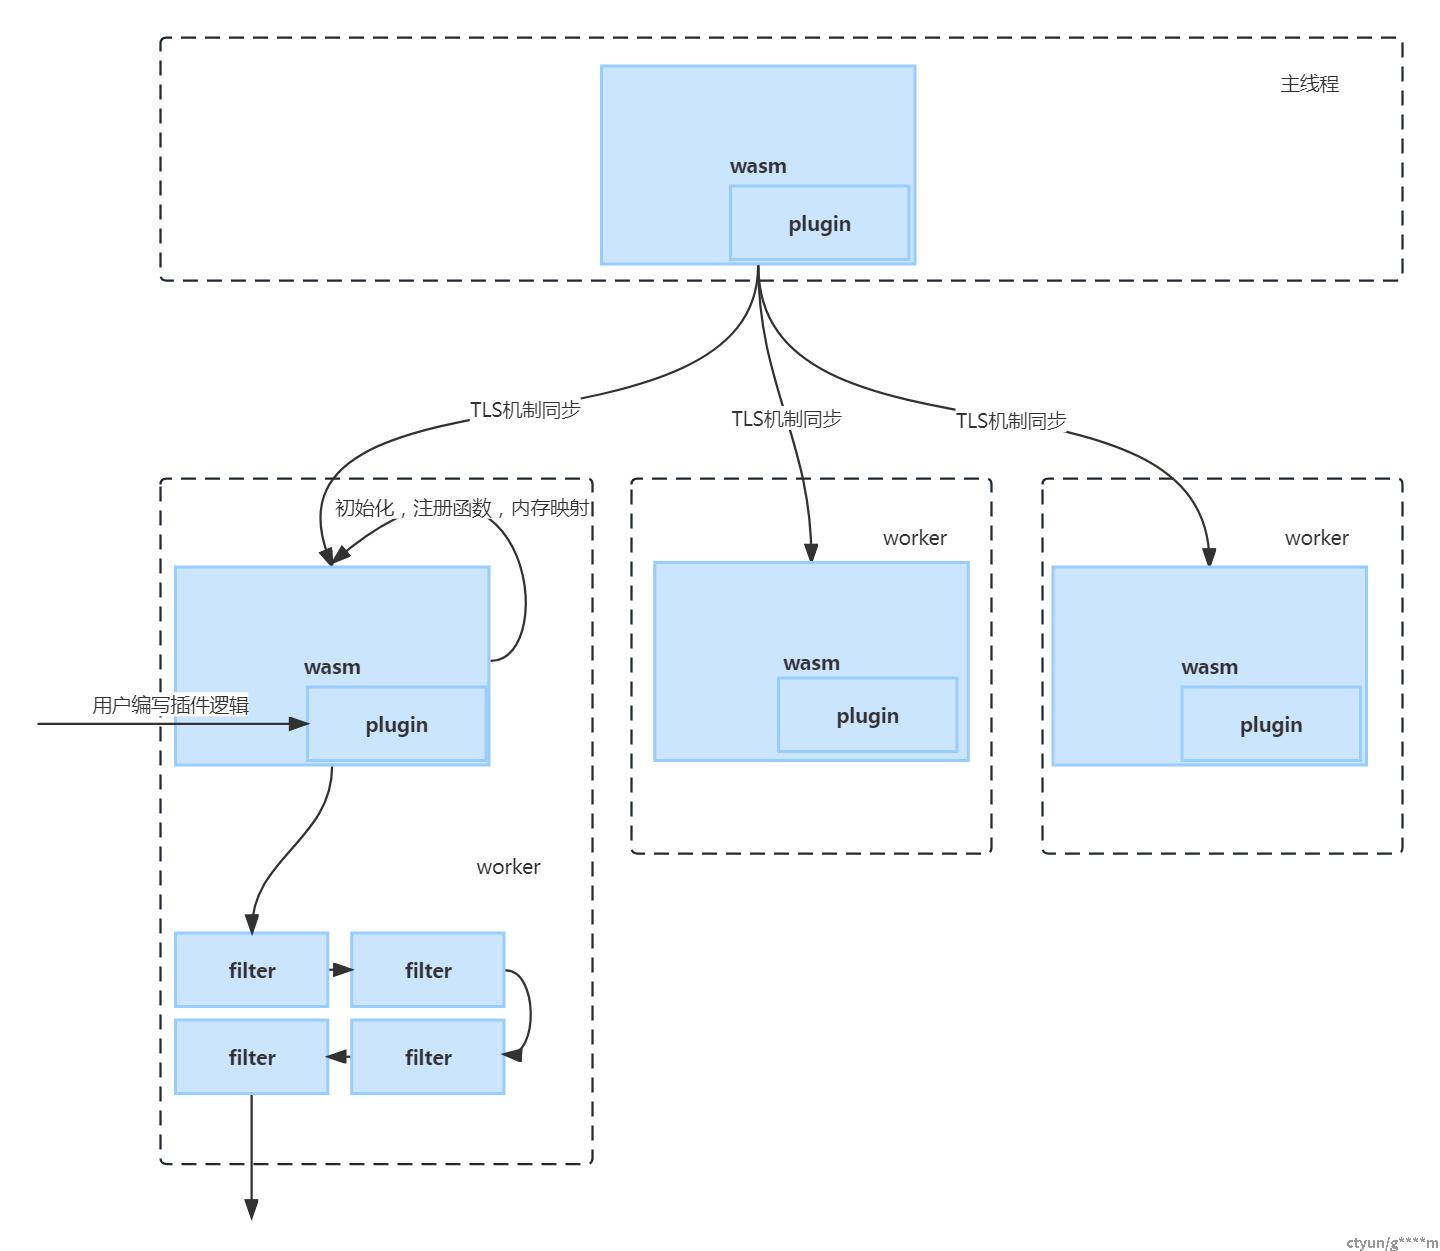
特殊地,在主线程中也有沙箱,主线程的沙箱是一个wasmservice类,用户也能编写插件,如果指定singleton为true则复用该句柄。
插入worker插件可以任意指定filter,如HTTP_FILTER。插入主线程则指定为BOOTSTRAP。
共享数据
关键结构体:Context, SharedData
1. Context
顾名思义就是上下文。
有以下几种:
ContextBase(WasmBase *wasm); // Vm Context.ContextBase(WasmBase *wasm, const std::shared_ptr<PluginBase> &plugin); // Root Context.ContextBase(WasmBase *wasm, uint32_t parent_context_id, const std::shared_ptr<PluginHandleBase> &plugin_handle); // Stream context.
一个VMContext对应创建多个PluginContext,PluginContext再分别给每个请求创建context。Context里面可以进行一些变量的传递。但是需要注意的是,每种context都有自己的作用范围。
官方的描述大概如下:
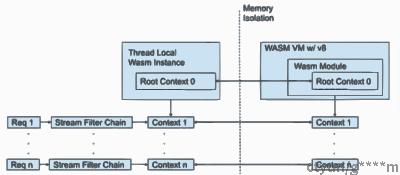
wasm本身还会由envoy放入一些属性,可以给我们上下文使用的。
Wasm attributes
In addition to all above, the following extra attributes are available to Wasm extensions:
|
Attribute |
Type |
Description |
|
plugin_name |
string |
Plugin name |
|
plugin_root_id |
string |
Plugin root ID |
|
plugin_vm_id |
string |
Plugin VM ID |
|
node |
Node |
Local node description |
|
cluster_name |
string |
Upstream cluster name |
|
cluster_metadata |
Metadata |
Upstream cluster metadata |
|
listener_direction |
int |
Enumeration value of the listener traffic direction |
|
listener_metadata |
Metadata |
Listener metadata |
|
route_name |
string |
Route name |
|
route_metadata |
Metadata |
Route metadata |
|
upstream_host_metadata |
Metadata |
Upstream host metadata |
listener_diretion需要使用int64来解析,参考代码如下:
property, err := proxywasm.GetProperty([]string{"listener_direction"})
if err != nil {
    proxywasm.LogErrorf("GetProperty listener_direction fail err %v try xds.listener_direction", err)
    property, err = proxywasm.GetProperty([]string{"xds", "listener_direction"})
    if err != nil {
       proxywasm.LogErrorf("GetProperty xds.listener_direction failed %v", err)
       return
    }
}
d := binary.LittleEndian.Uint64(property)
//UNSPECIFIED
//(DEFAULT) Default option is unspecified.
//
//INBOUND
//The transport is used for incoming traffic.
//
//OUTBOUND
//The transport is used for outgoing traffic.
if d == 2 {
    ctx.Outbound = true
}
2. SharedData
由于context的内存隔离,在不同线程里面同步数据是需要其他特殊机制的,SharedData是目前可用的一种方式。
定义
// Shared Data WasmResult ContextBase::getSharedData(std::string_view key, std::pair<std::string, uint32_t> *data) { return getGlobalSharedData().get(wasm_->vm_id(), key, data); } WasmResult ContextBase::setSharedData(std::string_view key, std::string_view value, uint32_t cas) { return getGlobalSharedData().set(wasm_->vm_id(), key, value, cas); } SharedData &getGlobalSharedData() { static auto *ptr = new SharedData; return *ptr; };
可以看到每个上下文,都可以使用sharedData,getGlobalSharedData内部是一个static指针,指向一个块SharedData,表示这个是一个全局静态变量。而且没有析构函数,可以近似认为这个是单例的一个内存空间。
注:虽然没有析构函数,但是每个vm创建后还是会注册一个函数给SharedData,传入vmid,在vm析构的过程中,会先调用SharedData的deleteByVmId把内存降下来。
关键函数是registerVmIdHandleCallback和~VmIdHandle()。VmIdHandle为WasmBase里面的一个shared_ptr智能指针,引用数为0后会析构。这部分代码不展开讲了,有兴趣的同学自己上github看。
SharedData分析
SharedData按vmid分map。每个map里面value为另一个unordered_map。这个unordered_map才是真正的共享数据,value为data+数据版本号(cas)。
// TODO: use std::shared_mutex in C++17. std::mutex mutex_; uint32_t cas_ = 1; std::map<std::string, std::unordered_map<std::string, std::pair<std::string, uint32_t>>> data_;
读写时的cas
- 目前还是用的mutex,这个是个很重的锁,但是有意改为使用shared_mutex。
- 当读写锁分开后,写操作需要利用数据版本号控制。
读接口把数据和版本号cas一起返回,调用端如果需要把数据写回的话,会判断cas是否为最新,如果不是最新,则表示数据被更新过,这样需要调用端自行重试。
读操作就不看了,简单看一些写操作:
WasmResult SharedData::set(std::string_view vm_id, std::string_view key, std::string_view value, uint32_t cas) { std::lock_guard<std::mutex> lock(mutex_); std::unordered_map<std::string, std::pair<std::string, uint32_t>> *map; auto map_it = data_.find(std::string(vm_id)); if (map_it == data_.end()) { map = &data_[std::string(vm_id)]; } else { map = &map_it->second; } auto it = map->find(std::string(key)); if (it != map->end()) { if (cas != 0U && cas != it->second.second) { return WasmResult::CasMismatch; } it->second = std::make_pair(std::string(value), nextCas()); } else { map->emplace(key, std::make_pair(std::string(value), nextCas())); } return WasmResult::Ok; }
nextCas还是一个全局的计数器,是一个软CAS,甚至没有vmid隔离,感觉还有优化空间。锁粒度未全局级,也有优化空间。
在Context中使用
WasmResult ContextBase::setSharedData(std::string_view key, std::string_view value, uint32_t cas) { return getGlobalSharedData().set(wasm_->vm_id(), key, value, cas); }
使用比较简单,直接get/set就行了,这里屏蔽了vm_id,就是说SharedData在插件编写者的角度来看,只能读写自己沙箱的数据,但是可以多线程共享。
如何使用沙箱
c++为例
c++sdk给出两个Context的工厂函数,我们可以自行创建子类来实现,里面有很多的虚函数,我们按需来继承就好。
他们分别是RootContext和Context。对应的就是Plugin级别的Context和Stream级别Context的。
sdk中给出的ContextBase虽然跟vm级别的Context同名,但是这仅仅是sdk给RootContext的普通Context的一个公共父类,重名只是巧合。我们是没有办法操作vm级别的Context的。
从前文的代码分析也可以看出来,Plugin是每个线程通过tls机制初始化的,他们和主线程之间内存隔离,线程之间也相互隔离。
沙箱的函数隔离
wasm的沙箱在启动的时候会注册一个函数列表,后续这个函数列表跟沙箱外的函数列表一一映射,在调用时会找到相应的函数运行。
envoy的函数注册
void Wasm::registerCallbacks() { WasmBase::registerCallbacks(); #define _REGISTER(_fn) \ wasm_vm_->registerCallback( \ "env", "envoy_" #_fn, &_fn, \ &proxy_wasm::ConvertFunctionWordToUint32<decltype(_fn), _fn>::convertFunctionWordToUint32) _REGISTER(resolve_dns); #undef _REGISTER }
proxy_wasm的函数注册
#define _REGISTER_PROXY(_fn) _REGISTER("env", "proxy_", , _fn) FOR_ALL_HOST_FUNCTIONS(_REGISTER_PROXY); if (abiVersion() == AbiVersion::ProxyWasm_0_1_0) { _REGISTER_PROXY(get_configuration); _REGISTER_PROXY(continue_request); _REGISTER_PROXY(continue_response); _REGISTER_PROXY(clear_route_cache); } else if (abiVersion() == AbiVersion::ProxyWasm_0_2_0) { _REGISTER_PROXY(continue_stream); _REGISTER_PROXY(close_stream); } else if (abiVersion() == AbiVersion::ProxyWasm_0_2_1) { _REGISTER_PROXY(continue_stream); _REGISTER_PROXY(close_stream); _REGISTER_PROXY(get_log_level); } #undef _REGISTER_PROXY //其中FOR_ALL_HOST_FUNCTIONS包括以下函数 #define FOR_ALL_HOST_FUNCTIONS(_f) \ _f(log) _f(get_status) _f(set_property) _f(get_property) _f(send_local_response) \ _f(get_shared_data) _f(set_shared_data) _f(register_shared_queue) _f(resolve_shared_queue) \ _f(dequeue_shared_queue) _f(enqueue_shared_queue) _f(get_header_map_value) \ _f(add_header_map_value) _f(replace_header_map_value) _f(remove_header_map_value) \ _f(get_header_map_pairs) _f(set_header_map_pairs) _f(get_header_map_size) \ _f(get_buffer_status) _f(get_buffer_bytes) _f(set_buffer_bytes) \ _f(http_call) _f(grpc_call) _f(grpc_stream) _f(grpc_close) \ _f(grpc_cancel) _f(grpc_send) _f(set_tick_period_milliseconds) \ _f(get_current_time_nanoseconds) _f(define_metric) \ _f(increment_metric) _f(record_metric) _f(get_metric) \ _f(set_effective_context) _f(done) \ _f(call_foreign_function)