searchusermenu
  • 发布文章
  • 消息中心
点赞
收藏
评论
分享
原创

一文教你alertmanager实现微信和邮箱告警

2023-10-10 03:31:02
211
0

一文教你使用alertmanager实现微信和邮箱告警

前言

alertmanager 是一个开源的告警方案实现。本文将详细介绍如何利用 alertmanager 实现邮箱和qiye微信告警。

整体架构

监控数据被推送到Prometheus,然后在Prometheus侧配置告警规则。如果监控的指标数据触发了告警规则的阈值,将会将告警数据发送到Alertmanager。通过Alertmanager,可以实现将告警发送到多个地方,例如发送到邮箱或微信。告警的整体架构如下所示:

下面详细介绍下具体实现。

安装alertmanager

下载alertmanager,并解压安装:

mkdir /usr/local/prometheus
tar -xf alertmanager-0.25.0.linux-amd64.tar.gz
mv alertmanager-0.25.0.linux-amd64.tar.gz alertmanager
 

检查配置

[root@evm-c7j1a8ape0h3uq7dl640 alertmanager]#
./amtool check-config alertmanager.yml
Checking 'alertmanager.yml'  SUCCESS
Found:
 - global config
 - route
 - 0 inhibit rules
 - 1 receivers
 - 1 templates
  SUCCESS
 

systemd启动

/usr/lib/systemd/system/alertmanager.service

[Unit]
Description=Alertmanager
After=network.target

[Service]
Type=forking
Restart=on-failure
RestartSec=5
ExecStart=/usr/local/prometheus/alertmanager/start.sh
ExecStop=/usr/local/prometheus/alertmanager/stop.sh

[Install]
WantedBy=multi-user.target
 
start.sh
#!/bin/bash

nohup /usr/local/prometheus/alertmanager/alertmanager --config.file='/usr/local/prometheus/alertmanager/alertmanager.yml' --cluster.advertise-address=0.0.0.0:9983 --web.listen-address=:9983 --log.level=debug > /usr/local/prometheus/alertmanager/alertmanager.log 2>&1 &
 
 
stop.sh
#!/bin/bash

ps -ef|grep alertmanager |grep -v grep | awk '{print $2}' | xargs kill -9
 
启动
systemctl daemon-reload
systemctl restart alertmanager
 

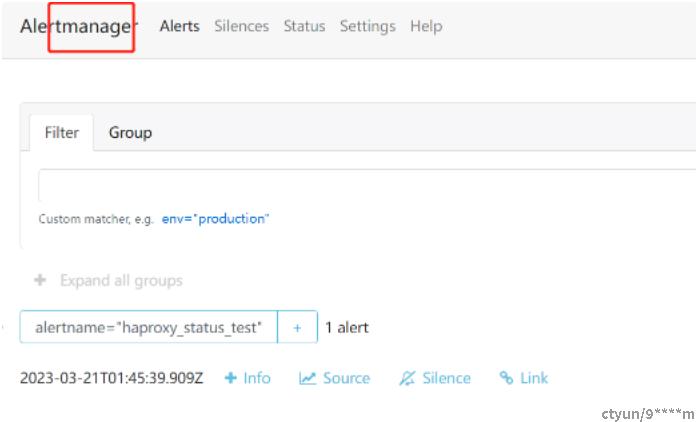
页面访问alertmanager

页面UI访问:localhost:9983

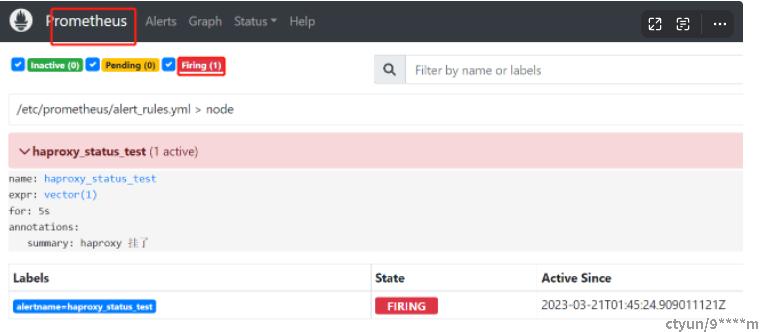
promethus也可以看:
邮箱告警实现

alertmanager.yml配置

global:
  resolve_timeout: 1m   # 每1分钟检测一次是否恢复
  smtp_smarthost: 'smtp.qq.com:465'
  smtp_from: 'xxx@qq.com'
  smtp_auth_username: 'xxx@qq.com'
  smtp_auth_password: 'xxx'  // 授权码
  smtp_require_tls: false

route:
  receiver: 'mail'
  group_by: ['type','alertname'] #告警中的标签,相同type+alertname的会合并为一个通知告警
  group_wait: 10s       # 初次发送告警延时
  group_interval: 10s   # 距离第一次发送告警,等待多久再次发送告警
  repeat_interval: 10s   # 告警重发时间

receivers:
- name: 'mail'
  email_configs:
  - to: 'xxx@qq.com'

- name: 'wechat'
  wechat_configs:
  - send_resolved: true
    message: '{{ template "wechat.default.message" . }}'
    to_party: '2'         # 
    agent_id: '1000002'     # 
    api_secret: 'xxx'
 

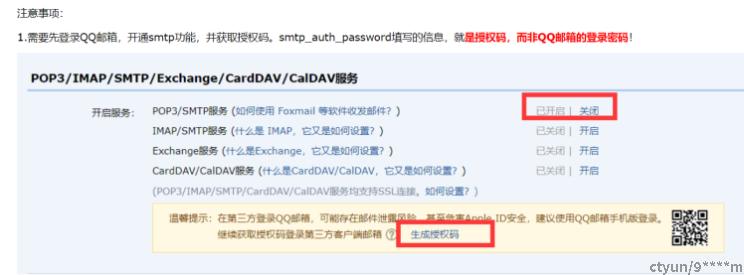
配置邮箱告警需要授权码,获取邮箱授权码:

promethus配置

# Alertmanager configuration
alerting:
  alertmanagers:
    - static_configs:
        - targets:
           - localhost:9983  // alertmanager的ip:port

# Load rules once and periodically evaluate them according to the global 'evaluation_interval'.
rule_files:
  - "/etc/prometheus/alert_rules.yml"  // 触发规则
 

alert_rules.yml

groups:
- name: node
  rules:
  - alert: haproxy_status_test
    expr: haproxy_up{exported_job="xxx", type="haproxy"} == 0
    #expr: vector(1)
    for: 5s
    annotations:
      summary: "haproxy {{ $labels.host}} 挂了"
      # labels.host就是上面PQL的输出中的host
 

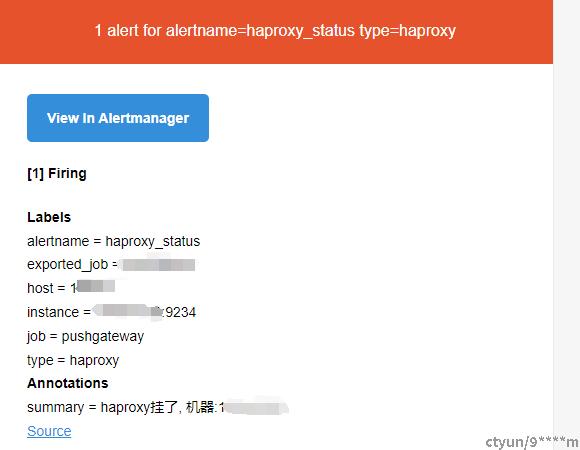
重启Prometheus和Alertmanager,停止一台HAProxy,您将收到以下告警邮件:
qiye微信告警webhook实现

alertmanager.yml中配置接收器we.book:

route:
  receiver: 'web.hook'  //指定接收器
  group_by: ['type','alertname']
  group_wait: 10s       # 初次发送告警延时
  group_interval: 300s   # 距离第一次发送告警,等待多久再次发送告警
  repeat_interval: 300s   # 告警重发时间

receivers:
- name: 'web.hook'
  webhook_configs:
  - url: 'localhost:8080/webhook'
    #http_config:
      #method: post
      #headers:
      #  Content-Type: application/json
    send_resolved: true
 

配置完成后,如果有告警,将会发送到配置的 endpoint 的 URL。发送的内容大致如下:

"receiver": "web.hook",
	"status": "firing",
	"alerts": [{
		"status": "firing",
		"labels": {
			"alertname": "haproxy_status",
			"exported_job": "xxx",
			"host": "xxx",
			"instance": "xxx:9234",
			"job": "pushgateway",
			"type": "haproxy"
		},
		"annotations": {
			"summary": "haproxy挂了, 机器:xxx"
		},
		"startsAt": "2023-03-21T08:18:32.202Z",
		"endsAt": "0001-01-01T00:00:00Z",
		"fingerprint": "aaae1485b1cbafdb"
	}],
	"groupLabels": {
		"alertname": "haproxy_status",
		"type": "haproxy"
	},
	"commonLabels": {
		"alertname": "haproxy_status",
		"exported_job": "xxx",
		"host": "xxx",
		"instance": "xxx:9234",
		"job": "pushgateway",
		"type": "haproxy"
	},
	"commonAnnotations": {
		"summary": "haproxy挂了, 机器:xxx"
	},
	"externalURL": "xxx",
	"version": "4",
	"groupKey": "{}:{alertname=\\"haproxy_status\\", type=\\"haproxy\\"}",
	"truncatedAlerts": 0
 

开发Goland监听程序,监听localhost:8080/webhook,解析请求数据,然后发送消息到qiye微信机器人的Webhook,这样机器人就能收到告警。以下是代码示例:

package main

import (
    "net/http"
    "fmt"
    "strings"

    "github.com/gin-gonic/gin"
    model "github.com/yunlzheng/alertmanaer-dingtalk-webhook/model"
)

func main() {
    // 这个targetUrl创建qiye微信机器人后就会有了
    targetUrl := "<https://qyapi.weixin.qq.com/cgi-bin/webhook/send?key=xxx>"
    router := gin.Default()
    router.POST("/webhook", func(c *gin.Context) {
        var notification model.Notification

	/*reqBody, _ := c.GetRawData()
        fmt.Printf("[INFO] Request: %s %s\\n", c.Request.Method, c.Request.RequestURI)
        fmt.Printf("requet body:%s", reqBody)
        return*/
        err := c.BindJSON(&notification)

        if err != nil {
	    fmt.Printf("BindJSON fail, err=", err)
            c.JSON(http.StatusBadRequest, gin.H{"error": err.Error()})
            return
        }

        //data, err := json.Marshal(&notification)
        //fmt.Println(err)
        //fmt.Println(data)
	// fmt.Println("notification.status:", notification.Status)
        alertSummary := ""

	for _, alert := range notification.Alerts {
            annotations := alert.Annotations
            if "" == annotations["summary"] {
                continue
            }
            alertSummary += "[" + annotations["summary"] + "]\\r\\n"
            //buffer.WriteString(fmt.Sprintf("##### %s\\n > %s\\n", annotations["summary"], annotations["description"]))
            //buffer.WriteString(fmt.Sprintf("\\n> 开始时间:%s\\n", alert.StartsAt.Format("15:04:05")))
        }

	if "" == alertSummary {
	    return
        }

        msgContent := fmt.Sprintf("{\\"msgtype\\":\\"text\\",\\"text\\":{\\"content\\":\\"%s\\"}}", alertSummary)
        fmt.Println(msgContent)
	payload := strings.NewReader(msgContent)
	req, _ := http.NewRequest("POST", targetUrl, payload)
	req.Header.Add("Content-Type", "application/json")
	response, err := http.DefaultClient.Do(req)
	fmt.Println(err, response)
        c.JSON(http.StatusOK, gin.H{"message": " successful receive alert notification message!"})
    })
    router.Run()
}


alertmanager告警存在的问题

  • 如果没有数据推送,pushgateway中保留的是旧数据,导致PQL告警可能是无效的,存在误报的情况。解决方法是定期删除pushgateway中的数据即可。

总结

本文通过实战的方式,利用Alertmanager实现了邮箱和qiye微信的告警功能。其中,qiye微信的告警采用自己实现Webhook的方式进行触发。根据业务需求,可以利用这个方案进行邮件或者qiye微信的告警。


0条评论
0 / 1000
9****m
15文章数
1粉丝数
9****m
15 文章 | 1 粉丝
原创

一文教你alertmanager实现微信和邮箱告警

2023-10-10 03:31:02
211
0

一文教你使用alertmanager实现微信和邮箱告警

前言

alertmanager 是一个开源的告警方案实现。本文将详细介绍如何利用 alertmanager 实现邮箱和qiye微信告警。

整体架构

监控数据被推送到Prometheus,然后在Prometheus侧配置告警规则。如果监控的指标数据触发了告警规则的阈值,将会将告警数据发送到Alertmanager。通过Alertmanager,可以实现将告警发送到多个地方,例如发送到邮箱或微信。告警的整体架构如下所示:

下面详细介绍下具体实现。

安装alertmanager

下载alertmanager,并解压安装:

mkdir /usr/local/prometheus
tar -xf alertmanager-0.25.0.linux-amd64.tar.gz
mv alertmanager-0.25.0.linux-amd64.tar.gz alertmanager
 

检查配置

[root@evm-c7j1a8ape0h3uq7dl640 alertmanager]#
./amtool check-config alertmanager.yml
Checking 'alertmanager.yml'  SUCCESS
Found:
 - global config
 - route
 - 0 inhibit rules
 - 1 receivers
 - 1 templates
  SUCCESS
 

systemd启动

/usr/lib/systemd/system/alertmanager.service

[Unit]
Description=Alertmanager
After=network.target

[Service]
Type=forking
Restart=on-failure
RestartSec=5
ExecStart=/usr/local/prometheus/alertmanager/start.sh
ExecStop=/usr/local/prometheus/alertmanager/stop.sh

[Install]
WantedBy=multi-user.target
 
start.sh
#!/bin/bash

nohup /usr/local/prometheus/alertmanager/alertmanager --config.file='/usr/local/prometheus/alertmanager/alertmanager.yml' --cluster.advertise-address=0.0.0.0:9983 --web.listen-address=:9983 --log.level=debug > /usr/local/prometheus/alertmanager/alertmanager.log 2>&1 &
 
 
stop.sh
#!/bin/bash

ps -ef|grep alertmanager |grep -v grep | awk '{print $2}' | xargs kill -9
 
启动
systemctl daemon-reload
systemctl restart alertmanager
 

页面访问alertmanager

页面UI访问:localhost:9983

promethus也可以看:

邮箱告警实现

alertmanager.yml配置

global:
  resolve_timeout: 1m   # 每1分钟检测一次是否恢复
  smtp_smarthost: 'smtp.qq.com:465'
  smtp_from: 'xxx@qq.com'
  smtp_auth_username: 'xxx@qq.com'
  smtp_auth_password: 'xxx'  // 授权码
  smtp_require_tls: false

route:
  receiver: 'mail'
  group_by: ['type','alertname'] #告警中的标签,相同type+alertname的会合并为一个通知告警
  group_wait: 10s       # 初次发送告警延时
  group_interval: 10s   # 距离第一次发送告警,等待多久再次发送告警
  repeat_interval: 10s   # 告警重发时间

receivers:
- name: 'mail'
  email_configs:
  - to: 'xxx@qq.com'

- name: 'wechat'
  wechat_configs:
  - send_resolved: true
    message: '{{ template "wechat.default.message" . }}'
    to_party: '2'         # 
    agent_id: '1000002'     # 
    api_secret: 'xxx'
 

配置邮箱告警需要授权码,获取邮箱授权码:

promethus配置

# Alertmanager configuration
alerting:
  alertmanagers:
    - static_configs:
        - targets:
           - localhost:9983  // alertmanager的ip:port

# Load rules once and periodically evaluate them according to the global 'evaluation_interval'.
rule_files:
  - "/etc/prometheus/alert_rules.yml"  // 触发规则
 

alert_rules.yml

groups:
- name: node
  rules:
  - alert: haproxy_status_test
    expr: haproxy_up{exported_job="xxx", type="haproxy"} == 0
    #expr: vector(1)
    for: 5s
    annotations:
      summary: "haproxy {{ $labels.host}} 挂了"
      # labels.host就是上面PQL的输出中的host
 

重启Prometheus和Alertmanager,停止一台HAProxy,您将收到以下告警邮件:

qiye微信告警webhook实现

alertmanager.yml中配置接收器we.book:

route:
  receiver: 'web.hook'  //指定接收器
  group_by: ['type','alertname']
  group_wait: 10s       # 初次发送告警延时
  group_interval: 300s   # 距离第一次发送告警,等待多久再次发送告警
  repeat_interval: 300s   # 告警重发时间

receivers:
- name: 'web.hook'
  webhook_configs:
  - url: 'localhost:8080/webhook'
    #http_config:
      #method: post
      #headers:
      #  Content-Type: application/json
    send_resolved: true
 

配置完成后,如果有告警,将会发送到配置的 endpoint 的 URL。发送的内容大致如下:

"receiver": "web.hook",
	"status": "firing",
	"alerts": [{
		"status": "firing",
		"labels": {
			"alertname": "haproxy_status",
			"exported_job": "xxx",
			"host": "xxx",
			"instance": "xxx:9234",
			"job": "pushgateway",
			"type": "haproxy"
		},
		"annotations": {
			"summary": "haproxy挂了, 机器:xxx"
		},
		"startsAt": "2023-03-21T08:18:32.202Z",
		"endsAt": "0001-01-01T00:00:00Z",
		"fingerprint": "aaae1485b1cbafdb"
	}],
	"groupLabels": {
		"alertname": "haproxy_status",
		"type": "haproxy"
	},
	"commonLabels": {
		"alertname": "haproxy_status",
		"exported_job": "xxx",
		"host": "xxx",
		"instance": "xxx:9234",
		"job": "pushgateway",
		"type": "haproxy"
	},
	"commonAnnotations": {
		"summary": "haproxy挂了, 机器:xxx"
	},
	"externalURL": "xxx",
	"version": "4",
	"groupKey": "{}:{alertname=\\"haproxy_status\\", type=\\"haproxy\\"}",
	"truncatedAlerts": 0
 

开发Goland监听程序,监听localhost:8080/webhook,解析请求数据,然后发送消息到qiye微信机器人的Webhook,这样机器人就能收到告警。以下是代码示例:

package main

import (
    "net/http"
    "fmt"
    "strings"

    "github.com/gin-gonic/gin"
    model "github.com/yunlzheng/alertmanaer-dingtalk-webhook/model"
)

func main() {
    // 这个targetUrl创建qiye微信机器人后就会有了
    targetUrl := "<https://qyapi.weixin.qq.com/cgi-bin/webhook/send?key=xxx>"
    router := gin.Default()
    router.POST("/webhook", func(c *gin.Context) {
        var notification model.Notification

	/*reqBody, _ := c.GetRawData()
        fmt.Printf("[INFO] Request: %s %s\\n", c.Request.Method, c.Request.RequestURI)
        fmt.Printf("requet body:%s", reqBody)
        return*/
        err := c.BindJSON(&notification)

        if err != nil {
	    fmt.Printf("BindJSON fail, err=", err)
            c.JSON(http.StatusBadRequest, gin.H{"error": err.Error()})
            return
        }

        //data, err := json.Marshal(&notification)
        //fmt.Println(err)
        //fmt.Println(data)
	// fmt.Println("notification.status:", notification.Status)
        alertSummary := ""

	for _, alert := range notification.Alerts {
            annotations := alert.Annotations
            if "" == annotations["summary"] {
                continue
            }
            alertSummary += "[" + annotations["summary"] + "]\\r\\n"
            //buffer.WriteString(fmt.Sprintf("##### %s\\n > %s\\n", annotations["summary"], annotations["description"]))
            //buffer.WriteString(fmt.Sprintf("\\n> 开始时间:%s\\n", alert.StartsAt.Format("15:04:05")))
        }

	if "" == alertSummary {
	    return
        }

        msgContent := fmt.Sprintf("{\\"msgtype\\":\\"text\\",\\"text\\":{\\"content\\":\\"%s\\"}}", alertSummary)
        fmt.Println(msgContent)
	payload := strings.NewReader(msgContent)
	req, _ := http.NewRequest("POST", targetUrl, payload)
	req.Header.Add("Content-Type", "application/json")
	response, err := http.DefaultClient.Do(req)
	fmt.Println(err, response)
        c.JSON(http.StatusOK, gin.H{"message": " successful receive alert notification message!"})
    })
    router.Run()
}


alertmanager告警存在的问题

  • 如果没有数据推送,pushgateway中保留的是旧数据,导致PQL告警可能是无效的,存在误报的情况。解决方法是定期删除pushgateway中的数据即可。

总结

本文通过实战的方式,利用Alertmanager实现了邮箱和qiye微信的告警功能。其中,qiye微信的告警采用自己实现Webhook的方式进行触发。根据业务需求,可以利用这个方案进行邮件或者qiye微信的告警。


文章来自个人专栏
实战
3 文章 | 1 订阅
0条评论
0 / 1000
请输入你的评论
2
1