searchusermenu
  • 发布文章
  • 消息中心
点赞
收藏
评论
分享
原创

OvS 实现VxLAN与QinQ相互转换

2023-10-07 04:20:47
74
0

前言

在云网络环境中,VxLAN作为一种常见的租户隔离机制,使用24比特的VNI来区分不同的租户;在传统的物理网元设备中,仅能够支持VLAN或者双层VLAN(QinQ)。VLAN使用12bit的VID来做区分,QinQ有两个VLAN头,刚好能够组合成24比特,理论上就能够实现VxLAN 与QinQ 进行相互转换, 实现老旧设备的兼容。 本文将验证VxLAN 与QinQ的相互转换功能,仅从理论角度进行验证,不保证在实际生产环境完全无修改即可良好应用。

网络拓扑

为了简化流程,使用单机部署的方式进行验证,两个client和两个server,server 部署相同的服务。
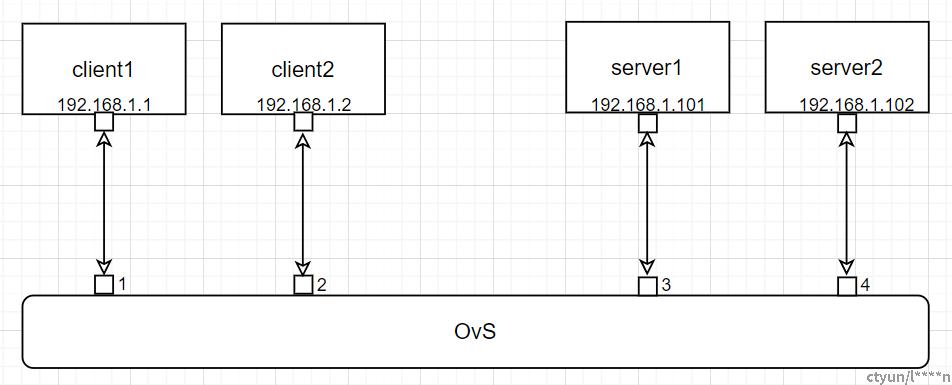
虚拟机使用virsh创建,xml 示例如下

<domain type="kvm">
  <name>0c5abe4e-bccf-44f1-90f6-c8cd57deda79</name>
  <uuid>0c5abe4e-bccf-44f1-90f6-c8cd57deda79</uuid>
  <memory unit="MiB">1024</memory>
  <currentMemory unit="MiB">1024</currentMemory>
  <vcpu current="1">2</vcpu>
  <os>
    <type arch="x86_64" machine="pc">hvm</type>
    <boot dev="hd"/>
  </os>
  <features>
    <acpi/>
    <apic/>
    <pae/>
  </features>
  <clock offset="utc"/>
  <on_poweroff>destroy</on_poweroff>
  <on_reboot>restart</on_reboot>
  <on_crash>restart</on_crash>
  <devices>
    <emulator>/usr/bin/qemu-kvm</emulator>
    <input bus="ps2" type="mouse"/>
    <disk device="disk" type="file">
      <driver cache="none" name="qemu" type="qcow2"/>
      <source file="/opt/vmimages/client.img"/>
      <target dev="vda"/>
    </disk>

    <interface type='bridge'>
      <source bridge='br-int'/>
      <virtualport type='openvswitch'/>
      <model type='virtio'/>
      <driver rx_queue_size='1024' tx_queue_size='1024'/>
      <alias name='net0'/>
      <address type='pci' domain='0x0000' bus='0x00' slot='0x03' function='0x0'/>
    </interface>

    <serial/>
    <console/>
    <graphics autoport="yes" listen="0.0.0.0" port="-1" tlsPort="-1" type="vnc">
      <listen address="0.0.0.0" type="address"/>
    </graphics>
    <video>
      <model heads="1" type="cirrus" vram="9126"/>
    </video>
    <memballoon model="virtio"/>
  </devices>
</domain>

OvS 流表设计

OvS流表使用多级pipeline设计:

  • table0 : ingress 表,数据流入
  • table8:分流表, 根据业务进行流表分发
  • table90: egress表,数据输出
  • table200:业务流表,实现VxLAN 转 VLAN
  • group100: ECMP 业务输出
    • bucket1: 模拟本地路径,直接跳转到output表
    • bucket2: 模拟源端路径,跳转table200(省去了vxlan相关)

基本连通性配置

由于存在默认的流表规则,因此VM 能够正常通信:

VxLAN 转VLAN 验证

为了进行简化,在table200 实现VxLAN 转VLAN,然后直接在table 90 实现output

# basic ECMP test
ovs-ofctl -O openflow15 del-flows br-int
ovs-ofctl -O OpenFlow15 add-group br-int "group_id=100,type=select,selection_method=hash,bucket=resubmit(,90),bucket=resubmit(,200)" # ECMP with 2 buckets

ovs-ofctl add-flow br-int "table=0,priority=100 actions=resubmit(,8)"
ovs-ofctl add-flow br-int "table=8,priority=10 actions=group:100"

ovs-ofctl -O openflow15 add-flow br-int "table=200,priority=10,arp,nw_src=192.168.1.1 actions=push_vlan:0x8100,mod_vlan_vid:1234,push_vlan:0x8100,mod_vlan_vid:567,resubmit(,90)"
ovs-ofctl -O openflow15 add-flow br-int "table=200,priority=10,arp,nw_src=192.168.1.2 actions=push_vlan:0x8100,mod_vlan_vid:4021,push_vlan:0x8100,mod_vlan_vid:765,resubmit(,90)"

ovs-ofctl add-flow br-int "table=90,priority=10,arp,nw_dst=192.168.1.101 actions=output:3"

打流进行抓包

从客户端收到的报文来看,192.168.1.1 发送的包走到了table 200, 在table 200里面打上了两层VLAN然后再在table90 将报文发送到了虚拟机。

QinQ 转VxLAN 验证

由于guest 不能直接发送双层VLAN的报文,因此使用scapy工具来构造数据包,guest里面直接采用最新的scapy-2.5.0 版本,构造报文如下:

sendp(Ether(dst='52:54:00:e4:51:5a', src='fa:16:3e:5b:af:3d')/Dot1Q(vlan=567,id=3,prio=2)/Dot1Q(vlan=1234,id=3,prio=2)/IP(dst='192.168.1.1',src='192.168.1.101')/ICMP(), iface='ens3', inter=1, loop=1)

构造了一个192.168.1.101 到192.168.1.1 的ICMP request报文,只是与普通ICMP报文不同的是打上了两层VLAN头,ID分别为567(外层)和1234(内层),发送端抓包如下图:

在br-int 构造两级pipeline, 第一级匹配外层VLAN, 匹配到过后剥掉VLAN头,然后跳转到第二级,第二级匹配内层VLAN, 匹配后剥离VLAN头后发送到目的端


ovs-ofctl add-flow br-int "table=0,in_port=3,dl_vlan=567 actions=strip_vlan,goto_table:1"

ovs-ofctl add-flow br-int "table=1,dl_vlan=1234 actions=strip_vlan,output:1"

然后查看流表比配情况

 
 ovs-ofctl dump-flows br-int
 cookie=0x0, duration=1045.855s, table=0, n_packets=1016, n_bytes=50800, in_port=vnet3,dl_vlan=567 actions=strip_vlan,resubmit(,1)
 cookie=0x0, duration=842.843s, table=1, n_packets=840, n_bytes=42000, dl_vlan=1234 actions=strip_vlan,output:vnet1

在192.168.1.1 所在虚机内抓包

结论

通过上面的验证,在OvS 通过设计合理的流表pipeline, 能够实现VxLAN到QinQ的相互转换,这样能够有效的兼容老设备而不丢失租户信息。

0条评论
0 / 1000
l****n
6文章数
0粉丝数
l****n
6 文章 | 0 粉丝
原创

OvS 实现VxLAN与QinQ相互转换

2023-10-07 04:20:47
74
0

前言

在云网络环境中,VxLAN作为一种常见的租户隔离机制,使用24比特的VNI来区分不同的租户;在传统的物理网元设备中,仅能够支持VLAN或者双层VLAN(QinQ)。VLAN使用12bit的VID来做区分,QinQ有两个VLAN头,刚好能够组合成24比特,理论上就能够实现VxLAN 与QinQ 进行相互转换, 实现老旧设备的兼容。 本文将验证VxLAN 与QinQ的相互转换功能,仅从理论角度进行验证,不保证在实际生产环境完全无修改即可良好应用。

网络拓扑

为了简化流程,使用单机部署的方式进行验证,两个client和两个server,server 部署相同的服务。

虚拟机使用virsh创建,xml 示例如下

<domain type="kvm">
  <name>0c5abe4e-bccf-44f1-90f6-c8cd57deda79</name>
  <uuid>0c5abe4e-bccf-44f1-90f6-c8cd57deda79</uuid>
  <memory unit="MiB">1024</memory>
  <currentMemory unit="MiB">1024</currentMemory>
  <vcpu current="1">2</vcpu>
  <os>
    <type arch="x86_64" machine="pc">hvm</type>
    <boot dev="hd"/>
  </os>
  <features>
    <acpi/>
    <apic/>
    <pae/>
  </features>
  <clock offset="utc"/>
  <on_poweroff>destroy</on_poweroff>
  <on_reboot>restart</on_reboot>
  <on_crash>restart</on_crash>
  <devices>
    <emulator>/usr/bin/qemu-kvm</emulator>
    <input bus="ps2" type="mouse"/>
    <disk device="disk" type="file">
      <driver cache="none" name="qemu" type="qcow2"/>
      <source file="/opt/vmimages/client.img"/>
      <target dev="vda"/>
    </disk>

    <interface type='bridge'>
      <source bridge='br-int'/>
      <virtualport type='openvswitch'/>
      <model type='virtio'/>
      <driver rx_queue_size='1024' tx_queue_size='1024'/>
      <alias name='net0'/>
      <address type='pci' domain='0x0000' bus='0x00' slot='0x03' function='0x0'/>
    </interface>

    <serial/>
    <console/>
    <graphics autoport="yes" listen="0.0.0.0" port="-1" tlsPort="-1" type="vnc">
      <listen address="0.0.0.0" type="address"/>
    </graphics>
    <video>
      <model heads="1" type="cirrus" vram="9126"/>
    </video>
    <memballoon model="virtio"/>
  </devices>
</domain>

OvS 流表设计

OvS流表使用多级pipeline设计:

  • table0 : ingress 表,数据流入
  • table8:分流表, 根据业务进行流表分发
  • table90: egress表,数据输出
  • table200:业务流表,实现VxLAN 转 VLAN
  • group100: ECMP 业务输出
    • bucket1: 模拟本地路径,直接跳转到output表
    • bucket2: 模拟源端路径,跳转table200(省去了vxlan相关)

基本连通性配置

由于存在默认的流表规则,因此VM 能够正常通信:

VxLAN 转VLAN 验证

为了进行简化,在table200 实现VxLAN 转VLAN,然后直接在table 90 实现output

# basic ECMP test
ovs-ofctl -O openflow15 del-flows br-int
ovs-ofctl -O OpenFlow15 add-group br-int "group_id=100,type=select,selection_method=hash,bucket=resubmit(,90),bucket=resubmit(,200)" # ECMP with 2 buckets

ovs-ofctl add-flow br-int "table=0,priority=100 actions=resubmit(,8)"
ovs-ofctl add-flow br-int "table=8,priority=10 actions=group:100"

ovs-ofctl -O openflow15 add-flow br-int "table=200,priority=10,arp,nw_src=192.168.1.1 actions=push_vlan:0x8100,mod_vlan_vid:1234,push_vlan:0x8100,mod_vlan_vid:567,resubmit(,90)"
ovs-ofctl -O openflow15 add-flow br-int "table=200,priority=10,arp,nw_src=192.168.1.2 actions=push_vlan:0x8100,mod_vlan_vid:4021,push_vlan:0x8100,mod_vlan_vid:765,resubmit(,90)"

ovs-ofctl add-flow br-int "table=90,priority=10,arp,nw_dst=192.168.1.101 actions=output:3"

打流进行抓包

从客户端收到的报文来看,192.168.1.1 发送的包走到了table 200, 在table 200里面打上了两层VLAN然后再在table90 将报文发送到了虚拟机。

QinQ 转VxLAN 验证

由于guest 不能直接发送双层VLAN的报文,因此使用scapy工具来构造数据包,guest里面直接采用最新的scapy-2.5.0 版本,构造报文如下:

sendp(Ether(dst='52:54:00:e4:51:5a', src='fa:16:3e:5b:af:3d')/Dot1Q(vlan=567,id=3,prio=2)/Dot1Q(vlan=1234,id=3,prio=2)/IP(dst='192.168.1.1',src='192.168.1.101')/ICMP(), iface='ens3', inter=1, loop=1)

构造了一个192.168.1.101 到192.168.1.1 的ICMP request报文,只是与普通ICMP报文不同的是打上了两层VLAN头,ID分别为567(外层)和1234(内层),发送端抓包如下图:

在br-int 构造两级pipeline, 第一级匹配外层VLAN, 匹配到过后剥掉VLAN头,然后跳转到第二级,第二级匹配内层VLAN, 匹配后剥离VLAN头后发送到目的端


ovs-ofctl add-flow br-int "table=0,in_port=3,dl_vlan=567 actions=strip_vlan,goto_table:1"

ovs-ofctl add-flow br-int "table=1,dl_vlan=1234 actions=strip_vlan,output:1"

然后查看流表比配情况

 
 ovs-ofctl dump-flows br-int
 cookie=0x0, duration=1045.855s, table=0, n_packets=1016, n_bytes=50800, in_port=vnet3,dl_vlan=567 actions=strip_vlan,resubmit(,1)
 cookie=0x0, duration=842.843s, table=1, n_packets=840, n_bytes=42000, dl_vlan=1234 actions=strip_vlan,output:vnet1

在192.168.1.1 所在虚机内抓包

结论

通过上面的验证,在OvS 通过设计合理的流表pipeline, 能够实现VxLAN到QinQ的相互转换,这样能够有效的兼容老设备而不丢失租户信息。

文章来自个人专栏
云上网络
2 文章 | 1 订阅
0条评论
0 / 1000
请输入你的评论
0
0