searchusermenu
  • 发布文章
  • 消息中心
点赞
收藏
评论
分享
原创

一种基于Vunit框架的自动化测试平台

2024-07-26 09:57:37
83
0

本文将介绍Vunit平台的特点和运作方式,并在Vunit框架的基础上编写一个小型自动化Verilog/System Verilog HDL模块测试平台。Vunit是一种用于硬件验证的开源工具,它具有许多强大的功能,可以帮助工程师更轻松地进行FPGA设计的模块验证工作。通过深入了解Vunit的特点和运作方式开发轻量化,自动化的测试平台,从而提高FPGA设计代码的质量和效率。

1.Vunit平台特点:

  • 开源平台:Vunit为开源平台,允许用户免费使用和自定义,从而增加了灵活性和可定制性。
  • 语言支持:Vunit支持VHDL和SystemVerilog语言,这使得它可以轻松与各种FPGA和ASIC设计流程集成,无论用户使用哪种语言进行硬件设计,都能够方便地进行验证。
  • 自动化测试:Vunit还具有自动化测试生成的功能,通过python自动生成测试框架、测试基准和测试案例,从而显著减少了测试代码的编写工作,提高了测试的一致性。
  • 可扩展性:Vunit还以其高度可扩展性脱颖而出,允许用户轻松添加自定义测试插件和功能(如自定义宏,自定义编译平台),以满足不同的硬件验证需求。
  • 良好的结果可读性:Vunit提供强大的报告和结果管理功能,能够生成详细的测试报告,包括测试覆盖率和失败的测试案例,帮助工程师快速识别和解决问题。

2.搭建基于Vunit框架的自动化测试平台

(1)功能目标:

  • 基于VUnit开源库,实现Makefile脚本一键自动化测试,并生成vcs可以直接打开的simv仿真文件。
  • 通过脚本,根据设计人员给出的顶层I/O表格,自动生成测试顶层模板文件和测试用例模板文件,通过修改模板文件可以实现顶层模块和测试用例的快速编写。
  • 通过脚本,一键进行VCS环境下的快速编译仿真。

(2)Vunit代码重构思路和相关宏介绍

由于Vunit原生不支持VCS仿真环境,也不支持通过Makefile直接运行,因此需要将Vunit代码进行拆解重构。一个基本的Vunit测试框架代码如下所示:

`include "vunit_defines.svh"

module tb_example;
logic port1 = 1'b0;
logic [15:0] port2;
 `TEST_SUITE begin
  `TEST_SUITE_SETUP begin
   //Here you will typically place things that are common to all tests, 
   //such as asserting the reset signal and starting the clock(s).
   $display("Running test suite setup code");
  end
  `TEST_CASE_SETUP begin
   //By default Vunit will run each test separately,
  //In many cases, this block would only assert/deassert the reset signal for a couple of clock-cycles.
   $display("Running test case setup code");
  end
  `TEST_CASE("Test that a successful test case passes") begin
    $display(This test case is expected to fail);
    `CHECK_EQUAL(1,1);
  end

  `TEST_CASE("Test that a failing test case that takes too long time fails with a timeout") begin
   $display("This test is expected to timeout because of the watch dog below")
   #2ns;
  end
 end
 `WATCHDOG(1ns);
 DUT_NAME dut(.*); //connect DUT with tb
endmodule

vunit涉及到了多个宏,均在vunit_defines.svh中进行了定义,`TEST_SUITE的定义如下:

`define TEST_SUITE_FROM_PARAMAETER(parameter_name) \
 import vunit_pkg: :*; \
 initial \
  if(__runner__.setup(parameter_name)) \
   while (__runner__.loop)

`define TEST_SUITE `TEST_SUITE_FROM_PARAMETER(runner_cfg)

setup:建立测试框架,加载需要测试的case,对每个case创建文件夹输出文件,并将测试状态设置为IDLE。

loop:控制状态变化。结合此时的测试状态和测试case队列,进行测试状态的跳转。

其中__runner__在vunit_pkg.sv中进行了定义,是类test_runner的例化对象,所有Vunit的主要控制函数均在该类中实现。

test_runner __runner__=new;

`TEST_CASE_SETUP的定义如下:

`define TEST_CASE_SETUP if (__runner__.is_test_case_setup())


其作用是将当前的测试状态置为“test_case_setup”阶段

`TEST_CASE(name)的定义如下:

`define TEST_CASE(test_name) if (__runner__.run(test_name))

其作用是运行指定的case,当状态为test_case且待测case与name相同时则执行case内部代码。

除了上述宏以外,我们还添加了很多实用的自定义宏到vunit_defines.svh中,如下所示:

`define WATCHDOG(runtime) \
   initial begin \
      __runner__.watchdog((runtime) / 1ns); \
   end

`define TEST_SUITE_FROM_PARAMETER(parameter_name) \
   import vunit_pkg::*; \
   initial \
     if (__runner__.setup(parameter_name)) \
      while (__runner__.loop)

`define TEST_SUITE `TEST_SUITE_FROM_PARAMETER(runner_cfg)
`define NESTED_TEST_SUITE `TEST_SUITE_FROM_PARAMETER(nested_runner_cfg)

`define TEST_CASE(test_name) if (__runner__.run(test_name))

`define TEST_SUITE_SETUP if (__runner__.is_test_suite_setup())
`define TEST_SUITE_CLEANUP if (__runner__.is_test_suite_cleanup())

`define TEST_CASE_SETUP if (__runner__.is_test_case_setup())
`define TEST_CASE_CLEANUP if (__runner__.is_test_case_cleanup())
`define __ERROR_FUNC(msg) $error(msg)
`define CREATE_ARG_STRING(arg, arg_str) \
   $swrite(arg_str, arg); \
   for (int i=0; i<arg_str.len(); i++) begin \
      if (arg_str[i] != " ") begin \
         arg_str = arg_str.substr(i, arg_str.len()-1); \
      break; \
      end \
   end
`define CREATE_MSG(full_msg,func_name,got,expected,prefix,msg=__none__) \
   string __none__; \
   string got_str; \
   string expected_str; \
   string full_msg; \
   int index; \
   got_str = "";\
   expected_str ="";\
   `CREATE_ARG_STRING(got, got_str); \
   `CREATE_ARG_STRING(expected, expected_str); \
   full_msg = {func_name, " failed! Got ",`"got`", "=",  got_str, " expected ", prefix, expected_str, ". ", msg};
`define CHECK_EQUAL(got,expected,msg=__none__) \
        assert ((got) === (expected)) else \
          begin \
          `CREATE_MSG(full_msg, "CHECK_EQUAL", got, expected, "", msg); \
             `__ERROR_FUNC(full_msg); \
          end
`define CHECK_NOT_EQUAL(got,expected,msg=__none__) \
        assert ((got) !== (expected)) else \
          begin \
             `CREATE_MSG(full_msg, "CHECK_NOT_EQUAL", got, expected, "!=", msg); \
             `__ERROR_FUNC(full_msg); \
          end
`define CHECK_GREATER(got,expected,msg=__none__) \
        assert ((got) > (expected)) else \
          begin \
             `CREATE_MSG(full_msg, "CHECK_GREATER", got, expected, ">", msg); \
             `__ERROR_FUNC(full_msg); \
          end
`define CHECK_LESS(got,expected,msg=__none__) \
        assert ((got) < (expected)) else \
          begin \
             `CREATE_MSG(full_msg, "CHECK_LESS", got, expected, "<", msg); \
             `__ERROR_FUNC(full_msg); \
          end
`define CHECK_EQUAL_VARIANCE(got,expected,variance,msg=__none__) \
        assert (((got) < ((expected) + (variance))) && ((got) > ((expected) - (variance)))) else \
          begin \
         string __none__; \
         string got_str; \
         string expected_str; \
         string variance_str; \
         string full_msg; \
         int index; \
         got_str = "";\
         expected_str ="";\
         variance_str="";\
         `CREATE_ARG_STRING(got, got_str); \
         `CREATE_ARG_STRING(expected, expected_str); \
         `CREATE_ARG_STRING(variance, variance_str); \
             full_msg = {"CHECK_EQUAL_VARIANCE failed! Got ",`"got`", "=",  got_str, " expected ", expected_str, " +-", variance_str, ". ", msg}; \
             `__ERROR_FUNC(full_msg); \
          end
  • `CHECK_EQUAL实现比较两变量(寄存器值)是否相等,若不等则打印msg,使用断言实现比较功能;
  • `CHECK_NOT_EQUAL实现比较两变量是否不相等,若相等则打印msg;
  • `CHECK_GREATER比较前一个变量是否大于后一个变量,若不大于,则打印msg;
  • `CHECK_LESS比较前一个变量是否小于后一个变量,若不小于,则打印msg;
  • `CHECK_EQUAL_VARIANCE比较两变量差值是否在variance范围内,若差值大于等于该范围,则打印msg;

用户还可以根据自己的需求自行在vunit_defines.svh中添加一些自定义函数。

由上述源码可以将vunit的工作过程总结为下图所示:

当执行`TEST_SUITE后测试状态初始化为IDLE,当成功加载待测case之后,测试状态进入init状态并执行`TEST_SUITE_SETUP,之后加载每一个测试case,依次执行test_case_setup,test_case和test_case_cleanup进行测试case的加载和仿真,最终执行test_suite_cleanup结束仿真。

(3)python脚本编写

为了实现测试平台的自动化,通过编写一个vunit_top_gen.py的脚本实现对xlsx端口文件的读取,并生成适用于Vunit平台的top模版sv文件和测试用例模板文件。vunit_top_gen.py会根据表头名检索表格数据,并自动将其转换为SystemVerilog语句存储在tb_generated.sv中,将 tb_generated.sv根据自己的需求修改后,应另存为test_top.sv以供Makefile读取。

vunit_top_gen.py:

import os
import pandas as pd

def format_ports_and_create_sv_v5(excel_file, top_file, test_case_file):
    # Load the Excel file into a DataFrame
	df = pd.read_excel(excel_file,engine = 'openpyxl')

    # Format the ports without direction (input/output)
	formatted_ports = []
	for _, row in df.iterrows():
		port_name = row['port_name']
		width = int(row['width'])
        # Format the port differently based on width
		if width == 1:
			if pd.isna(row['initial_value']):
				formatted_port = f"logic {port_name};"
			else:
				initial_value = row['initial_value']
				formatted_port = f"logic {port_name} = {initial_value};"
		else:
			if pd.isna(row['initial_value']):
				formatted_port = f"logic [{width-1}:0] {port_name};"
			else:
				initial_value = row['initial_value']
				formatted_port = f"logic [{width-1}:0] {port_name} = {initial_value};"
		formatted_ports.append(formatted_port)
    # Load the content of the template SV file
	top_content = [
        "// You do not need to worry about adding vunit_defines.svh to your\n",
        "// include path, VUnit will automatically do that for you if VUnit is\n",
        "// correctly installed (and your python run-script is correct).\n",
        "`include \"../testcases/vunit_defines.svh\"\n",
		"`include \"../testcases/Test_Case_Name.sv\"\n"
        "\n",
        "module test_top;\n",
        "`TEST_SUITE_FROM_PARAMETER(\"enabled_test_cases : Test_Case_Name\") // replace test_case_list to your own task case name\n",
		"begin\n",
			"`Test_Case_Body(\"Test_Case_Name\");\n",
		"end\n",
		"   `WATCHDOG(1ns);\n",
		"	DUT_name dut(.*);\n",
        "endmodule"
    ]
    #print(tb_content[0])
    # Find the position to insert the formatted ports (after the module definition)
	insert_position = None
	for idx, line in enumerate(top_content):
		if "module" in line and ";" in line:
			insert_position = idx + 1
			break
	# Insert the formatted ports into the content
	if insert_position is not None:
		for port in reversed(formatted_ports):
			top_content.insert(insert_position, port + '\n')
	test_case_content = [
		"`define Test_Case_Body(Test_Case_Name) \n"
		"	`TEST_CASE(Test_Case_Name) begin \n"
		"	`CHECK_EQUAL(1'b1, 1'b1, \"expected to be equal\"); \n"
		"	end"
			]


    # Write the updated content to the output file
	with open(top_file, 'w') as f:
		f.writelines(top_content)
	with open(test_case_file, 'w') as f:
		f.writelines(test_case_content)

if __name__ == "__main__":
	format_ports_and_create_sv_v5("FIFO.xlsx", "../tb/tb_generated.sv","../tests/Test_Case_Name.sv")
	print("../testbench/tb_generated.sv & ../testcases/Test_Case_Name.sv模板文件已生成")
	# Scanning the dut directory for .v files
	v_files = [file for file in os.listdir("../dut") if (file.endswith(".v") or file.endswith(".sv"))]

	# Formatting the output based on the provided format
	formatted_output = "//replace your rtl here\n$DUT_PATH/dut_top_define.v\n\n//+incdir+$DUT_PATH/spi\n\n//==demo rtl begin==\n"
	for v_file in v_files:
		formatted_output += "$DUT_PATH/" + v_file + "\n"
	formatted_output += "//==demo rtl end===="

	# Saving to dut_filelist.f
	with open("../dut/dut_filelist.f", "w") as file:
		file.write(formatted_output)
	print("设计文件目录已存储至../dut/dut_filelist.f")

# 定义文件夹和文件名
	folder_path = '../dut'
	file_name = 'dut_top_define.v'
	file_path = os.path.join(folder_path, file_name)

# 检查文件是否存在
	if not os.path.exists(file_path):
    # 如果文件不存在,则创建一个空白文件
		with open(file_path, 'w') as f:
			pass
		print(f"'{file_name}' 文件已被创建在 '{folder_path}' 文件夹中。")
	else:
		print(f"'{file_name}' 文件已存在在 '{folder_path}' 文件

运行该python脚本后,将会生成顶层模板文件tb_generated.sv和测试用例模板文件Test_Case_Name.sv,如下图所示:

tb_generated.sv:

`include "../testcases/vunit_defines.svh"
`include "../testcases/Test_Case_Name.sv"

module test_top;
logic rst_n = 1'b0;
logic rclk = 1'b0;
logic wclk = 1'b0;
logic [15:0] wdata;
logic wren = 1'b0;
logic [15:0] rdata;
logic rden = 1'b0;
logic wfull;
logic rempty;
logic prog_full;
`TEST_SUITE_FROM_PARAMETER("enabled_test_cases : Test_Case_Name") // replace test_case_list to your own task case name
begin
`Test_Case_Body("Test_Case_Name");
end
   `WATCHDOG(1ns);
	DUT_name dut(.*);
endmodule

其中头文件中include了两个文件,分别为Vunit库文件vunit_defines.svh和自动生成的测试用例模版文件Test_Case_Name.sv, 测试用例模板文件如下图所示:

Test_Case_Name.sv:

`define Test_Case_Body(Test_Case_Name) 
	`TEST_CASE(Test_Case_Name) begin 
	`CHECK_EQUAL(1'b1, 1'b1, "expected to be equal"); 
	end

直接在begin和end之间添加测试逻辑就可以完成对测试用例的编写。

由于SystemVerilog的语法要求宏定义中换行前需要用”\”符号进行结尾,以保证编译器能够完整读取一条宏定义,因此还需要写一个自动运行的python脚本,其功能是读取tests文件夹下所有的测试case文件,并在除去最后一行的每一行末尾添加”\”符号,将新文件全部另存为在tests/gen_tests中,该脚本命名为testcase_gen.py,代码如下所示:

testcase_gen.py:

import os

def add_backslashes_to_files(input_dir, output_dir):
    # Ensure the output directory exists
    os.makedirs(output_dir, exist_ok=True)

    # Get list of .sv files from the input directory
    sv_files = [f for f in os.listdir(input_dir) if f.endswith(".sv")]

    for sv_file in sv_files:
        with open(os.path.join(input_dir, sv_file), "r") as file:
            content = file.readlines()

        # Add backslashes to each line
        modified_content = [line.rstrip() + " \\\n" for line in content]

        # Write the modified content to the output directory
        with open(os.path.join(output_dir, sv_file), "w") as file:
            file.writelines(modified_content)

if __name__ == "__main__":
    # Process the files from the tests directory and save to gen_tb
    # path = "../tests/gen_tests"
    # # 检查路径是否存在
    # if not os.path.exists(path):
    #     # 如果不存在,则创建该目录
    #     os.makedirs(path)
    #     print("gen_tests文件夹已创建!")
    # else:
    #     print("gen_tests文件夹已存在!")
    add_backslashes_to_files("../tests", "../tests/gen_tests")
    print("testcase已生成")

(4)Makefile脚本编写

由于原生Vunit通过python脚本进行仿真,且仿真环境仅支持Modelsim/QuestaSim。为了添加其对VCS的支持,同时避免开发人员编写python脚本,故编写了Makefile脚本实现Vunit对VCS的支持,同时实现测试流程的自动化。该Makefile文件如下图所示:

Makefile:

user_name = $(shell whoami)
DIR = $(shell pwd)
TB_DIR := $(DIR)/../tb
SIM_OUTPUT_DIR := $(DIR)/output
test_name = $@
ifeq ($(test_name),)
  test_name = __all__
endif
seed = $@
ifeq ($(seed), random)
  seed_id := $(shell date +%N) 
else 
  ifeq ($(seed),)
    seed_id := 123456
  else
    seed_id := $(seed)
  endif
endif
TB_TEST_ID := $(test_name)_$(seed_id)
common_opt += -full64 -sverilog -kdb -lca +vpi
common_opt += +libext+.v+.sv -timescale=1ns/10fs
cmp_opt += +plusarg_save
#add vunit to compile environment
cmp_opt += -debug_access+all -debug_region=cell+encrypt ../tb/tb_define/vunit_pkg.sv 

TC_SIM_OUTPUT_DIR = $(SIM_OUTPUT_DIR)/$(TB_TEST_ID)
regress_mode = off
ifeq ($(regress_mode),on)
  DUT_SIM_EXEC := $(TC_SIM_OUTPUT_DIR)/$(TB_TEST_ID)_simv
  cmp_opt += -Mdir=$(TC_SIM_OUTPUT_DIR)/$(TB_TEST_ID)_csrc
  cmp_opt += -l $(TC_SIM_OUTPUT_DIR)/$(TB_TEST_ID).cmp_log
else
  DUT_SIM_EXEC := $(SIM_OUTPUT_DIR)/st_$(regress_mode)_simv
  cmp_opt += -Mdir=$(SIM_OUTPUT_DIR)/st_$(regress_mode)_csrc
  cmp_opt += -l $(SIM_OUTPUT_DIR)/st_$(regress_mode).cmp_log
endif
cmp_opt += -o $(DUT_SIM_EXEC)
cmp_opt += -debug_all
cmp_opt += +lint=TFIPC-L
cmp_opt += +vcs+initreg+random
cmp_opt += +define+TEST_NAME=\"$(test_name)\"
run_opt += +vcs+initreg+0
run_opt += -l $(TC_SIM_OUTPUT_DIR)/$(TB_TEST_ID).run_log
fsdb_dump = on
ifeq ($(fsdb_dump),on)
  run_opt += -ucli
  run_opt += +fsdbfile+$(TC_SIM_OUTPUT_DIR)/$(TB_TEST_ID).fsdb
  run_opt += -i wave_fsdb.do
endif
cmp_opt += -top test_top
common_opt += +incdir+$(TB_DIR)
TB_TOP += $(TB_DIR)/test_top.sv
export DUT_PATH = $(DIR)/../dut
common_opt += +incdir+$(DIR)/../{.,dut}
common_opt += +incdir+$(DIR)/../tests/gen_tests
DUT_SRC := -F $(DIR)/../dut/dut_filelist.f

help:
	@echo "Step1: Replace your rtl filelist in dut directory dut_filelist_for_sim.f"
	@echo "Step2: Replace your dut instance in tb/top directory tb_dut_inst.sv"
	@echo "Step3: To run testcase, Execute this command"
	@echo "make all test_name=<testcase name> [seed=<value> or seed=random] [fsdb_dump=on|off]"
	@echo "these command run demo testcase"
	@echo "make all test_name=spi_cfg_base_test seed=123456 fsdb_dump=on"
gen: 
       #generate top template
	python vunit_top_gen.py
all: clean comp run
comp:
       #generate testcase template
	python testcase_gen.py
       #run VCS
	$(shell if [ ! -d $(TC_SIM_OUTPUT_DIR) ]; then mkdir -p $(TC_SIM_OUTPUT_DIR); fi;)
	vcs $(common_opt) $(cmp_pre_opt) $(cmp_opt) $(DUT_SRC) $(TB_TOP)

run:
	$(shell if [ ! -d $(TC_SIM_OUTPUT_DIR) ]; then mkdir -p $(TC_SIM_OUTPUT_DIR); fi;)
	$(DUT_SIM_EXEC) $(run_opt)

verdi:
	verdi -sverilog -sv $(common_opt) $(verdi_opt) $(DUT_SRC) $(TB_TOP) &

cov:
	dve -full64 -covdir $(SIM_OUTPUT_DIR)/cov/*.vdb &
clean:
	rm -rf $(SIM_OUTPUT_DIR)/*csrc $(SIM_OUTPUT_DIR)/*simv* $(TC_SIM_OUTPUT_DIR)/*csrc $(TC_SIM_OUTPUT_DIR)/*simv*


通过将vunit_plg.sv加入到cmp_opt变量中实现将Vunit相关组件加入编译环境,通过加入相关启动指令实现通过VCS启动基于Vunit的仿真,Makefile的工作过程如下图所示:
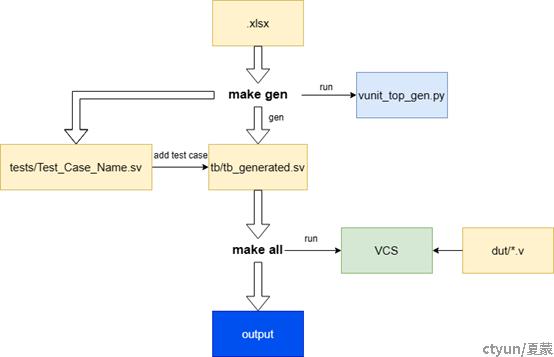
首先通过make gen命令可以运行vunit_top_gen.py读取存储了顶层接口信息的.xlsx文件同时产生测试case模板文件Test_Case_Name.sv和顶层模板文件tb_generated.sv。

对两个模板文件根据设计需求编辑完成后,运行make all指令将会调用VCS进行编译(make all comp指令),同时生成仿真output文件包括simv,fsdb,log等(make all run指令)。

3.自动化测试平台测试结果分析

以一个异步FIFO代码的测试为例,该测试平台的文件夹结构如下图所示:
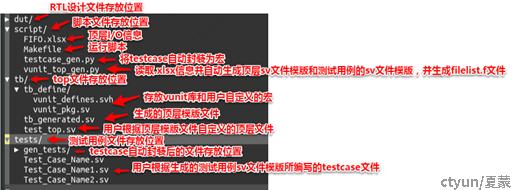
(1).运行make gen命令将会运行vunit_top_gen.py读取.xlsx表格文件,并在tb文件夹下产生顶层模版文件tb_generated.sv,同时在tests文件夹下产生Test_Case_Name.sv。

存有顶层文件I/O信息的.xlsx表格格式应当如下图所示:
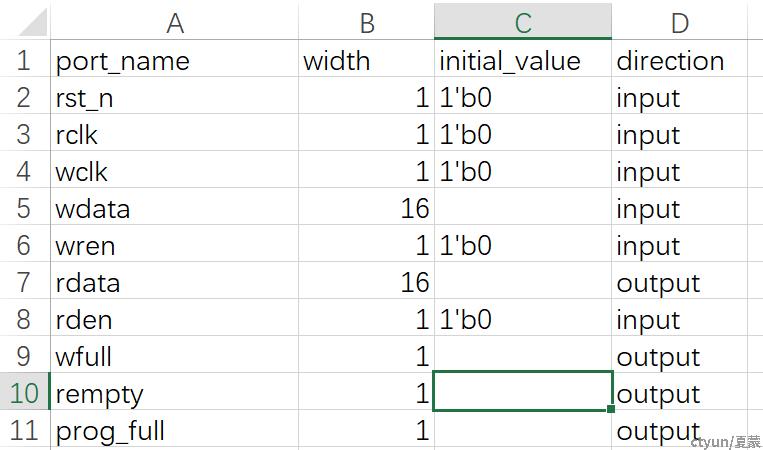
vunit_top_gen.py会根据表头名检索表格数据,并自动将其转换为sv语言存储在tb_generated.sv中,将 tb_generated.sv根据自己的需求修改后,应另存为test_top.sv以供Makefile读取,以异步FIFO为例,编写好的test_top.sv文件如下所示。

tb/test_top.sv

`include "./tb_define/vunit_defines.svh"
`include "./tests/gen_tests/Test_Case_Name.sv"
`include "./tests/gen_tests/Test_Case_Name1.sv"
`include "./tests/gen_tests/Test_Case_Name2.sv"

module test_top;
logic rst_n = 1'b0;
logic rclk = 1'b0;
logic wclk = 1'b0;
logic [15:0] wdata;
logic wren = 1'b0;
logic [15:0] rdata;
logic rden = 1'b0;
logic wfull;
logic rempty;
logic prog_full;
localparam CYCLE_WR = 40;
task automatic reset();
	rst_n = 1'b0;
	#50ns;
	rst_n = 1'b1;
endtask
`TEST_SUITE_FROM_PARAMETER({"enabled_test_cases : ",`TEST_NAME}) // replace test_case_list to your own task case name
begin
		`Test_Case_Body("Test_Case_Name");
		`Test_Case_Body1("Test_Case_Name1");
		`Test_Case_Body2("Test_Case_Name2");


end
   `WATCHDOG(100ms);
always begin 
	#(CYCLE_WR/2/4 * 1ns); 
	wclk = ~wclk;
end
always begin 
	#(CYCLE_WR/2 * 1ns); 
	rclk = ~rclk;
end
	fifo #(.DW(16),.DEPTH(32),.PROG_DEPTH(16)) dut(.*);
endmodule


其中头文件中include了两个文件,分别为Vunit库文件vunit_defines.svh和自动生成的测试用例模版文件Test_Case_Name.sv, Test_Case_Name.sv

tests/Test_Case_Name1.sv:

`define Test_Case_Body1(Test_Case_Name) 
	`TEST_CASE(Test_Case_Name) begin 
		reset(); 
		wait(rst_n); 
		`CHECK_EQUAL(rempty, 1'b1, "expected high rempty"); 
		$display("Writing_to_fifo:1"); 
		rden = 1'b0; 
		wren = 1'b1; 
		repeat(32)begin 
			@(negedge wclk)
			wdata = {$random()} % 65535; 
		end 
		$display("read_from_fifo:1"); 
		@(negedge wclk) 
		wren = 1'b0; 
		repeat(32) begin 
			@(negedge rclk) 
			rden = 1'b1; 
		end 
		`CHECK_EQUAL(rempty, 1'b1, "expected high rempty"); 
		//#(1000000000) $finish(); 
	end

tests/Test_Case_Name2.sv:

`define Test_Case_Body2(Test_Case_Name) 
	`TEST_CASE(Test_Case_Name) begin 
		wdata = 16'h4321;
		reset();
		wait(rst_n);
		wren = 1'b1;
		rden = 1'b0;
		repeat(35) begin
			@(negedge wclk)
			wdata = {$random()} % 65535;
		end
		$display("write_full_test:2"); 
		@(negedge wclk)
		`CHECK_EQUAL(wfull, 1'b1, "expected high wfull");
		#5ms $finish(); 
	end

(2)当顶层文件test_top.sv和test文件夹下的测试用例文件全部准备完成后,运行make all指令调用vcs执行仿真比较并存储波形,输出文件存储在script/output文件夹。

  • 运行make all时会执行test_top中定义的所有仿真
  • 运行make all run test_name=Test_Case_Name1会运行名为Test_Case_Name1的仿真
  • 运行make all run test_name=Test_Case_Name1,Test_Case_Name2会同时运行两个仿真 Test_Case_Name1和 Test_Case_Name2,运行结果如下

生成的output文件夹内容如下:

其中Test_Case_Name文件夹中含有.fsdb文件和.runlog文件


4.总结

本文介绍了Vunit平台的特点和运作方式,并在Vunit框架的基础上通过分析修改源代码,添加python脚本模块和Makefile脚本模块,设计了一个小型自动化Verilog/System Verilog HDL模块测试平台,完成了顶层文件和测试用例文件的一键生成功能,实现了基于Vunit框架的VCS仿真流程自动化,从而提高了FPGA硬件设计代码的质量和效率。


0条评论
0 / 1000
夏蒙
2文章数
1粉丝数
夏蒙
2 文章 | 1 粉丝
夏蒙
2文章数
1粉丝数
夏蒙
2 文章 | 1 粉丝
原创

一种基于Vunit框架的自动化测试平台

2024-07-26 09:57:37
83
0

本文将介绍Vunit平台的特点和运作方式,并在Vunit框架的基础上编写一个小型自动化Verilog/System Verilog HDL模块测试平台。Vunit是一种用于硬件验证的开源工具,它具有许多强大的功能,可以帮助工程师更轻松地进行FPGA设计的模块验证工作。通过深入了解Vunit的特点和运作方式开发轻量化,自动化的测试平台,从而提高FPGA设计代码的质量和效率。

1.Vunit平台特点:

  • 开源平台:Vunit为开源平台,允许用户免费使用和自定义,从而增加了灵活性和可定制性。
  • 语言支持:Vunit支持VHDL和SystemVerilog语言,这使得它可以轻松与各种FPGA和ASIC设计流程集成,无论用户使用哪种语言进行硬件设计,都能够方便地进行验证。
  • 自动化测试:Vunit还具有自动化测试生成的功能,通过python自动生成测试框架、测试基准和测试案例,从而显著减少了测试代码的编写工作,提高了测试的一致性。
  • 可扩展性:Vunit还以其高度可扩展性脱颖而出,允许用户轻松添加自定义测试插件和功能(如自定义宏,自定义编译平台),以满足不同的硬件验证需求。
  • 良好的结果可读性:Vunit提供强大的报告和结果管理功能,能够生成详细的测试报告,包括测试覆盖率和失败的测试案例,帮助工程师快速识别和解决问题。

2.搭建基于Vunit框架的自动化测试平台

(1)功能目标:

  • 基于VUnit开源库,实现Makefile脚本一键自动化测试,并生成vcs可以直接打开的simv仿真文件。
  • 通过脚本,根据设计人员给出的顶层I/O表格,自动生成测试顶层模板文件和测试用例模板文件,通过修改模板文件可以实现顶层模块和测试用例的快速编写。
  • 通过脚本,一键进行VCS环境下的快速编译仿真。

(2)Vunit代码重构思路和相关宏介绍

由于Vunit原生不支持VCS仿真环境,也不支持通过Makefile直接运行,因此需要将Vunit代码进行拆解重构。一个基本的Vunit测试框架代码如下所示:

`include "vunit_defines.svh"

module tb_example;
logic port1 = 1'b0;
logic [15:0] port2;
 `TEST_SUITE begin
  `TEST_SUITE_SETUP begin
   //Here you will typically place things that are common to all tests, 
   //such as asserting the reset signal and starting the clock(s).
   $display("Running test suite setup code");
  end
  `TEST_CASE_SETUP begin
   //By default Vunit will run each test separately,
  //In many cases, this block would only assert/deassert the reset signal for a couple of clock-cycles.
   $display("Running test case setup code");
  end
  `TEST_CASE("Test that a successful test case passes") begin
    $display(This test case is expected to fail);
    `CHECK_EQUAL(1,1);
  end

  `TEST_CASE("Test that a failing test case that takes too long time fails with a timeout") begin
   $display("This test is expected to timeout because of the watch dog below")
   #2ns;
  end
 end
 `WATCHDOG(1ns);
 DUT_NAME dut(.*); //connect DUT with tb
endmodule

vunit涉及到了多个宏,均在vunit_defines.svh中进行了定义,`TEST_SUITE的定义如下:

`define TEST_SUITE_FROM_PARAMAETER(parameter_name) \
 import vunit_pkg: :*; \
 initial \
  if(__runner__.setup(parameter_name)) \
   while (__runner__.loop)

`define TEST_SUITE `TEST_SUITE_FROM_PARAMETER(runner_cfg)

setup:建立测试框架,加载需要测试的case,对每个case创建文件夹输出文件,并将测试状态设置为IDLE。

loop:控制状态变化。结合此时的测试状态和测试case队列,进行测试状态的跳转。

其中__runner__在vunit_pkg.sv中进行了定义,是类test_runner的例化对象,所有Vunit的主要控制函数均在该类中实现。

test_runner __runner__=new;

`TEST_CASE_SETUP的定义如下:

`define TEST_CASE_SETUP if (__runner__.is_test_case_setup())


其作用是将当前的测试状态置为“test_case_setup”阶段

`TEST_CASE(name)的定义如下:

`define TEST_CASE(test_name) if (__runner__.run(test_name))

其作用是运行指定的case,当状态为test_case且待测case与name相同时则执行case内部代码。

除了上述宏以外,我们还添加了很多实用的自定义宏到vunit_defines.svh中,如下所示:

`define WATCHDOG(runtime) \
   initial begin \
      __runner__.watchdog((runtime) / 1ns); \
   end

`define TEST_SUITE_FROM_PARAMETER(parameter_name) \
   import vunit_pkg::*; \
   initial \
     if (__runner__.setup(parameter_name)) \
      while (__runner__.loop)

`define TEST_SUITE `TEST_SUITE_FROM_PARAMETER(runner_cfg)
`define NESTED_TEST_SUITE `TEST_SUITE_FROM_PARAMETER(nested_runner_cfg)

`define TEST_CASE(test_name) if (__runner__.run(test_name))

`define TEST_SUITE_SETUP if (__runner__.is_test_suite_setup())
`define TEST_SUITE_CLEANUP if (__runner__.is_test_suite_cleanup())

`define TEST_CASE_SETUP if (__runner__.is_test_case_setup())
`define TEST_CASE_CLEANUP if (__runner__.is_test_case_cleanup())
`define __ERROR_FUNC(msg) $error(msg)
`define CREATE_ARG_STRING(arg, arg_str) \
   $swrite(arg_str, arg); \
   for (int i=0; i<arg_str.len(); i++) begin \
      if (arg_str[i] != " ") begin \
         arg_str = arg_str.substr(i, arg_str.len()-1); \
      break; \
      end \
   end
`define CREATE_MSG(full_msg,func_name,got,expected,prefix,msg=__none__) \
   string __none__; \
   string got_str; \
   string expected_str; \
   string full_msg; \
   int index; \
   got_str = "";\
   expected_str ="";\
   `CREATE_ARG_STRING(got, got_str); \
   `CREATE_ARG_STRING(expected, expected_str); \
   full_msg = {func_name, " failed! Got ",`"got`", "=",  got_str, " expected ", prefix, expected_str, ". ", msg};
`define CHECK_EQUAL(got,expected,msg=__none__) \
        assert ((got) === (expected)) else \
          begin \
          `CREATE_MSG(full_msg, "CHECK_EQUAL", got, expected, "", msg); \
             `__ERROR_FUNC(full_msg); \
          end
`define CHECK_NOT_EQUAL(got,expected,msg=__none__) \
        assert ((got) !== (expected)) else \
          begin \
             `CREATE_MSG(full_msg, "CHECK_NOT_EQUAL", got, expected, "!=", msg); \
             `__ERROR_FUNC(full_msg); \
          end
`define CHECK_GREATER(got,expected,msg=__none__) \
        assert ((got) > (expected)) else \
          begin \
             `CREATE_MSG(full_msg, "CHECK_GREATER", got, expected, ">", msg); \
             `__ERROR_FUNC(full_msg); \
          end
`define CHECK_LESS(got,expected,msg=__none__) \
        assert ((got) < (expected)) else \
          begin \
             `CREATE_MSG(full_msg, "CHECK_LESS", got, expected, "<", msg); \
             `__ERROR_FUNC(full_msg); \
          end
`define CHECK_EQUAL_VARIANCE(got,expected,variance,msg=__none__) \
        assert (((got) < ((expected) + (variance))) && ((got) > ((expected) - (variance)))) else \
          begin \
         string __none__; \
         string got_str; \
         string expected_str; \
         string variance_str; \
         string full_msg; \
         int index; \
         got_str = "";\
         expected_str ="";\
         variance_str="";\
         `CREATE_ARG_STRING(got, got_str); \
         `CREATE_ARG_STRING(expected, expected_str); \
         `CREATE_ARG_STRING(variance, variance_str); \
             full_msg = {"CHECK_EQUAL_VARIANCE failed! Got ",`"got`", "=",  got_str, " expected ", expected_str, " +-", variance_str, ". ", msg}; \
             `__ERROR_FUNC(full_msg); \
          end
  • `CHECK_EQUAL实现比较两变量(寄存器值)是否相等,若不等则打印msg,使用断言实现比较功能;
  • `CHECK_NOT_EQUAL实现比较两变量是否不相等,若相等则打印msg;
  • `CHECK_GREATER比较前一个变量是否大于后一个变量,若不大于,则打印msg;
  • `CHECK_LESS比较前一个变量是否小于后一个变量,若不小于,则打印msg;
  • `CHECK_EQUAL_VARIANCE比较两变量差值是否在variance范围内,若差值大于等于该范围,则打印msg;

用户还可以根据自己的需求自行在vunit_defines.svh中添加一些自定义函数。

由上述源码可以将vunit的工作过程总结为下图所示:

当执行`TEST_SUITE后测试状态初始化为IDLE,当成功加载待测case之后,测试状态进入init状态并执行`TEST_SUITE_SETUP,之后加载每一个测试case,依次执行test_case_setup,test_case和test_case_cleanup进行测试case的加载和仿真,最终执行test_suite_cleanup结束仿真。

(3)python脚本编写

为了实现测试平台的自动化,通过编写一个vunit_top_gen.py的脚本实现对xlsx端口文件的读取,并生成适用于Vunit平台的top模版sv文件和测试用例模板文件。vunit_top_gen.py会根据表头名检索表格数据,并自动将其转换为SystemVerilog语句存储在tb_generated.sv中,将 tb_generated.sv根据自己的需求修改后,应另存为test_top.sv以供Makefile读取。

vunit_top_gen.py:

import os
import pandas as pd

def format_ports_and_create_sv_v5(excel_file, top_file, test_case_file):
    # Load the Excel file into a DataFrame
	df = pd.read_excel(excel_file,engine = 'openpyxl')

    # Format the ports without direction (input/output)
	formatted_ports = []
	for _, row in df.iterrows():
		port_name = row['port_name']
		width = int(row['width'])
        # Format the port differently based on width
		if width == 1:
			if pd.isna(row['initial_value']):
				formatted_port = f"logic {port_name};"
			else:
				initial_value = row['initial_value']
				formatted_port = f"logic {port_name} = {initial_value};"
		else:
			if pd.isna(row['initial_value']):
				formatted_port = f"logic [{width-1}:0] {port_name};"
			else:
				initial_value = row['initial_value']
				formatted_port = f"logic [{width-1}:0] {port_name} = {initial_value};"
		formatted_ports.append(formatted_port)
    # Load the content of the template SV file
	top_content = [
        "// You do not need to worry about adding vunit_defines.svh to your\n",
        "// include path, VUnit will automatically do that for you if VUnit is\n",
        "// correctly installed (and your python run-script is correct).\n",
        "`include \"../testcases/vunit_defines.svh\"\n",
		"`include \"../testcases/Test_Case_Name.sv\"\n"
        "\n",
        "module test_top;\n",
        "`TEST_SUITE_FROM_PARAMETER(\"enabled_test_cases : Test_Case_Name\") // replace test_case_list to your own task case name\n",
		"begin\n",
			"`Test_Case_Body(\"Test_Case_Name\");\n",
		"end\n",
		"   `WATCHDOG(1ns);\n",
		"	DUT_name dut(.*);\n",
        "endmodule"
    ]
    #print(tb_content[0])
    # Find the position to insert the formatted ports (after the module definition)
	insert_position = None
	for idx, line in enumerate(top_content):
		if "module" in line and ";" in line:
			insert_position = idx + 1
			break
	# Insert the formatted ports into the content
	if insert_position is not None:
		for port in reversed(formatted_ports):
			top_content.insert(insert_position, port + '\n')
	test_case_content = [
		"`define Test_Case_Body(Test_Case_Name) \n"
		"	`TEST_CASE(Test_Case_Name) begin \n"
		"	`CHECK_EQUAL(1'b1, 1'b1, \"expected to be equal\"); \n"
		"	end"
			]


    # Write the updated content to the output file
	with open(top_file, 'w') as f:
		f.writelines(top_content)
	with open(test_case_file, 'w') as f:
		f.writelines(test_case_content)

if __name__ == "__main__":
	format_ports_and_create_sv_v5("FIFO.xlsx", "../tb/tb_generated.sv","../tests/Test_Case_Name.sv")
	print("../testbench/tb_generated.sv & ../testcases/Test_Case_Name.sv模板文件已生成")
	# Scanning the dut directory for .v files
	v_files = [file for file in os.listdir("../dut") if (file.endswith(".v") or file.endswith(".sv"))]

	# Formatting the output based on the provided format
	formatted_output = "//replace your rtl here\n$DUT_PATH/dut_top_define.v\n\n//+incdir+$DUT_PATH/spi\n\n//==demo rtl begin==\n"
	for v_file in v_files:
		formatted_output += "$DUT_PATH/" + v_file + "\n"
	formatted_output += "//==demo rtl end===="

	# Saving to dut_filelist.f
	with open("../dut/dut_filelist.f", "w") as file:
		file.write(formatted_output)
	print("设计文件目录已存储至../dut/dut_filelist.f")

# 定义文件夹和文件名
	folder_path = '../dut'
	file_name = 'dut_top_define.v'
	file_path = os.path.join(folder_path, file_name)

# 检查文件是否存在
	if not os.path.exists(file_path):
    # 如果文件不存在,则创建一个空白文件
		with open(file_path, 'w') as f:
			pass
		print(f"'{file_name}' 文件已被创建在 '{folder_path}' 文件夹中。")
	else:
		print(f"'{file_name}' 文件已存在在 '{folder_path}' 文件

运行该python脚本后,将会生成顶层模板文件tb_generated.sv和测试用例模板文件Test_Case_Name.sv,如下图所示:

tb_generated.sv:

`include "../testcases/vunit_defines.svh"
`include "../testcases/Test_Case_Name.sv"

module test_top;
logic rst_n = 1'b0;
logic rclk = 1'b0;
logic wclk = 1'b0;
logic [15:0] wdata;
logic wren = 1'b0;
logic [15:0] rdata;
logic rden = 1'b0;
logic wfull;
logic rempty;
logic prog_full;
`TEST_SUITE_FROM_PARAMETER("enabled_test_cases : Test_Case_Name") // replace test_case_list to your own task case name
begin
`Test_Case_Body("Test_Case_Name");
end
   `WATCHDOG(1ns);
	DUT_name dut(.*);
endmodule

其中头文件中include了两个文件,分别为Vunit库文件vunit_defines.svh和自动生成的测试用例模版文件Test_Case_Name.sv, 测试用例模板文件如下图所示:

Test_Case_Name.sv:

`define Test_Case_Body(Test_Case_Name) 
	`TEST_CASE(Test_Case_Name) begin 
	`CHECK_EQUAL(1'b1, 1'b1, "expected to be equal"); 
	end

直接在begin和end之间添加测试逻辑就可以完成对测试用例的编写。

由于SystemVerilog的语法要求宏定义中换行前需要用”\”符号进行结尾,以保证编译器能够完整读取一条宏定义,因此还需要写一个自动运行的python脚本,其功能是读取tests文件夹下所有的测试case文件,并在除去最后一行的每一行末尾添加”\”符号,将新文件全部另存为在tests/gen_tests中,该脚本命名为testcase_gen.py,代码如下所示:

testcase_gen.py:

import os

def add_backslashes_to_files(input_dir, output_dir):
    # Ensure the output directory exists
    os.makedirs(output_dir, exist_ok=True)

    # Get list of .sv files from the input directory
    sv_files = [f for f in os.listdir(input_dir) if f.endswith(".sv")]

    for sv_file in sv_files:
        with open(os.path.join(input_dir, sv_file), "r") as file:
            content = file.readlines()

        # Add backslashes to each line
        modified_content = [line.rstrip() + " \\\n" for line in content]

        # Write the modified content to the output directory
        with open(os.path.join(output_dir, sv_file), "w") as file:
            file.writelines(modified_content)

if __name__ == "__main__":
    # Process the files from the tests directory and save to gen_tb
    # path = "../tests/gen_tests"
    # # 检查路径是否存在
    # if not os.path.exists(path):
    #     # 如果不存在,则创建该目录
    #     os.makedirs(path)
    #     print("gen_tests文件夹已创建!")
    # else:
    #     print("gen_tests文件夹已存在!")
    add_backslashes_to_files("../tests", "../tests/gen_tests")
    print("testcase已生成")

(4)Makefile脚本编写

由于原生Vunit通过python脚本进行仿真,且仿真环境仅支持Modelsim/QuestaSim。为了添加其对VCS的支持,同时避免开发人员编写python脚本,故编写了Makefile脚本实现Vunit对VCS的支持,同时实现测试流程的自动化。该Makefile文件如下图所示:

Makefile:

user_name = $(shell whoami)
DIR = $(shell pwd)
TB_DIR := $(DIR)/../tb
SIM_OUTPUT_DIR := $(DIR)/output
test_name = $@
ifeq ($(test_name),)
  test_name = __all__
endif
seed = $@
ifeq ($(seed), random)
  seed_id := $(shell date +%N) 
else 
  ifeq ($(seed),)
    seed_id := 123456
  else
    seed_id := $(seed)
  endif
endif
TB_TEST_ID := $(test_name)_$(seed_id)
common_opt += -full64 -sverilog -kdb -lca +vpi
common_opt += +libext+.v+.sv -timescale=1ns/10fs
cmp_opt += +plusarg_save
#add vunit to compile environment
cmp_opt += -debug_access+all -debug_region=cell+encrypt ../tb/tb_define/vunit_pkg.sv 

TC_SIM_OUTPUT_DIR = $(SIM_OUTPUT_DIR)/$(TB_TEST_ID)
regress_mode = off
ifeq ($(regress_mode),on)
  DUT_SIM_EXEC := $(TC_SIM_OUTPUT_DIR)/$(TB_TEST_ID)_simv
  cmp_opt += -Mdir=$(TC_SIM_OUTPUT_DIR)/$(TB_TEST_ID)_csrc
  cmp_opt += -l $(TC_SIM_OUTPUT_DIR)/$(TB_TEST_ID).cmp_log
else
  DUT_SIM_EXEC := $(SIM_OUTPUT_DIR)/st_$(regress_mode)_simv
  cmp_opt += -Mdir=$(SIM_OUTPUT_DIR)/st_$(regress_mode)_csrc
  cmp_opt += -l $(SIM_OUTPUT_DIR)/st_$(regress_mode).cmp_log
endif
cmp_opt += -o $(DUT_SIM_EXEC)
cmp_opt += -debug_all
cmp_opt += +lint=TFIPC-L
cmp_opt += +vcs+initreg+random
cmp_opt += +define+TEST_NAME=\"$(test_name)\"
run_opt += +vcs+initreg+0
run_opt += -l $(TC_SIM_OUTPUT_DIR)/$(TB_TEST_ID).run_log
fsdb_dump = on
ifeq ($(fsdb_dump),on)
  run_opt += -ucli
  run_opt += +fsdbfile+$(TC_SIM_OUTPUT_DIR)/$(TB_TEST_ID).fsdb
  run_opt += -i wave_fsdb.do
endif
cmp_opt += -top test_top
common_opt += +incdir+$(TB_DIR)
TB_TOP += $(TB_DIR)/test_top.sv
export DUT_PATH = $(DIR)/../dut
common_opt += +incdir+$(DIR)/../{.,dut}
common_opt += +incdir+$(DIR)/../tests/gen_tests
DUT_SRC := -F $(DIR)/../dut/dut_filelist.f

help:
	@echo "Step1: Replace your rtl filelist in dut directory dut_filelist_for_sim.f"
	@echo "Step2: Replace your dut instance in tb/top directory tb_dut_inst.sv"
	@echo "Step3: To run testcase, Execute this command"
	@echo "make all test_name=<testcase name> [seed=<value> or seed=random] [fsdb_dump=on|off]"
	@echo "these command run demo testcase"
	@echo "make all test_name=spi_cfg_base_test seed=123456 fsdb_dump=on"
gen: 
       #generate top template
	python vunit_top_gen.py
all: clean comp run
comp:
       #generate testcase template
	python testcase_gen.py
       #run VCS
	$(shell if [ ! -d $(TC_SIM_OUTPUT_DIR) ]; then mkdir -p $(TC_SIM_OUTPUT_DIR); fi;)
	vcs $(common_opt) $(cmp_pre_opt) $(cmp_opt) $(DUT_SRC) $(TB_TOP)

run:
	$(shell if [ ! -d $(TC_SIM_OUTPUT_DIR) ]; then mkdir -p $(TC_SIM_OUTPUT_DIR); fi;)
	$(DUT_SIM_EXEC) $(run_opt)

verdi:
	verdi -sverilog -sv $(common_opt) $(verdi_opt) $(DUT_SRC) $(TB_TOP) &

cov:
	dve -full64 -covdir $(SIM_OUTPUT_DIR)/cov/*.vdb &
clean:
	rm -rf $(SIM_OUTPUT_DIR)/*csrc $(SIM_OUTPUT_DIR)/*simv* $(TC_SIM_OUTPUT_DIR)/*csrc $(TC_SIM_OUTPUT_DIR)/*simv*


通过将vunit_plg.sv加入到cmp_opt变量中实现将Vunit相关组件加入编译环境,通过加入相关启动指令实现通过VCS启动基于Vunit的仿真,Makefile的工作过程如下图所示:

首先通过make gen命令可以运行vunit_top_gen.py读取存储了顶层接口信息的.xlsx文件同时产生测试case模板文件Test_Case_Name.sv和顶层模板文件tb_generated.sv。

对两个模板文件根据设计需求编辑完成后,运行make all指令将会调用VCS进行编译(make all comp指令),同时生成仿真output文件包括simv,fsdb,log等(make all run指令)。

3.自动化测试平台测试结果分析

以一个异步FIFO代码的测试为例,该测试平台的文件夹结构如下图所示:

(1).运行make gen命令将会运行vunit_top_gen.py读取.xlsx表格文件,并在tb文件夹下产生顶层模版文件tb_generated.sv,同时在tests文件夹下产生Test_Case_Name.sv。

存有顶层文件I/O信息的.xlsx表格格式应当如下图所示:

vunit_top_gen.py会根据表头名检索表格数据,并自动将其转换为sv语言存储在tb_generated.sv中,将 tb_generated.sv根据自己的需求修改后,应另存为test_top.sv以供Makefile读取,以异步FIFO为例,编写好的test_top.sv文件如下所示。

tb/test_top.sv

`include "./tb_define/vunit_defines.svh"
`include "./tests/gen_tests/Test_Case_Name.sv"
`include "./tests/gen_tests/Test_Case_Name1.sv"
`include "./tests/gen_tests/Test_Case_Name2.sv"

module test_top;
logic rst_n = 1'b0;
logic rclk = 1'b0;
logic wclk = 1'b0;
logic [15:0] wdata;
logic wren = 1'b0;
logic [15:0] rdata;
logic rden = 1'b0;
logic wfull;
logic rempty;
logic prog_full;
localparam CYCLE_WR = 40;
task automatic reset();
	rst_n = 1'b0;
	#50ns;
	rst_n = 1'b1;
endtask
`TEST_SUITE_FROM_PARAMETER({"enabled_test_cases : ",`TEST_NAME}) // replace test_case_list to your own task case name
begin
		`Test_Case_Body("Test_Case_Name");
		`Test_Case_Body1("Test_Case_Name1");
		`Test_Case_Body2("Test_Case_Name2");


end
   `WATCHDOG(100ms);
always begin 
	#(CYCLE_WR/2/4 * 1ns); 
	wclk = ~wclk;
end
always begin 
	#(CYCLE_WR/2 * 1ns); 
	rclk = ~rclk;
end
	fifo #(.DW(16),.DEPTH(32),.PROG_DEPTH(16)) dut(.*);
endmodule


其中头文件中include了两个文件,分别为Vunit库文件vunit_defines.svh和自动生成的测试用例模版文件Test_Case_Name.sv, Test_Case_Name.sv

tests/Test_Case_Name1.sv:

`define Test_Case_Body1(Test_Case_Name) 
	`TEST_CASE(Test_Case_Name) begin 
		reset(); 
		wait(rst_n); 
		`CHECK_EQUAL(rempty, 1'b1, "expected high rempty"); 
		$display("Writing_to_fifo:1"); 
		rden = 1'b0; 
		wren = 1'b1; 
		repeat(32)begin 
			@(negedge wclk)
			wdata = {$random()} % 65535; 
		end 
		$display("read_from_fifo:1"); 
		@(negedge wclk) 
		wren = 1'b0; 
		repeat(32) begin 
			@(negedge rclk) 
			rden = 1'b1; 
		end 
		`CHECK_EQUAL(rempty, 1'b1, "expected high rempty"); 
		//#(1000000000) $finish(); 
	end

tests/Test_Case_Name2.sv:

`define Test_Case_Body2(Test_Case_Name) 
	`TEST_CASE(Test_Case_Name) begin 
		wdata = 16'h4321;
		reset();
		wait(rst_n);
		wren = 1'b1;
		rden = 1'b0;
		repeat(35) begin
			@(negedge wclk)
			wdata = {$random()} % 65535;
		end
		$display("write_full_test:2"); 
		@(negedge wclk)
		`CHECK_EQUAL(wfull, 1'b1, "expected high wfull");
		#5ms $finish(); 
	end

(2)当顶层文件test_top.sv和test文件夹下的测试用例文件全部准备完成后,运行make all指令调用vcs执行仿真比较并存储波形,输出文件存储在script/output文件夹。

  • 运行make all时会执行test_top中定义的所有仿真
  • 运行make all run test_name=Test_Case_Name1会运行名为Test_Case_Name1的仿真
  • 运行make all run test_name=Test_Case_Name1,Test_Case_Name2会同时运行两个仿真 Test_Case_Name1和 Test_Case_Name2,运行结果如下

生成的output文件夹内容如下:

其中Test_Case_Name文件夹中含有.fsdb文件和.runlog文件


4.总结

本文介绍了Vunit平台的特点和运作方式,并在Vunit框架的基础上通过分析修改源代码,添加python脚本模块和Makefile脚本模块,设计了一个小型自动化Verilog/System Verilog HDL模块测试平台,完成了顶层文件和测试用例文件的一键生成功能,实现了基于Vunit框架的VCS仿真流程自动化,从而提高了FPGA硬件设计代码的质量和效率。


文章来自个人专栏
FPGA验证技术开发
1 文章 | 1 订阅
0条评论
0 / 1000
请输入你的评论
2
1