macOS有着严格的用户权限管理,一般情况下App都是运行在普通用户权限下,这个时候App是无法修改系统配置,也不能往用户目录以外的目录读写文件。有些操作下我们必须要获取root权限才能执行,比如:
1. 往系统目录安装可执行文件(比如:/usr/bin);
2. 设置App为系统启动项;
3. 修改系统设置;
目前主要有三种方式可以获取系统的root权限:
1. 使用<Security.framework>的AuthorizationExecuteWithPrivileges:
这个接口允许我们在执行命令行命令的时候弹出提示框,用户输入root密码之后能够以root的权限执行命令。
- (BOOL)executeCommand:(NSString *)command withArgs:(NSArray *)argumentArray synchronous:(BOOL)sync
{
    FILE *communicationStream = NULL;
    int i;
    OSStatus myStatus;
    char outputString[1024];
    time_t startTime = time(NULL);

    char **copyArguments = malloc(sizeof(char *) * (argumentArray.count + 1));

    for (i = 0; i < argumentArray.count; i++) {
        copyArguments[i] = (char *)[argumentArray[i] UTF8String];
    }
    copyArguments[i] = NULL;

    myStatus = AuthorizationExecuteWithPrivileges(myAuthorizationRef,
                                                  command.UTF8String,
                                                  kAuthorizationFlagDefaults,
                                                  copyArguments,
                                                  (sync ? &communicationStream : NULL)); // FILE HANDLE for I/O

    if (myStatus==errAuthorizationSuccess && sync) {
        while (!myStatus && !feof(communicationStream) && fgets(outputString, 1024, communicationStream) && time(NULL)-startTime<10) {
            if (strlen(outputString) > 1)
                NSLog(@"NSAuthorization: %s",outputString);
        }
        fclose(communicationStream);
    }

    free(copyArguments);

    if (myStatus != errAuthorizationSuccess)
        NSLog(@"Error: Executing %@ with Authorization: %d", command, (int)myStatus);

    return (myStatus == errAuthorizationSuccess);
}
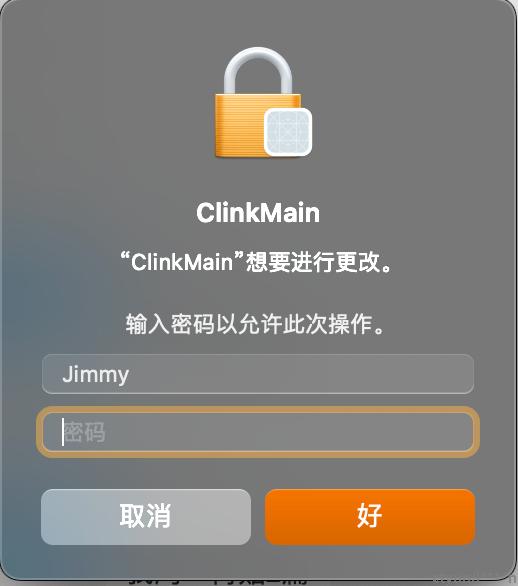
运行效果,提示"xxx 想要进行更改":

需要注意的是这个接口在macOS 10.7以后就是Deprecated了,苹果推荐使用另一种方式进行提权操作。
2. 使用<ServiceManagement.framework> 的 SMJobBless:
这是苹果用于替换第一种方式的提权方案,它需要我们创建一个命令行程序Helper设置为随launchd启动(拥有root权限),App再通过SMJobBless接口实现和Helper通信,从而将需要root权限执行的命令交由Helper执行:
Helper命令行工具:
1. 配置Info.plist
<?xml version="1.0" encoding="UTF-8"?>
<!DOCTYPE plist PUBLIC "-//Apple//DTD PLIST 1.0//EN" "http://www.apple.com/DTDs/PropertyList-1.0.dtd">
<plist version="1.0">
<dict>
	<key>CFBundleIdentifier</key>
	<string>com.apple.SMJobBlessHelper</string>
	<key>CFBundleInfoDictionaryVersion</key>
	<string>6.0</string>
	<key>CFBundleName</key>
	<string>SMJobBlessHelper</string>
	<key>CFBundleVersion</key>
	<string>1.5</string>
	<key>SMAuthorizedClients</key>
	<array>
		<string>identifier "com.apple.SMJobBlessHelper" and anchor apple generic and certificate leaf = "Apple Development: developer@apple.com (67UEKSL8V5)" and certificate 1[field.1.2] /* exists */</string>
	</array>
</dict>
</plist>这里的SMAuthorizedClients是通过官方脚本生成:SMJobBlessUtil.py
$ ./SMJobBlessUtil.py setreq Build/Products/Debug/SMJobBlessApp.app SMJobBlessApp/SMJobBlessApp-Info.plist SMJobBlessHelper/SMJobBlessHelper-Info.plist<?xml version="1.0" encoding="UTF-8"?>
<!DOCTYPE plist PUBLIC "-//Apple//DTD PLIST 1.0//EN" "http://www.apple.com/DTDs/PropertyList-1.0.dtd">
<plist version="1.0">
<dict>
<key>CFBundleIdentifier</key>
<string>com.asbbl.ClinkMainHelper</string>
<key>CFBundleInfoDictionaryVersion</key>
<string>6.0</string>
<key>CFBundleName</key>
<string>ClinkMainHelper</string>
<key>CFBundleVersion</key>
<string>1.5</string>
<key>SMAuthorizedClients</key>
<array>
<string>identifier "com.asbbl.ClinkMain" and anchor apple generic and certificate leaf= "Apple Development: developer@apple.com (67NQWSL8V5)" and certificate 1[field.1.2.8401] /* exists */</string>
</array>
</dict>
</plist>2. Launchd.plist 用于配置Helper自启动:
<?xml version="1.0" encoding="UTF-8"?>
<!DOCTYPE plist PUBLIC "-//Apple//DTD PLIST 1.0//EN" "http://www.apple.com/DTDs/PropertyList-1.0.dtd">
<plist version="1.0">
<dict>
	<key>Label</key>
	<string>com.apple.SMJobBlessHelper</string>
	<key>MachServices</key>
	<dict>
		<key>com.apple.SMJobBlessHelper</key>
		<true/>
	</dict>
	<key>RunAtLoad</key>
	<true/>
</dict>
</plist>
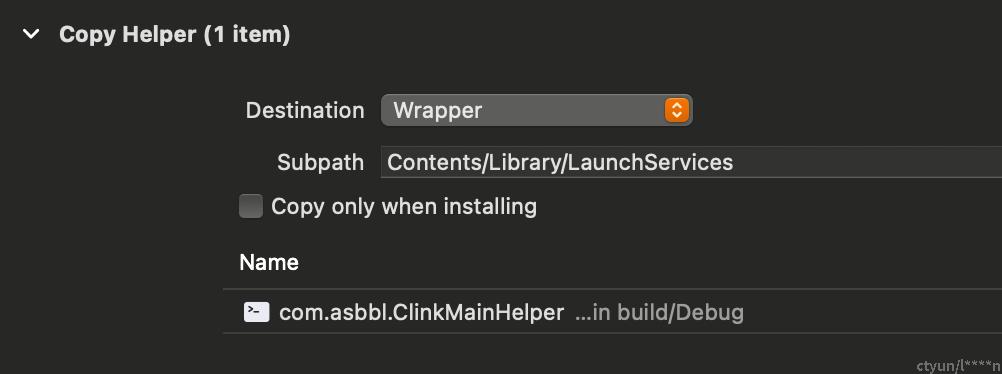
3. 在主程序配置Helper安装(Build Phase):

通过以上3步就完成了Helper的配置,接下来看下如何和Helper通信:
1. Helper 初始化Listener,用于监听主App的连接请求:
@interface HelperListener : NSObject<NSXPCListenerDelegate>

// allows NSXPCListener to configure/accept/resume a new incoming NSXPCConnection
-(BOOL)listener:(NSXPCListener *)listener shouldAcceptNewConnection:(NSXPCConnection *)newConnection;

@end

@implementation ExtendedNSXPCConnection

- (instancetype)init
{
    if ((self = [super init]) {
        //init listener
        listener = [[NSXPCListener alloc] initWithMachServiceName:MAIN_HELPER_ID];
        if(!listener) {
            os_log_error(logHandle, "ERROR: failed to create mach service %@", MAIN_HELPER_ID);
            return NO;
        } else {
            os_log_info(logHandle, "created mach service %@", MAIN_HELPER_ID);
        }

        // start listen
        listener.delegate = self;
        [listener resume];

        return self;
    }
    return nil;
}

-(BOOL)listener:(NSXPCListener *)listener shouldAcceptNewConnection:(NSXPCConnection *)newConnection
{
    newConnection.exportedInterface = [NSXPCInterface interfaceWithProtocol:@protocol(XPCProtocol)];
    newConnection.exportedObject = [[HelperInterface alloc] init];
    [newConnection resume];

    //dbg msg
    os_log_debug(logHandle, "allowed XPC connection: %@", newConnection);
    return YES;
}
其中HelperInterface是实现了协议XPCProtocol的类,就是真正实现功能的类型。
2. 主App通过SMJobBless和Helper通信:
- (BOOL)blessHelper
{
    BOOL wasBlessed = NO;

    AuthorizationRef authRef = NULL;
    CFErrorRef error = NULL;
    AuthorizationItem authItem = {};
    AuthorizationRights authRights = {};
    AuthorizationFlags authFlags = 0;

    //create auth
    if(errAuthorizationSuccess != AuthorizationCreate(NULL, kAuthorizationEmptyEnvironment, kAuthorizationFlagDefaults, &authRef)) {
        NSLog(@"ERROR: failed to create authorization");
        goto bail;
    }

    //init auth item
    memset(&authItem, 0x0, sizeof(authItem));

    authItem.name = kSMRightBlessPrivilegedHelper;
    authRights.count = 1;
    authRights.items = &authItem;

    //init flags
    authFlags = kAuthorizationFlagDefaults | kAuthorizationFlagInteractionAllowed | kAuthorizationFlagPreAuthorize | kAuthorizationFlagExtendRights;

    //get auth rights
    if(errAuthorizationSuccess != AuthorizationCopyRights(authRef, &authRights, kAuthorizationEmptyEnvironment, authFlags, NULL)) {
        NSLog(@"ERROR: failed to copy authorization rights");
        goto bail;
    }

    //bless
    if(YES != (BOOL)SMJobBless(kSMDomainSystemLaunchd, (__bridge CFStringRef)(MAIN_HELPER_ID), authRef, &error)) {
        //err msg
        NSLog(@"ERROR: failed to bless job (%@)", ((__bridge NSError*)error));
        goto bail;
    }

    //happy
    wasBlessed = YES;

bail:

    if(NULL != authRef) {
        AuthorizationFree(authRef, kAuthorizationFlagDefaults);
        authRef = NULL;
    }

    if(NULL != error) {
        CFRelease(error);
        error = NULL;
    }

    return wasBlessed;
}

- (void)invokeHelper
{
    // Bless Helper
     [self blessHelper];

    // Create XPCService
    xpcServiceConnection = [[NSXPCConnection alloc] initWithMachServiceName:MAIN_HELPER_ID options:0];
    xpcServiceConnection.remoteObjectInterface = [NSXPCInterface interfaceWithProtocol:@protocol(XPCProtocol)];
    [xpcServiceConnection resume];
}
XPCProtocol就是主App和Helper之间约定的API,主App创建XPCServiceConnection之后就可以直接通过该API实现接口调用:
    __block BOOL result = NO;
    [[xpcServiceConnection synchronousRemoteObjectProxyWithErrorHandler:^(NSError * proxyError)
    {
        NSLog(@"ERROR: failed to execute 'uninstall' method on helper tool (error: %@)", proxyError);

    }] installDrivers:drivers reply:^(NSNumber *status, NSString *msg)
    {
        result = [status boolValue];
        NSLog(@"%@", msg);
    }];
XPCProtocol定义:
@protocol XPCProtocol

// install drivers
- (void)installDrivers:(NSArray<NSString *> *)drivers reply:(void (^)(NSNumber *status, NSString *msg))reply;

@end
需要注意使用SMJobBless的方式实现提权需要对Helper程序进行签名,并且要求是正式的付费开发者账号签名才有效,免费的个人开发者账号即使签名成功了,Helper程序也无法被launchd正常启动。
3. 直接通过AppleScript实现提权:
这种方式只能同步执行命令,会阻塞当前App主线程(子线程无法实现密码输入),所以只适合那种可以在前台并且不耗时的命令行任务。
- (BOOL)runProcessAsAdministrator:(NSString*)scriptPath
                     withArguments:(NSArray *)arguments
                            output:(NSString **)output
                  errorDescription:(NSString **)errorDescription
{
    NSString * allArgs = [arguments componentsJoinedByString:@" "];
    NSString * fullScript = [NSString stringWithFormat:@"%@ %@", scriptPath, allArgs];

    NSDictionary *errorInfo = [NSDictionary new];
    NSString *script =  [NSString stringWithFormat:@"do shell script \"%@\" with administrator privileges", fullScript];

    NSAppleScript *appleScript = [[NSAppleScript new] initWithSource:script];
    NSAppleEventDescriptor * eventResult = [appleScript executeAndReturnError:&errorInfo];

    // Check errorInfo
    if (! eventResult)
    {
        // Describe common errors
        *errorDescription = nil;
        if ([errorInfo valueForKey:NSAppleScriptErrorNumber])
        {
            NSNumber * errorNumber = (NSNumber *)[errorInfo valueForKey:NSAppleScriptErrorNumber];
            if ([errorNumber intValue] == -128)
                *errorDescription = @"The administrator password is required to do this.";
        }

        // Set error message from provided message
        if (*errorDescription == nil)
        {
            if ([errorInfo valueForKey:NSAppleScriptErrorMessage])
                *errorDescription =  (NSString *)[errorInfo valueForKey:NSAppleScriptErrorMessage];
        }

        return NO;
    }
    else
    {
        // Set output to the AppleScript's output
        *output = [eventResult stringValue];

        return YES;
    }
}
总结
三种方式中第一种最佳,不需要签名和开发者账号(每次都需要输入密码),虽然已经被苹果标为Deprecated,不过目前最新的系统版本仍能使用;第二种方式是苹果官方认可的唯一方式,缺点是繁琐、开发工作量大,而且需要付费开发者账号进行签名;第三种方式缺点是执行过程不可控,而且会阻塞主App运行,适用场景有限。