searchusermenu
  • 发布文章
  • 消息中心
点赞
收藏
评论
分享
原创

大数据权限管理框架ranger的安装使用文档

2023-05-26 02:46:05
173
0

Apache Ranger

Apache Ranger是基于访问策略的权限控制模型,通过对库表配置不同的访问策略,再赋权给用户,达到数据隔离的目的。
Apache Ranger提供了基于行列级别的权限控制,粒度更细,同时在数据查询中,可以对行级数据做脱敏和Masking操作。
Apache Ranger目前集成了Hadoop生态中众多不同的系统,目前已经覆盖了Hive、HDFS、Yarn、HBase、Kafka、Kudu、Solr等17类。
Apache Ranger支持审计日志,可以记录各种操作的审计日志,提供统一的查询接口和界面,但目前审计日志只支持存放在Solr中。

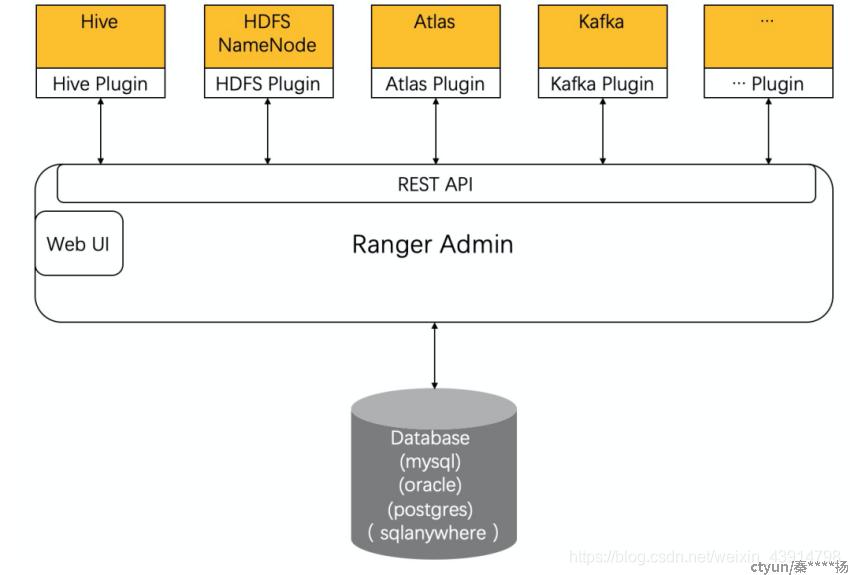
Apache Ranger架构:

Apache Ranger属于C/S架构。Ranger-Admin属于Server端,用来提供授权策略的管理服务,可以通过Web UI对用户、角色、组、
授权策略进行变更,这些管理能力也会通过REST API对外暴露。各种Plugins插件就是Client端,通过REST API与Ranger-Admin进
行交互,定时拉取最新的权限策略并更新到plugin的缓存仓储中。每个插件实现了对应系统的访问控制相关的扩展接口,在特定
的逻辑处理和模型转换之后,最终会对plugin通用common层的服务进行调用,包括权限管理、用户管理、角色管理、组管理、
鉴权等。其中鉴权时,会对缓存仓储中的策略进行匹配。

架构图:
编译:

1.下载源码
Git clone https://gitee.com/mirrors/apache-ranger.git

2.切换ranger2.2分支

3.修改文件
Windows环境需要修改:
C:\mysoft\github_pro\apache-ranger\security-admin\src\main\webapp\package.json
{
  "name": "security-admin",
  "version": "2.0.0",
  "scripts": {
    "r.js": "r.js.cmd"
  },
  "devDependencies": {
    "requirejs": "^2.3.6"
  }
}

C:\mysoft\github_pro\apache-ranger\plugin-kylin\pom.xml
<dependency>
    <groupId>org.apache.kylin</groupId>
    <artifactId>kylin-server-base</artifactId>
    <version>${kylin.version}</version>
    <scope>provided</scope>
    <exclusions>
        <exclusion>
            <groupId>org.apache.kylin</groupId>
            <artifactId>kylin-external-htrace</artifactId>
        </exclusion>
        <exclusion>
            <groupId>org.apache.calcite</groupId>
            <artifactId>calcite-core</artifactId>
        </exclusion>
<!--增加-->
	<exclusion>
   	 	<groupId>org.apache.calcite</groupId>
    		<artifactId>calcite-linq4j</artifactId>
	</exclusion>
    </exclusions>
</dependency>

C:\mysoft\github_pro\apache-ranger\ranger-kylin-plugin-shim\pom.xml
<dependency>
    <groupId>org.apache.kylin</groupId>
    <artifactId>kylin-server-base</artifactId>
    <version>${kylin.version}</version>
    <scope>provided</scope>
    <exclusions>
        <exclusion>
            <groupId>org.apache.kylin</groupId>
            <artifactId>kylin-external-htrace</artifactId>
        </exclusion>
        <exclusion>
            <groupId>org.apache.calcite</groupId>
            <artifactId>calcite-core</artifactId>
        </exclusion>
        <!--增加-->
        <exclusion>
            <groupId>org.apache.calcite</groupId>
            <artifactId>calcite-linq4j</artifactId>
        </exclusion>
    </exclusions>
</dependency>

4.本地安装python3版本
如果没有python3命令需要修改maven文件
C:\mysoft\github_pro\apache-ranger\ranger-util\pom.xml
<executions>
    <execution>
        <id>generate-version-annotation</id>
        <phase>generate-sources</phase>
        <configuration>
            <target>
                <!--修改前-->
               <!-- <exec executable="python3" failonerror="true">-->
                <!--修改后-->
                <exec executable="python" failonerror="true">
                    <arg value="${project.basedir}/src/scripts/saveVersion.py"/>
                    <arg value="${project.version}"/>
                    <arg value="${ranger.version.shortname}"/>
                    <arg value="${project.basedir}"/>
                </exec>
            </target>
        </configuration>
        <goals>
            <goal>run</goal>
        </goals>
    </execution>

5.本地安装nodejs

6.执行命令:
mvn clean compile package install -DskipTests -Drat.skip=true


安装ranger

1.安装java1.8环境

2.mysql环境
2.1.创建mysql创建数据库ranger
mysql> create database ranger;
2.2.创建ranger用户
mysql> grant all privileges on ranger.* to ranger@'%'  identified by 'ranger';

3.安装solr环境
1.下载solr
[test@test2 software]$ tar -zxvf solr-8.3.0.tgz -C /opt/module/

4.Python3
yum install python3

5.安装ranger2.2
[test@test2 module]$ tar -zxvf  ranger-2.2.0-admin.tar.gz -C /opt/module/               

6.修改solr配置信息
6.1.进入目录
[test@test2 module]$ cd /opt/module/ranger-2.2.0-admin/contrib/solr_for_audit_setup/

6.2.修改install.properties文件如下:
[test@test2 solr_for_audit_setup]$ vim install.properties

6.3.在当前文件执行solr安装脚本文件
[test@test2 solr_for_audit_setup]$ sudo ./setup.sh

6.4.进入solr目录
[root@test1 conf]# cd /opt/module/solr-8.3.0/ranger_audit_server/scripts/

6.5.切换用户 
[root@test2 solr_for_audit_setup]# su solr

6.6.启动solr
[solr@test2 scripts]$ ./start_solr.sh

6.7.如果启动报错 bash: ./start_solr.sh: /bin/bash^M: 坏的解释器: 没有那个文件或目录,使用命令修改:
[solr@test2 scripts]$ sed -i 's/\r$//' solr.in.sh solr.in.sh.j2 solr.sh solr.sh.j2  start_solr.sh start_solr.sh.j2 stop_solr.sh stop_solr.sh.j2 

6.8.访问页面,启动solr
http://test2:6083/solr/#/

6.9.停止solr
[solr@test2 scripts]$ ./stop_solr.sh


7.修改ranger配置信息
7.1.进入ranger目录下 (切换用户 su root)
[solr@test2 scripts]$ cd /opt/module/ranger-2.2.0-admin/

7.2.上传mysql-connector-java-5.1.37.jar 到/opt/module 目录

7.3.修改install.properties  如下所示
[root@test2 ranger-2.2.0-admin]# vim install.properties

7.4.执行安装命令
[root@test2 ranger-2.2.0-admin]# ./setup.sh

7.5.执行配置文件命令
[root@test2 ranger-2.2.0-admin]# ./set_globals.sh 

7.6.配置rangeradmin的web页面配置信息
[root@test2 ranger-2.2.0-admin]# cd /etc/ranger/admin/conf/
[root@test2 conf]# vim ranger-admin-site.xml
 <property>
     <name>ranger.service.host</name>
     <value>test2</value>
</property>
<property>
       <name>ranger.jpa.jdbc.password</name>
       <value>ranger</value>
       <description />
</property>

7.7.启动ranger
[root@test2 logs]# ranger-admin start

8.查看错误日志
[root@test2 conf]# cd /opt/module/ranger-2.2.0-admin/ews/logs/
[root@test2 logs]# tail -f 1000 catalina.out 

9.访问http://test2:6080/login.jsp
用户名:admin   密码:ranger123 登录使用

10.停止ranger命令
[root@test2 logs]# ranger-admin stop


Ranger Hive-plugin安装

1.解压
[root@test2 software]# tar -zxvf /opt/software/ranger-2.2.0-hive-plugin.tar.gz -C /opt/module/ranger-2.2.0-admin/

2.修改配置文件
[root@test2 software]# vim /opt/module/ranger-2.2.0-admin/ranger-2.2.0-hive-plugin/install.properties
#策略管理器的url地址
POLICY_MGR_URL=http://test2:6080
#组件名称可以自定义
REPOSITORY_NAME=hivedev
#hive的安装目录
COMPONENT_INSTALL_DIR_NAME=/opt/module/hive
#hive组件的启动用户
CUSTOM_USER=test
#hive组件启动用户所属组
CUSTOM_GROUP=test


3.将hive的配置文件作为软连接安装到Ranger Hive-plugin目录下		
[root@test2 ranger-2.2.0-hive-plugin]# ln -s /opt/module/hive/conf/ conf

4.重启metastore,hiveserver2  启动hiveplugin
[root@test2 ranger-2.2.0-hive-plugin]# ./enable-hive-plugin.sh
如果报错
r further details.
Exception in thread "main" java.lang.NoClassDefFoundError: org/apache/htrace/core/Tracer$Builder
上传htrace-core4-4.1.0-incubating.jar包到/opt/module/ranger-2.2.0-admin/ranger-2.2.0-hive-plugin/install/lib


0条评论
0 / 1000
秦****扬
3文章数
0粉丝数
秦****扬
3 文章 | 0 粉丝
秦****扬
3文章数
0粉丝数
秦****扬
3 文章 | 0 粉丝
原创

大数据权限管理框架ranger的安装使用文档

2023-05-26 02:46:05
173
0

Apache Ranger

Apache Ranger是基于访问策略的权限控制模型,通过对库表配置不同的访问策略,再赋权给用户,达到数据隔离的目的。
Apache Ranger提供了基于行列级别的权限控制,粒度更细,同时在数据查询中,可以对行级数据做脱敏和Masking操作。
Apache Ranger目前集成了Hadoop生态中众多不同的系统,目前已经覆盖了Hive、HDFS、Yarn、HBase、Kafka、Kudu、Solr等17类。
Apache Ranger支持审计日志,可以记录各种操作的审计日志,提供统一的查询接口和界面,但目前审计日志只支持存放在Solr中。

Apache Ranger架构:

Apache Ranger属于C/S架构。Ranger-Admin属于Server端,用来提供授权策略的管理服务,可以通过Web UI对用户、角色、组、
授权策略进行变更,这些管理能力也会通过REST API对外暴露。各种Plugins插件就是Client端,通过REST API与Ranger-Admin进
行交互,定时拉取最新的权限策略并更新到plugin的缓存仓储中。每个插件实现了对应系统的访问控制相关的扩展接口,在特定
的逻辑处理和模型转换之后,最终会对plugin通用common层的服务进行调用,包括权限管理、用户管理、角色管理、组管理、
鉴权等。其中鉴权时,会对缓存仓储中的策略进行匹配。

架构图:

编译:

1.下载源码
Git clone https://gitee.com/mirrors/apache-ranger.git

2.切换ranger2.2分支

3.修改文件
Windows环境需要修改:
C:\mysoft\github_pro\apache-ranger\security-admin\src\main\webapp\package.json
{
  "name": "security-admin",
  "version": "2.0.0",
  "scripts": {
    "r.js": "r.js.cmd"
  },
  "devDependencies": {
    "requirejs": "^2.3.6"
  }
}

C:\mysoft\github_pro\apache-ranger\plugin-kylin\pom.xml
<dependency>
    <groupId>org.apache.kylin</groupId>
    <artifactId>kylin-server-base</artifactId>
    <version>${kylin.version}</version>
    <scope>provided</scope>
    <exclusions>
        <exclusion>
            <groupId>org.apache.kylin</groupId>
            <artifactId>kylin-external-htrace</artifactId>
        </exclusion>
        <exclusion>
            <groupId>org.apache.calcite</groupId>
            <artifactId>calcite-core</artifactId>
        </exclusion>
<!--增加-->
	<exclusion>
   	 	<groupId>org.apache.calcite</groupId>
    		<artifactId>calcite-linq4j</artifactId>
	</exclusion>
    </exclusions>
</dependency>

C:\mysoft\github_pro\apache-ranger\ranger-kylin-plugin-shim\pom.xml
<dependency>
    <groupId>org.apache.kylin</groupId>
    <artifactId>kylin-server-base</artifactId>
    <version>${kylin.version}</version>
    <scope>provided</scope>
    <exclusions>
        <exclusion>
            <groupId>org.apache.kylin</groupId>
            <artifactId>kylin-external-htrace</artifactId>
        </exclusion>
        <exclusion>
            <groupId>org.apache.calcite</groupId>
            <artifactId>calcite-core</artifactId>
        </exclusion>
        <!--增加-->
        <exclusion>
            <groupId>org.apache.calcite</groupId>
            <artifactId>calcite-linq4j</artifactId>
        </exclusion>
    </exclusions>
</dependency>

4.本地安装python3版本
如果没有python3命令需要修改maven文件
C:\mysoft\github_pro\apache-ranger\ranger-util\pom.xml
<executions>
    <execution>
        <id>generate-version-annotation</id>
        <phase>generate-sources</phase>
        <configuration>
            <target>
                <!--修改前-->
               <!-- <exec executable="python3" failonerror="true">-->
                <!--修改后-->
                <exec executable="python" failonerror="true">
                    <arg value="${project.basedir}/src/scripts/saveVersion.py"/>
                    <arg value="${project.version}"/>
                    <arg value="${ranger.version.shortname}"/>
                    <arg value="${project.basedir}"/>
                </exec>
            </target>
        </configuration>
        <goals>
            <goal>run</goal>
        </goals>
    </execution>

5.本地安装nodejs

6.执行命令:
mvn clean compile package install -DskipTests -Drat.skip=true


安装ranger

1.安装java1.8环境

2.mysql环境
2.1.创建mysql创建数据库ranger
mysql> create database ranger;
2.2.创建ranger用户
mysql> grant all privileges on ranger.* to ranger@'%'  identified by 'ranger';

3.安装solr环境
1.下载solr
[test@test2 software]$ tar -zxvf solr-8.3.0.tgz -C /opt/module/

4.Python3
yum install python3

5.安装ranger2.2
[test@test2 module]$ tar -zxvf  ranger-2.2.0-admin.tar.gz -C /opt/module/               

6.修改solr配置信息
6.1.进入目录
[test@test2 module]$ cd /opt/module/ranger-2.2.0-admin/contrib/solr_for_audit_setup/

6.2.修改install.properties文件如下:
[test@test2 solr_for_audit_setup]$ vim install.properties

6.3.在当前文件执行solr安装脚本文件
[test@test2 solr_for_audit_setup]$ sudo ./setup.sh

6.4.进入solr目录
[root@test1 conf]# cd /opt/module/solr-8.3.0/ranger_audit_server/scripts/

6.5.切换用户 
[root@test2 solr_for_audit_setup]# su solr

6.6.启动solr
[solr@test2 scripts]$ ./start_solr.sh

6.7.如果启动报错 bash: ./start_solr.sh: /bin/bash^M: 坏的解释器: 没有那个文件或目录,使用命令修改:
[solr@test2 scripts]$ sed -i 's/\r$//' solr.in.sh solr.in.sh.j2 solr.sh solr.sh.j2  start_solr.sh start_solr.sh.j2 stop_solr.sh stop_solr.sh.j2 

6.8.访问页面,启动solr
http://test2:6083/solr/#/

6.9.停止solr
[solr@test2 scripts]$ ./stop_solr.sh


7.修改ranger配置信息
7.1.进入ranger目录下 (切换用户 su root)
[solr@test2 scripts]$ cd /opt/module/ranger-2.2.0-admin/

7.2.上传mysql-connector-java-5.1.37.jar 到/opt/module 目录

7.3.修改install.properties  如下所示
[root@test2 ranger-2.2.0-admin]# vim install.properties

7.4.执行安装命令
[root@test2 ranger-2.2.0-admin]# ./setup.sh

7.5.执行配置文件命令
[root@test2 ranger-2.2.0-admin]# ./set_globals.sh 

7.6.配置rangeradmin的web页面配置信息
[root@test2 ranger-2.2.0-admin]# cd /etc/ranger/admin/conf/
[root@test2 conf]# vim ranger-admin-site.xml
 <property>
     <name>ranger.service.host</name>
     <value>test2</value>
</property>
<property>
       <name>ranger.jpa.jdbc.password</name>
       <value>ranger</value>
       <description />
</property>

7.7.启动ranger
[root@test2 logs]# ranger-admin start

8.查看错误日志
[root@test2 conf]# cd /opt/module/ranger-2.2.0-admin/ews/logs/
[root@test2 logs]# tail -f 1000 catalina.out 

9.访问http://test2:6080/login.jsp
用户名:admin   密码:ranger123 登录使用

10.停止ranger命令
[root@test2 logs]# ranger-admin stop


Ranger Hive-plugin安装

1.解压
[root@test2 software]# tar -zxvf /opt/software/ranger-2.2.0-hive-plugin.tar.gz -C /opt/module/ranger-2.2.0-admin/

2.修改配置文件
[root@test2 software]# vim /opt/module/ranger-2.2.0-admin/ranger-2.2.0-hive-plugin/install.properties
#策略管理器的url地址
POLICY_MGR_URL=http://test2:6080
#组件名称可以自定义
REPOSITORY_NAME=hivedev
#hive的安装目录
COMPONENT_INSTALL_DIR_NAME=/opt/module/hive
#hive组件的启动用户
CUSTOM_USER=test
#hive组件启动用户所属组
CUSTOM_GROUP=test


3.将hive的配置文件作为软连接安装到Ranger Hive-plugin目录下		
[root@test2 ranger-2.2.0-hive-plugin]# ln -s /opt/module/hive/conf/ conf

4.重启metastore,hiveserver2  启动hiveplugin
[root@test2 ranger-2.2.0-hive-plugin]# ./enable-hive-plugin.sh
如果报错
r further details.
Exception in thread "main" java.lang.NoClassDefFoundError: org/apache/htrace/core/Tracer$Builder
上传htrace-core4-4.1.0-incubating.jar包到/opt/module/ranger-2.2.0-admin/ranger-2.2.0-hive-plugin/install/lib


文章来自个人专栏
大数据框架
3 文章 | 1 订阅
0条评论
0 / 1000
请输入你的评论
1
0