3D技术是前端技术中,比较高端的技术,所以能用的工具还比较少,相信以后3D技术的应用会越来越多。
Threejs就是一个很好的3D框架,Threejs不但是开源免费的框架,文档也特别的给力。
关于Threejs的详细,可以访问three.js的官网。
Three.js – JavaScript 3D Library ()
Vue是现在前端的三个框架之一,我也是我最常使用的MVVM框架。
Typescript是对Javascript这种弱类型语言的扩展,可以用强语言的方式来写Javascript,兼容ES 2017。
本文用Vue3+Typescript对Threejs进行了以下整合。
一、搭建Vue3+Typescript的基础框架
工欲善其事,必先利其器。
我们首先要用Vite搭建一下脚手架。
在Dos命令中使用
pnpm create vite threejs-vue3-ts --template vue执行命令后,当前文件夹增加了threejs-vue3-ts的文件夹。
里面有vue3+typescript所需要的所有基础代码
二、设置Vue的路由
这里我写了三个threejs的demo, 所以配置了三个路由,代码如下:
import { createRouter, createWebHistory, RouteRecordRaw } from 'vue-router'

const history = createWebHistory()

const routes: Array<RouteRecordRaw> = [
        {
                path: '/',
                redirect: 'bridgeTraffic'
        },
        {
                path: '/bridgeTraffic',
                name: 'bridgeTraffic',
                component: () => import('../views/BridgeTraffic.vue')
        },
        {
                path: '/car',
                name: 'car',
                component: () => import('../views/Car.vue')
        },
        {
                path: '/earthAndMoon',
                name: 'earthAndMoon',
                component: () => import('../views/EarthAndMoon.vue')
        }
]

const router = createRouter({
        history,
        routes
})

export default router
有了Vue的路由后,你就可以通过切换路由切换不同的页面了。
三、具体的代码实现。
1)安装three.js
通过npm安装:
npm i three2)编写App.vue
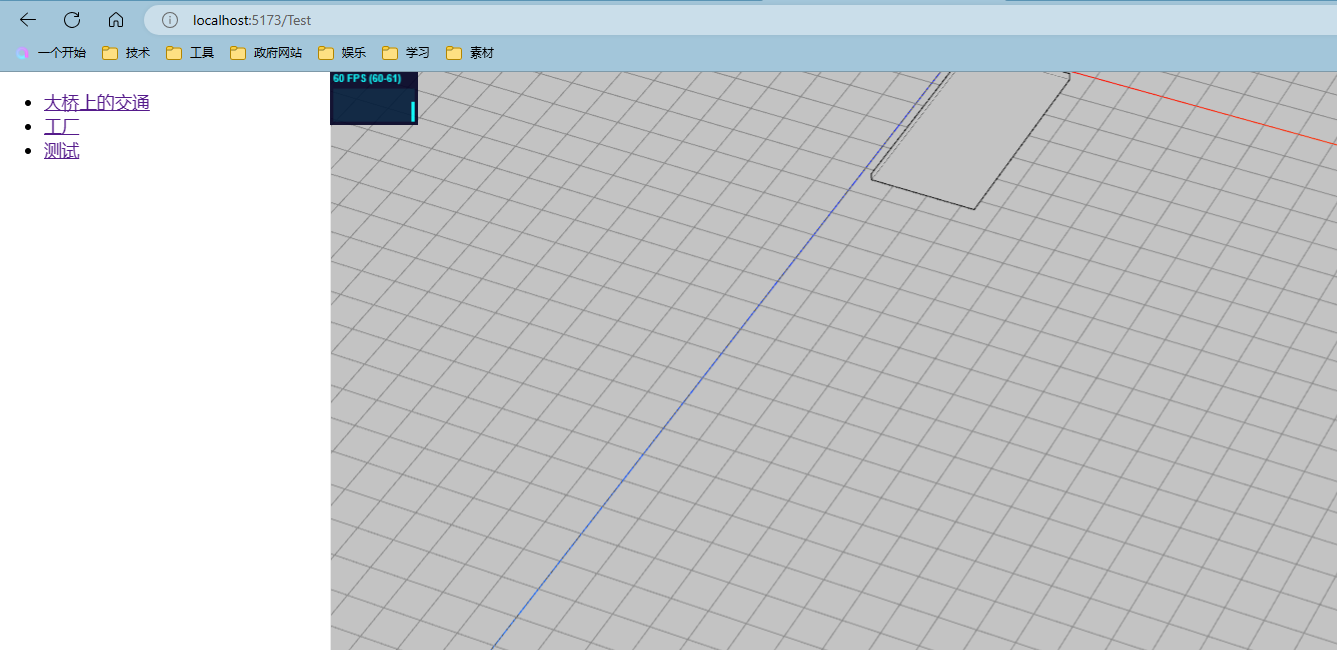
这里,我们把页面分成两块,一块用来显示导航,一块用来显示3D的场景。
代码:
<template>
  <div class="container">
    <div class="nav">
      <ul>
        <li>
          <a href>大桥上的交通</a>
        </li>
        <li>
          <a href>工厂</a>
        </li>
        <li>
          <a href>测试</a>
        </li>
      </ul>
    </div>
    <div class="content">
      <router-view></router-view>
    </div>
  </div>

</template>

<script setup lang="ts">


</script>

<style scoped>

  .container{
    height: 100%;
  }

  .nav {
    position: fixed;
    z-index: 100;
    left: 0px;
    width: 300px;;
    height: 100%;
    overflow: auto;
    border-right: 1px solid #E8E8E8;
    display: flex;
    flex-direction: column;
    transition: 0s 0s height;
  }

  .content {
    position: absolute;
    border: 0px;
    left: 0;
    right: 0;
    width: 100%;
    height: 100%;
    overflow: auto;
    padding-left: 300px;
  }
</style>
右边route-view用来显示Component。
接下来,我们再增加一个vue文件,作为显示的Compoent,这里我们暂时取名Test.vue。
Test.vue
<template>
  <div ref="container" class="container"></div>
</template>

<script setup lang="ts">

import { onMounted, onUnmounted, getCurrentInstance } from 'vue'

import { TestScene } from '../scene/TestScene'

let scene:TestScene|null = null;

onMounted(() => {

  const container = getCurrentInstance()?.refs['container'];
  // 场景的容器

  scene = new TestScene();
  scene.init(container);

})

onUnmounted(() => {
  if (scene) {
    scene.clear();
  }
});

</script>

<style scoped>
.container {
  width: 100%;
  height: 100%;
  overflow: hidden;
  position: relative;
}
</style>
在建一个TestScene.ts。来处理场景的相关逻辑就差不多了。
import * as THREE from 'three';

import FPSState from '../plugins/FPSState';
import { OrbitControls } from 'three/examples/jsm/controls/OrbitControls';

import {Thing} from './thing'
import {TreeSideBoxGeometry} from './TreeSideBoxGeometry';

import data from './data.json'

export class TestScene {

    parameters:any = null;
    container: HTMLElement | null = null;

    stats: any;

    camera: THREE.PerspectiveCamera | null = null;
    scene: THREE.Scene | null = null;
    renderer: THREE.WebGLRenderer | null = null;

    onWindowResize: any;
    onWindowMousedown: any;

    things: Array<Thing> = [];

    constructor() {

    }

    /**
     * 创建渲染器
     */
    createRenderer() {
        // 渲染器
        const renderer = this.renderer = new THREE.WebGLRenderer({ antialias: true, logarithmicDepthBuffer: true });
        renderer.setClearColor('white');
        renderer.setPixelRatio(window.devicePixelRatio);
        renderer.setSize(this.container.offsetWidth, this.container.offsetHeight);
        renderer.toneMapping = THREE.ACESFilmicToneMapping;
        renderer.shadowMap.enabled = true;
        renderer.shadowMap.type = THREE.VSMShadowMap;
        this.container.appendChild(renderer.domElement);
    }

    /**
     * 创建摄像机
     */
    createCamera() {
        // 相机
        let camera = this.camera = new THREE.PerspectiveCamera(15, this.container.offsetWidth / this.container.offsetHeight, 1, 20000);
        camera.position.set(1800, 3000, 3500);

        // 相机轨道控制器
        let controls: OrbitControls = new OrbitControls(camera, this.renderer.domElement);

        controls.maxPolarAngle = Math.PI * 0.495;
        // controls.enablePan = false
        controls.target.set(600, 10, 800);

        controls.maxDistance = 8000.0;
        controls.update();
    }

    /**
     * 创建性能监视器
     */
    createFPSState() {
        // 性能监视器
        const stats = this.stats = new FPSState();
        stats.appendTo(this.container);
    }

    init(el:any) {

        this.container = el;
        this.createRenderer();
        this.createCamera();
        this.createFPSState();


        // 场景
        const scene = this.scene = new THREE.Scene();

        const gridHelper = new THREE.GridHelper( 3000, 60 );
		scene.add( gridHelper );

        scene.add( new THREE.AxesHelper( 2000 ) );

        console.log('data', data);

        const geometry = new THREE.PlaneGeometry( 10000, 10000 );
        geometry.rotateX( - Math.PI / 2 );

        let plane = new THREE.Mesh( geometry, new THREE.MeshBasicMaterial( { color: 0xffffff,side: THREE.DoubleSide } ) );
        plane.position.set(0, -1, 0);
        scene.add( plane );


        let x = 30;
        let y = 40;
        let width = 150;
        let height = 300;
        this.createArea(x, y, width, height);

        // 开启渲染
        this.animate();

        let that = this;

        const onWindowResize = this.onWindowResize = function() {
            if (that.container) {
                camera.aspect = that.container?.offsetWidth / that.container?.offsetHeight;
                camera.updateProjectionMatrix();
                that.renderer?.setSize(that.container.offsetWidth, that.container.offsetHeight);
            }

        }
        window.addEventListener('resize', onWindowResize);

        const onWindowMousedown = this.onWindowMousedown = function(event:any) {
            const raycaster = new THREE.Raycaster();
            const pointer = new THREE.Vector2();

            pointer.x = (event.clientX / window.innerWidth) * 2 - 1;
            pointer.y = - (event.clientY / window.innerHeight) * 2 + 1;

            raycaster.setFromCamera(pointer, camera)

        }
        window.addEventListener('mousedown', onWindowMousedown);

    }

    /**
     * 创建几何形状
     */
    createArea(x: number, y: number, width: number, height: number) {
        let scene = this.scene;
        const rollOverGeo = new TreeSideBoxGeometry(width, 10, height);

        const coneEdges = new THREE.EdgesGeometry( rollOverGeo);
        var edgesMtl =  new THREE.LineBasicMaterial({color: 0x000000});
        let rollOverMaterial = new THREE.MeshBasicMaterial( { color: 0xffffff,side: THREE.DoubleSide } );
        let rollOverMesh = new THREE.Mesh( rollOverGeo, rollOverMaterial );
        const boundingBox = new THREE.LineSegments(coneEdges, edgesMtl);

        x = x + width / 2;
        y = y + height / 2;
        boundingBox.position.set(x, 25, y);
        scene?.add(boundingBox);
        rollOverMesh.position.set(x, 25, y);
        scene?.add( rollOverMesh );
    }


    addThing(thing: Thing) {
        this.things.push(thing);
    }

    animate() {
        requestAnimationFrame(()=> {
            this.animate();
        });
        this.render();
        this.stats.update();
    }

    render() {
        if (this.camera && this.scene && this.renderer) {
            this.renderer.render(this.scene, this.camera);
        }

    }

    clear() {

        if (this.onWindowResize) {
            window.removeEventListener('resize', this.onWindowResize)
        }
        if (this.onWindowMousedown) {
            window.removeEventListener('mousedown', this.onWindowMousedown);
        }


        if (this.scene) {
            this.scene.traverse((child: any) => {

                if (child.isMesh) {
                    if (child.geometry) child.geometry.dispose();
                    if (child.material) child.material.dispose();
                    child.clear();
                }
            });
        }

    }

}
CommonScene里面分装了场景所需要的代码。
最后显示的效果:


