一、学习内容
- 线程join,详细解析join的执行和源码,join方法的实战案例
- 优雅关闭线程,暴力关闭线程自定义实现(Thread API综合运用)
二 、具体内容
2.1 线程join详细分析
Thread API提供的三个不同的join方法
| 方法 | 描述 |
|---|---|
| public final void join() throws InterruptedException | 等待这个线程死亡。 |
| public final void join(long millis)throws InterruptedException | 等待这个线程死亡的时间最多为millis毫秒,0的超时意味着永远等待 |
| public final void join(long millis, int nanos)throws InterruptedException | 等待最多millis毫秒加上这个线程死亡的nanos纳秒 |
Thread的join方法有着强大的功能,与sleep一样也是可中断的方法,如果有其他线程执行了当前线程的interrupt操作,它会捕获到中断信号,并且擦除线程的interrupt标识,join某个线程A,会使线程B进入等待,直到线程A生命周期结束,或者到达给定的时间,则在此期间B线程进入Blocked状态。
- 需求:现在需要先让子线程先执行完毕,然后执行主线程。也就是说主线程让子线程先执行,然后自己再执行。
示例:join方法
public class ThreadJoin {

	public static void main(String args[]) throws InterruptedException{

		// 1.定义两个线程,并保存在threads中
		List<Thread> threads = IntStream.range(1,3)
				.mapToObj(ThreadJoin :: create).collect(toList());

		// 2.启动着两个线程
		threads.forEach(Thread :: start);

		// 3.执行线程的Join方法
		for(Thread thread : threads){
			thread.join();  // 此处我们两个子线程都启动,交替执行,主线程稍后执行
		}
		// 4.main线程循环输出
		for(int i = 0; i < 10; i++){
			System.out.println(Thread.currentThread().getName() + "#" + i);
			shortSleep();
		}
	}
	//构造一个简单的线程每个线程只是简单的循环输出
	public static Thread create(int seq){
		return new Thread(() ->
		{
			for(int i = 0; i < 10; i++){
				System.out.println(Thread.currentThread().getName() + "#" + i);
				shortSleep();
			}
		}, String.valueOf(seq));
	}

	private static void shortSleep() {
		try {
			TimeUnit.SECONDS.sleep(1);
		} catch (InterruptedException e) {
			e.printStackTrace();
		}
	}
}
- 上面的创建了两个线程,分别启动,并且调用了每个线程的join方法(同学们注意了:join方法是被主线程调用的,因此在第一个线程还没有结束生命周期的时候,第二个线程的join不会得到执行,但第二个线程也已经启动了),观察运行结果我们发现,线程一和线程二交替输出直到它们的生命周期结束,main线程的循环才开始运行,运行结果如下:

小结:join方法会使当前线程永远的等待下去,直到此期间被另外的线程中断,或者join的线程结束,当然也可以使用join的另外两个方法,指定毫秒数,当线程终止时,会调用线程自身的notifyAll()方法,会通知所有等待在该线程对象上的线程。
我们再看一个实例:
public class TestThread02 {
    public static void main(String[] args) throws InterruptedException {
        Thread thread1 = new Thread(new Runnable() {
            @Override
            public void run() {
                for (int i = 0; i < 60; i++) {
                    System.out.println("子线程---T1---i---" + i);
                }
            }
        },"T1");
        Thread thread2 = new Thread(new Runnable() {
            @Override
            public void run() {
                for (int j = 0; j < 60; j++) {
                    System.out.println("子线程---T2---j---" + j);
                }
            }
        },"T2");
        thread1.start();

        thread1.join();
        thread2.start();
        thread2.join();
        /**
         *
         thread1.join();
         thread2.join();  当这两个join 放在一起的时候我们看到thread1和thread2交替执行,结果并不是
         */
        for (int x = 0; x < 30; x++) {
            System.out.println("主线程T3---x---" + x);
        }
    }
}
运行结果(线程数量改为三个,以便观察结果):
- 我们使用了thread1,.join()方法之后,T2线程需要等待T1线程执行完毕执行完毕之后才能执行,当T1线程启动之后,我们要马上执行thread1.join();,当我们同时启动两个线程后再执行join方法,线程T1和T2还是会交替执行,出现的结果并不是我们想要的结果。这是为什么那?
重点
可以看出join()方法的底层使用的还是wait方法,join方法是一个同步方法(加锁),当主线程调用thread1.join()方法时优先获得了thread1对象的锁,随后进入方法,调用了thread1对象的wait()方法,使主线程进入了thread1对象的等待池(wait set,并且放弃了monitor的所有权,sleep没有),此时线程T1还在执行,并且随后的T2线程 thread2.start()还没有执行,因此,T2线程还没有开始。等待T1线程执行完毕之后,主线程继续执行,走到了thread.start(),T2线程开始执行,最后才执行主线程。(当前线程等待子线程运行结束)
- 我们的两个例子形成了鲜明的对比,大家可以自行测试,其实以上的代码不是真正意义上join实现,我们接下来改变一下代码实现,实现
我们接下来看看join方法的源码
public final synchronized void join(long millis)
    throws InterruptedException {
        long base = System.currentTimeMillis();
        long now = 0;

        if (millis < 0) {
            throw new IllegalArgumentException("timeout value is negative");
        }

        if (millis == 0) {
            while (isAlive()) {  // 判断这个线程是否还活着,他已经启动了,且没有消亡
                wait(0); // 由于是本地方法,JDK官网并没有给出明确的定义,不同的JDK厂家有着不同的实现方式
            }
        } else {  // 当等待时间大于0时
            while (isAlive()) {
                long delay = millis - now;
                if (delay <= 0) {
                    break;
                }
                wait(delay);
                now = System.currentTimeMillis() - base;
            }
        }
我们在看看wait方法的有没有给出源码
public final native void wait(long timeout) throws InterruptedException; // 是的,没有给出明确的实现
我们这里实现一个面试题,t1,t2,t3执行顺序的面试
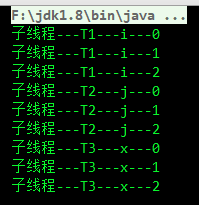
join在那个线程,我们当前的线程就让给调用join()方法的线程,但是这样做我们线程串行化执行,并不能看到多个线程交替执行的结果,大家体会一下
代码示例
public class TestThread02 {
    public static void main(String[] args) throws InterruptedException {
        Thread t1 = new Thread(new Runnable() {
            @Override
            public void run() {
                for (int i = 0; i < 3; i++) {
                    System.out.println("子线程---T1---i---" + i);
                }
            }
        });
        t1.start();
        Thread t2 = new Thread(new Runnable() {
            @Override
            public void run() {
                try {
                    t1.join(); // t2 让给 t1
                } catch (InterruptedException e) {
                    e.printStackTrace();
                }
                for (int j = 0; j < 3; j++) {
                    System.out.println("子线程---T2---j---" + j);
                }
            }
        });
        t2.start();
        Thread t3 = new Thread(new Runnable() {
            @Override
            public void run() {
                try {
                    t2.join(); // t3 让给 t2
                } catch (InterruptedException e) {
                    e.printStackTrace();
                }
                for (int x = 0; x < 3; x++) {
                    System.out.println("子线程---T3---x---" + x);
                }
            }
        });
        t3.start();
    }
}
运行结果
2.1.1 线程join实例分析
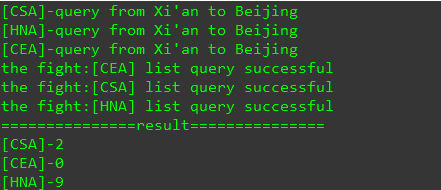
- 结合一个实际的案例,体验join方法的实例使用场景,假设我使用同程艺龙查询咸阳机场-广州白云机场的航班, 我发起这个查询请求,APP中没有实时数据,需要到各大航空公司去获取信息,最后需要统一整理加工返回到同程艺龙APP,使用join方法完成下面的功能。

- 该例子是典型的串行任务局部并行化处理,每一个公司的接口不一样,获取的数据格式也不一样,查询速度也存在着差异,如果再跟航空公司进行串行化交互,客户端要等待很长时间,用户体验会非常差。
解决方案:我们将每一个航空公司的查询交给一个线程去工作,然后在它们结束工作后统一对数据进行处理,这样既可以节约时间,也能够提升用户体验效果(汪文君Java高并发)。
定义查询接口FightQuery
public interface FightQuery {
	public List<String> get();
}
定义航班的task
public class FightQueryTask extends Thread implements FightQuery {

	private final String origin;  //起点
	private final String destination;  //终点
	private final List<String> fightList = new ArrayList<>();  //航班的存储
	public FightQueryTask(String airline, String origin, String destination){
		super("[" + airline + "]");
		this.origin = origin;
		this.destination = destination;
	}
	@Override
	public void run(){
		System.out.printf("%s-query from %s to %s \n"
				, this.getName(), this.origin, this.destination);
		//用一个随机值来反应不同的查询速度
		int randomVal = ThreadLocalRandom.current().nextInt(10);
		try {
			TimeUnit.SECONDS.sleep(randomVal);
			this.fightList.add(this.getName() + "-" + randomVal);
			System.out.printf("the fight:%s list query successful\n", this.getName());

		} catch (InterruptedException e) {
			e.printStackTrace();
		}
	}
	@Override
	public List<String> get() {
		return this.fightList;
	}
}
定义查询测试FightQueryExample
public class FightQueryExample {
	//1.合作的各大航空公司
	private static List<String> fightCompany = Arrays.asList("CSA", "CEA", "HNA");
	public static void main(String args[]){

		List<String> result = search("Xi'an", "Beijing");
		System.out.println("===============result===============");
		result.forEach(System.out :: println);
	}
	/**
	 *
	 * @param original 始发地
	 * @param dest     目的地
	 * @return         航班列表
	 */
	public static List<String> search(String original, String dest){
		final List<String> result = new ArrayList<>();
		//2.创建查询航班信息的线程列表
		List<FightQueryTask> tasks = fightCompany.stream()
				.map(f -> createSearchTask(f, original, dest)).collect(toList());
		//3.分别启动这些线程
		tasks.forEach(Thread :: start);
		//4.分别调用每一个线程的join方法,阻塞当前线程
		tasks.forEach(t -> {
			try {
				t.join();
			} catch (InterruptedException e) {
				e.printStackTrace();
			}
		});
		//5.在此之前,当前线程会被阻塞住,获取每一个查询线程的结果,并且加入到result中
		tasks.stream().map(FightQuery :: get).forEach(result :: addAll);
		return result;
	}

	private static FightQueryTask createSearchTask(String fight, String original, String dest){
		return new FightQueryTask(fight, original, dest);
	}
}
运行结果:
这里在分享一个有趣的join代码
public class JoinTest {
public static void main(String[] args) throws InterruptedException {
/*
* 我在干什么?
*/
Thread.currentThread().join();
}
}

- 分析:我在干什么?可以看到程序一直在运行,我在等我自己结束,main线程在等我main线程的结束。有些服务启动(JettyHttpServer.start())作为daemon,应用结束后它为了不占用资源就自动退掉了,而我们不想他结束,就会让它自身join
2.1.2 join实例二(多个线程采集服务器数据)
package com.thread.basicmethod.chapter05;

import java.util.concurrent.TimeUnit;

/**
 * @Author: kangna
 * @Date: 2019/8/21 10:07
 * @Version:
 * @Description: 开启多个线程去服务器采集数据
 */
class CaptureRunnable implements Runnable {
    // 机器名
    private String machineName;
    // 花费时间
    private long spendTime;

    public CaptureRunnable(String machineName, long spendTime) {
        this.machineName = machineName;
        this.spendTime = spendTime;
    }

    @Override
    public void run() {
        // do the really captrue data
        try {
            TimeUnit.MILLISECONDS.sleep(spendTime);
            System.out.println(machineName + " completed data captrue and successfully.");
        } catch (InterruptedException e) {
            e.printStackTrace();
        }
    }

    public String getMachineName() {
        return machineName + " finish. ";
    }
}

/**
 * 如此的程序我们可以看到 数据采集的过程已经完成而我们的各个线程的还在采集数据且没有结束,显然这样做是
 * 不符合常规的,至此我们使用 join() 方法 实现程序的控制
 */
public class ThreadJoinMachine {
    public static void main(String[] args) throws InterruptedException {
        long startTimeStamp = System.currentTimeMillis();
        Thread t1 = new Thread(new CaptureRunnable("M1",10_000L));
        Thread t2 = new Thread(new CaptureRunnable("M2",30_000L));
        Thread t3 = new Thread(new CaptureRunnable("M3",15_000L));
        t1.start();
        t2.start();
        t3.start();

        t1.join();
        t2.join();
        t3.join();

        // 最后主线程入 记录 采集 数据
        long endTimeStamp = System.currentTimeMillis();
        System.out.printf("Saving data begin timestamp is:%s, and end timestamp is:%s", startTimeStamp, endTimeStamp);

    }
}
运行结果:
2.2 关闭一个线程
- JDK的中有个stop方法,但是官方早已不推荐使用了,官方给出该方法在关闭线程时可能不会释放掉monitor锁。
2.2.1 线程结束生命周期正常结束
线程运行结束,完成了自己伟大的使命之后,就会正常退出。
2.2.2 捕获中断信号关闭线程
我们通过new Thread的方式创建线程,这种方式看似简单有效,实则它的派生成本是比较高的,因此在一个线程中会循环的执行某个任务,比如心跳检查,不断的接收网络消息报文,系统决定退出的时候,可以借助中断线程的方式使其退出。
示例:捕获中断信号关闭线程
public class InterruptThreadExit {

	public static void main(String args[]) throws InterruptedException{
		Thread t = new Thread(){
			@Override
			public void run(){
				System.out.println("I will start to work");
				while(!isInterrupted()){
					// woring
				}
				System.out.println("I will be exiting");
			}
		};
		t.start();
		TimeUnit.SECONDS.sleep(5);
		System.out.println("System will be shutdown.");
		t.interrupt();
	}
}
2.2.3 使用volatile开关控制(boolean)
由于线程的中断标识很有可能被擦除,或者逻辑单元中不会调用任何可中断的方法。除此之外,使用volatile修饰的开关flag关闭线程也是一种常见的方式。
示例:使用volatile开关控制(boolean)
public class FlagThreadExit {
	//定义静态内部类继承Thread
	static class MyTask extends Thread{
		private volatile boolean on = true;  //使用volatile关键字保证开关的可见性
		@Override
		public void run(){
			System.out.println("I will start to work.");
			while(on && ! Thread.currentThread().isInterrupted()){
				// 正在运行
			}
			System.out.println("I will be exiting.");
		}
		public void close(){
			this.on = false;
//			this.interrupt();   关闭也可以啊,汪老师可能为了保险起见
		}
	}
	public static void main(String args[]) throws InterruptedException{
		MyTask mt = new MyTask();
		mt.start();
		TimeUnit.SECONDS.sleep(5);
		System.out.println("System will be shutdown.");
		mt.close();
	}
}
2.2.4 暴力关闭线程(Thread API综合应用)
编写ThreadService实现暴力关闭线程
定义ThreadService类
package com.thread.basicmethod.chapter03;

/*****************************
 * @Author: kangna
 * @Date: 2019/8/21 14:21
 * @Version:
 * @Desc: 线程服务类
 ******************************/
public class ThreadService {

    // 执行任务的线程
    private Thread executeThread;

    // 定义boolean 值 判断一下
    private boolean finished = false;
    /**
     * 执行异步任务,在执行线程中创建守护线程
     * @param task
     */
    public void execute(Runnable task) {

        // 调用的时候 创建线程
        executeThread = new Thread() {
            @Override
            public void run() {
                // 创建守护线程, 在执行线程中创建守护线程
                Thread runner = new Thread(task);
                runner.setDaemon(true); // 将带有task任务的 runner线程设为守护线程

                runner.start(); // 可能守护线程没有执行,在run()中就已经结束
                try {
                    runner.join(); // 直到执行死为止,就是我不能这么早早的就挂了
                    finished = true;
                } catch (InterruptedException e) {
                    e.printStackTrace();
                }
            }
        };
        executeThread.start();
    }

    /**
     * 等待的毫秒数
     * @param mills 允许任务执行时长
     */
    public void shutdown(long mills) {
        long currentTime = System.currentTimeMillis();

         // 判断给你30秒执行,你可能 3秒  也可能 3个小时
        while (!finished) {
            if (System.currentTimeMillis() - currentTime >= mills) {
                System.out.println("任务执行超时,需要结束");
                executeThread.interrupt();  // 执行线程中断,守护线程作为子线程也将结束
                break;
            }
            try {
                executeThread.sleep(1);
            } catch (InterruptedException e) {
                System.out.println("执行线程被打断");
                break;
            }
        }
    }
}
测试类
package com.thread.basicmethod.chapter03;

/********************************
 * @Author: kangna
 * @Date: 2019/8/21 15:04
 * @Version:
 * @Desc: 线程暴力关闭测试类
 ********************************/
public class ThreadCloseForce {
    public static void main(String[] args) {
        ThreadService threadService = new ThreadService();
        long startTime = System.currentTimeMillis();
        threadService.execute( () -> {
//            // 加载一个大文件
//            while (true) {
//
//            }
            /*
             加载一个小文件,早早地结束了, 由于设置有boolean值,也会结束
             不会傻傻的等待10秒
              */

            try {
                Thread.sleep(5_000L);
            } catch (InterruptedException e) {
                e.printStackTrace();
            }

        });
        threadService.shutdown(10_000L);
        long endTime = System.currentTimeMillis();
        System.out.println(endTime - startTime);
    }
}
3 总结
- 线程join方法功能强大且重要;
- 优雅关闭线程的两种常用操作中断和定义boolean变量。
- 最后我们使用Thread API的多个方法自定义一个暴力关闭线程的类

