Spring Boot 的核心配置文件用于配置Spring Boot 程序,名字必须以 application 开始
1. 核心配置格式
(1).properties文件(默认采用该文件)
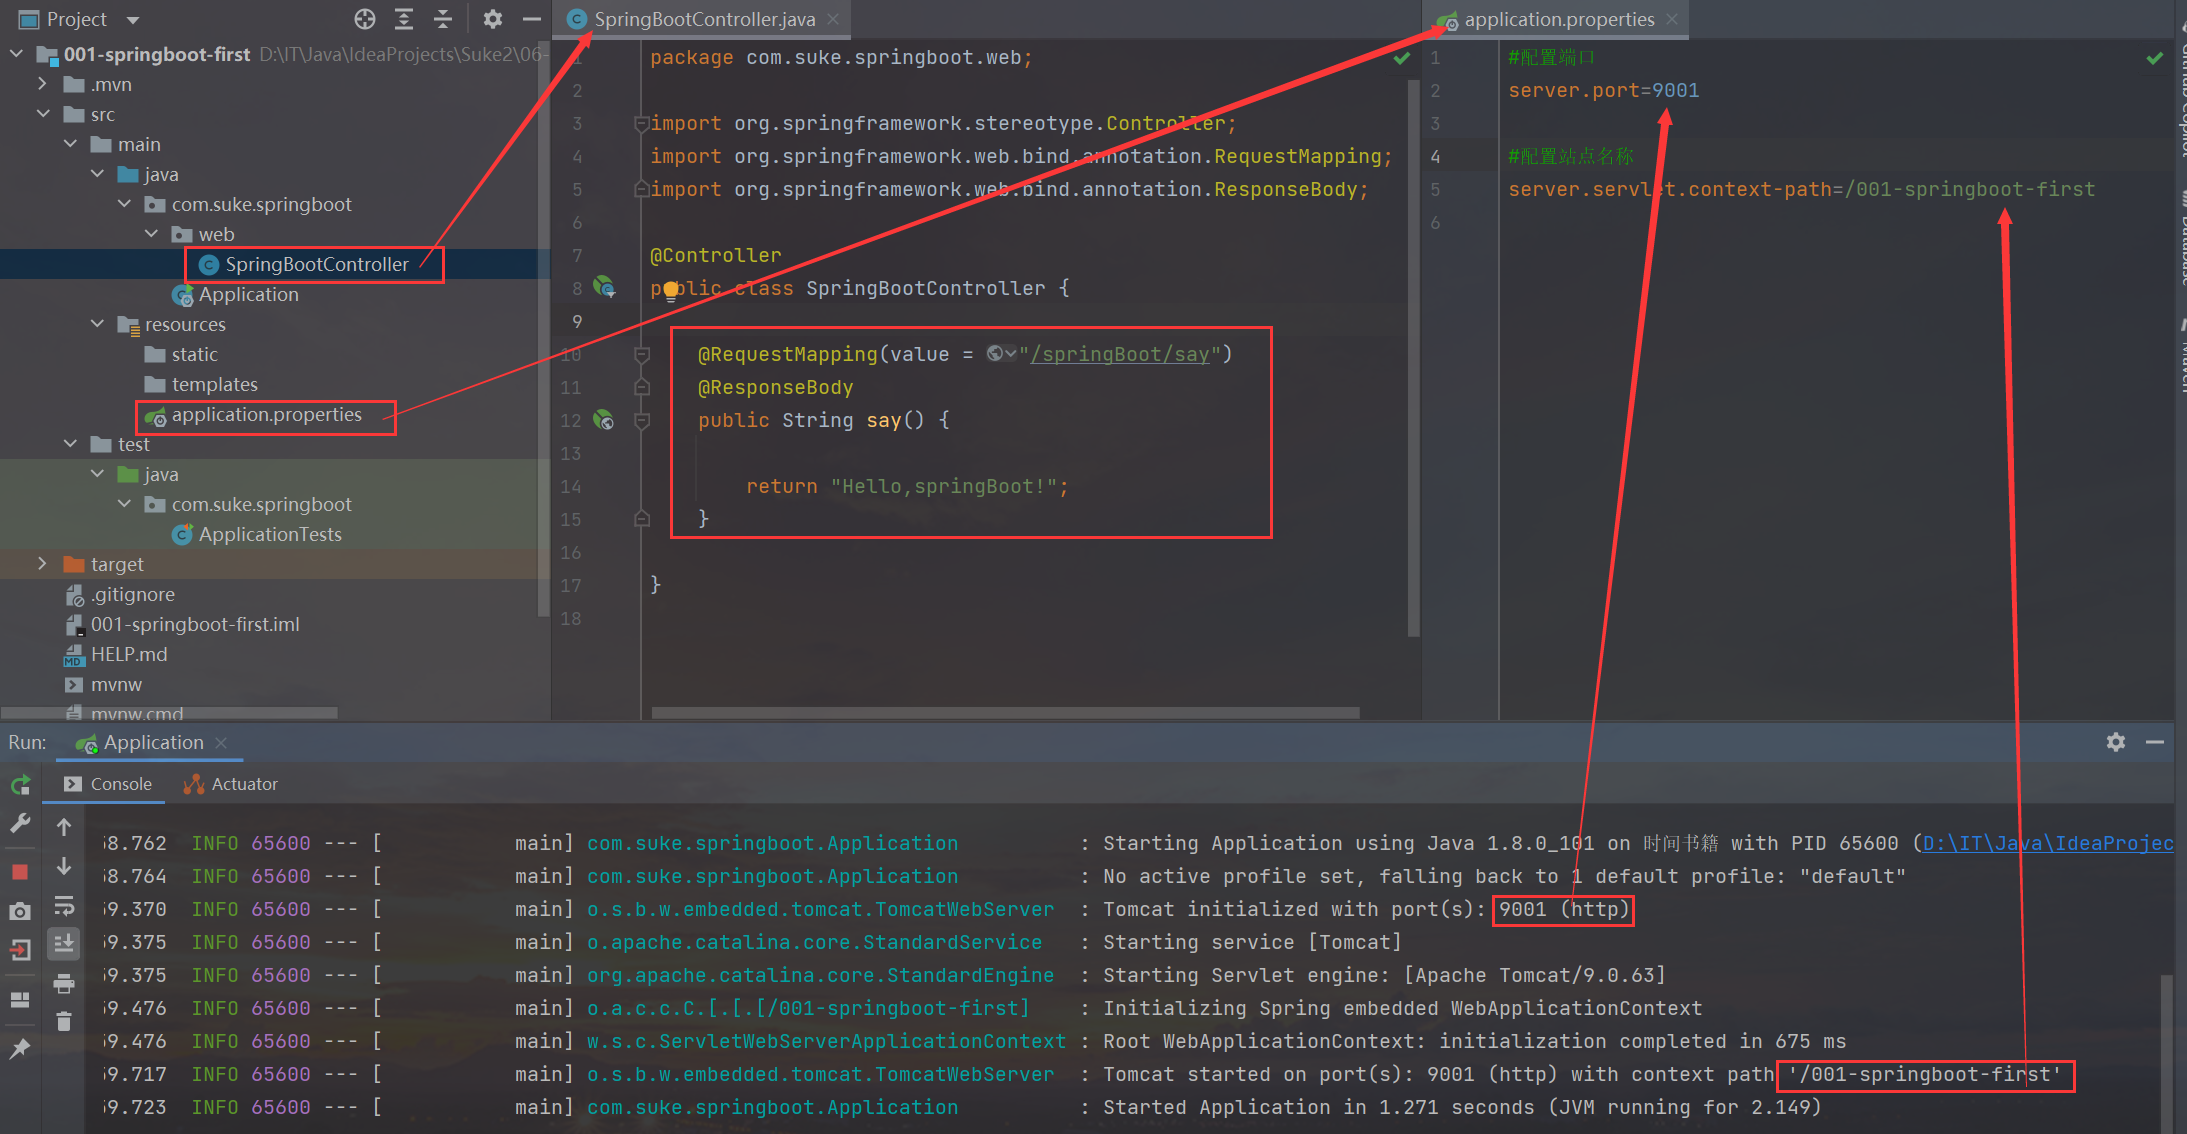
通过修改application.properties配置文件,在修改默认tomcat端口号及项目上下文件根(站点)

SpringBootController
import org.springframework.stereotype.Controller;
import org.springframework.web.bind.annotation.RequestMapping;
import org.springframework.web.bind.annotation.ResponseBody;

@Controller
public class SpringBootController {
    @RequestMapping(value = "/springBoot/say")
    @ResponseBody
    public String say() {
        return "Hello,springBoot!";
    }
}
application.properties
键值对的properties属性文件配置方式
#配置端口
server.port=9001

#配置站点名称
server.servlet.context-path=/001-springboot-first
启动测试 --》页面显示结果 localhost:9001/001-springboot-first/springBoot/say

(2).yml文件
yml文件和properties文件没有任何区别,只是不同配置方式而已。
yml 是一种 yaml 格式的配置文件,主要采用一定的空格、换行等格式排版进行配置。
yaml 是一种直观的能够被计算机识别的的数据序列化格式,容易被人类阅读,yaml 类似于 xml,但是语法比xml 简洁很多,值与前面的冒号配置项必须要有一个空格, yml 后缀也可以使用 yaml 后缀
SpringBootController
import org.springframework.stereotype.Controller;
import org.springframework.web.bind.annotation.RequestMapping;
import org.springframework.web.bind.annotation.ResponseBody;

@Controller
public class SpringBootController {
    @RequestMapping(value = "/springBoot/say")
    @ResponseBody
    public String say() {
        return "Hello,springBoot!";
    }
}
application.yml
server:
  port: 8001
  servlet:
    context-path: /001-springboot-first
注意:当两种格式配置文件同时存在,使用的是.properties配置文件,为了演示yml,可以先将其改名,重新运行Application,查看启动的端口及上下文根
启动测试 --》页面显示结果 localhost:8001/001-springboot-first/springBoot/say

2. 多环境配置
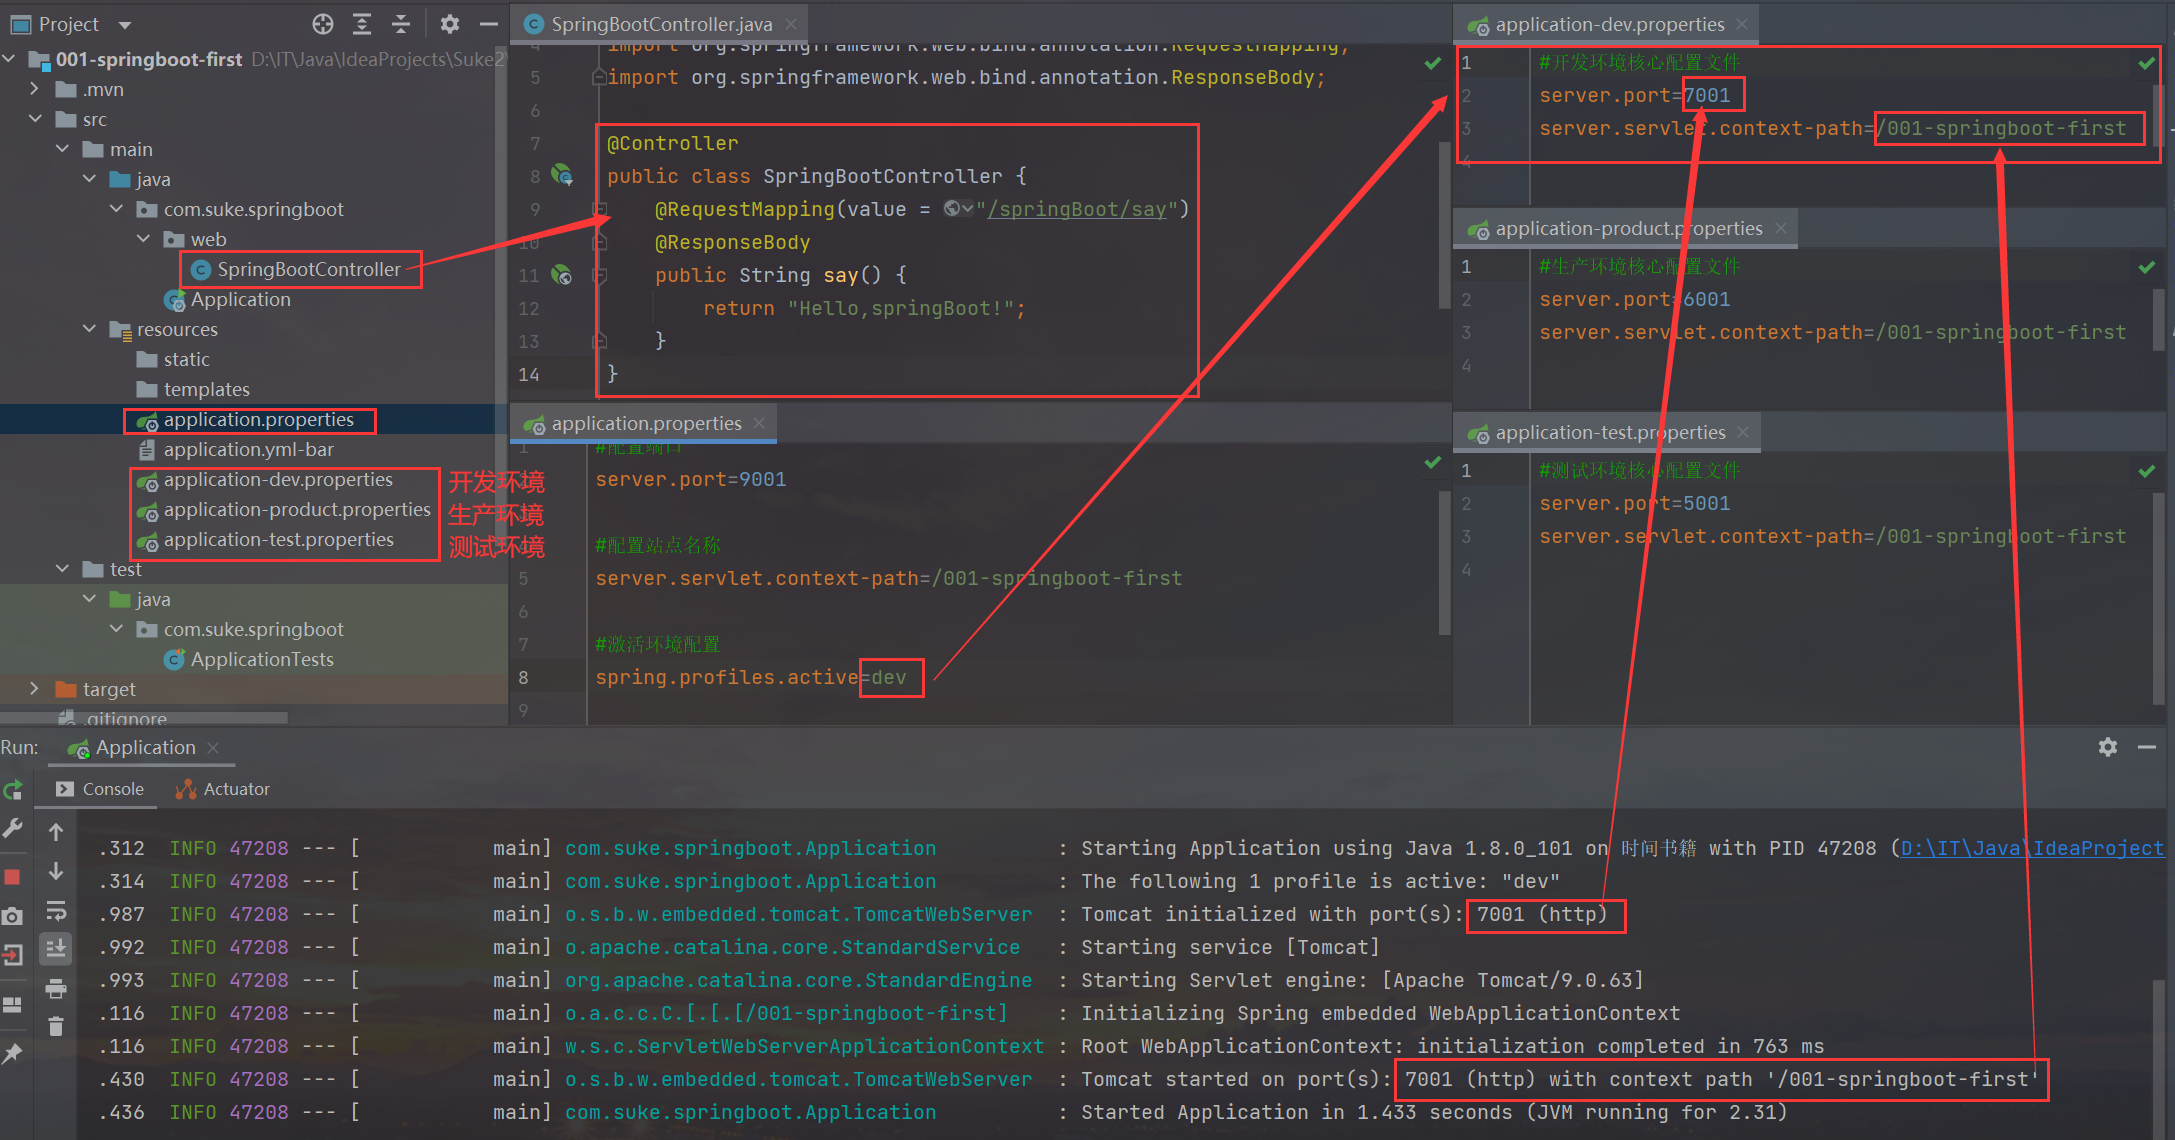
在实际开发的过程中,我们的项目会经历很多的阶段(开发 --> 测试 --> 上线),每个阶段的配置也会不同,例如:端口、上下文根、数据库等,那么这个时候为了方便在不同的环境之间切换,SpringBoot提供了多环境配置,具体步骤如下

SpringBootController
import org.springframework.stereotype.Controller;
import org.springframework.web.bind.annotation.RequestMapping;
import org.springframework.web.bind.annotation.ResponseBody;

@Controller
public class SpringBootController {
    @RequestMapping(value = "/springBoot/say")
    @ResponseBody
    public String say() {
        return "Hello,springBoot!";
    }
}
application.properties
等号右边的值和配置文件的环境标识名一致,可以更改总配置文件的配置,重新运行Application,查看启动的端口及上下文根目录
#激活环境配置
spring.profiles.active=dev
application-dev.properties
#开发环境核心配置文件
server.port=7001
server.servlet.context-path=/001-springboot-first
application-product.properties
#生产环境核心配置文件
server.port=6001
server.servlet.context-path=/001-springboot-first
application-test.properties
#测试环境核心配置文件
server.port=5001
server.servlet.context-path=/001-springboot-first
启动测试 --》页面显示结果 localhost:7001/001-springboot-first/springBoot/say

3. Spring Boot自定义配置
在SpringBoot的核心配置文件中,除了使用内置的配置项之外,我们还可以在自定义配置,然后采用如下注解去读取配置的属性值
(1)@Value注解
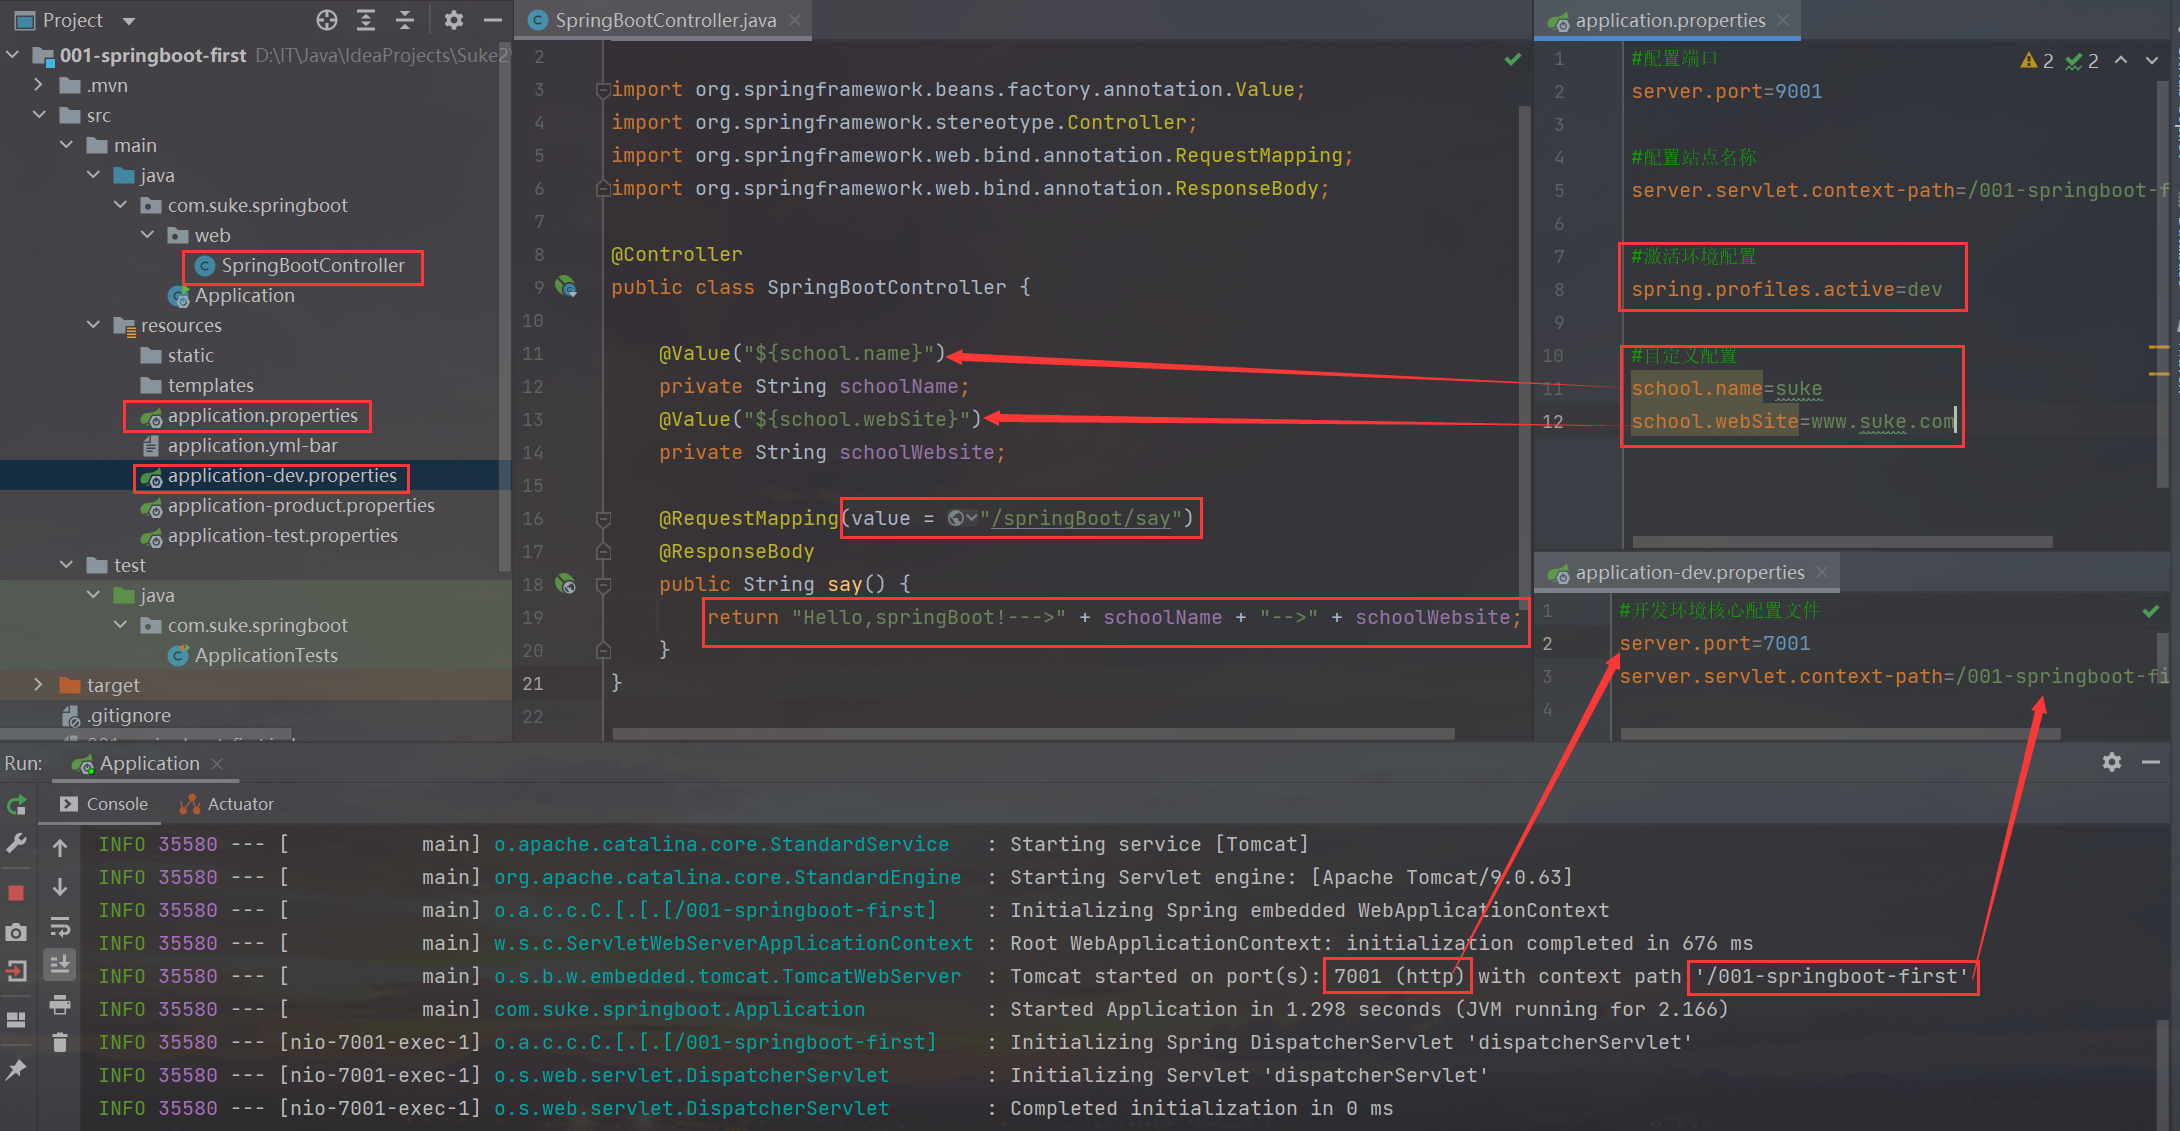
在核心配置文件applicatin.properties中,添加两个自定义配置项school.name和school.webSite。在IDEA中可以看到这两个属性不能被SpringBoot识别,背景是桔色的
在SpringBootController中定义属性,并使用@Value注解或者自定义配置值,并对其方法进行测试

SpringBootController
@Controller
public class SpringBootController {

    @Value("${school.name}")
    private String schoolName;

    @Value("${school.webSite}")
    private String schoolWebsite;

    @RequestMapping(value = "/springBoot/say")
    @ResponseBody
    public String say() {
        return "Hello,springBoot!--->" + schoolName + "-->" + schoolWebsite;
    }
}
application.properties
等号右边的值和配置文件的环境标识名一致,可以更改总配置文件的配置,重新运行Application,查看启动的端口及上下文根目录
#激活环境配置
spring.profiles.active=dev
application-dev.properties
#开发环境核心配置文件
server.port=7001
server.servlet.context-path=/001-springboot-first
启动测试 --》页面显示结果 localhost:7001/001-springboot-first/springBoot/say

(2)@ConfigurationProperties

ConfigInfo
import org.springframework.boot.context.properties.ConfigurationProperties;
import org.springframework.stereotype.Component;

@ConfigurationProperties(prefix = "school")
@Component
public class ConfigInfo {
    private String name;
    private String website;

    public ConfigInfo() {
    }

    public String getName() {
        return name;
    }

    public void setName(String name) {
        this.name = name;
    }

    public String getWebsite() {
        return website;
    }

    public void setWebsite(String website) {
        this.website = website;
    }

    @Override
    public String toString() {
        return "ConfigInfo{" +
                "name='" + name + '\'' +
                ", website='" + website + '\'' +
                '}';
    }
}
SpringBootController
@Controller
public class SpringBootController {

    @Autowired
    ConfigInfo configInfo;

    @Value("${school.name}")
    private String schoolName;

    @Value("${school.webSite}")
    private String schoolWebsite;

    @RequestMapping(value = "/springBoot/say")
    @ResponseBody
    public String say() {
        return "Hello,springBoot!--->" + schoolName + "-->" + schoolWebsite + "-->" + configInfo;
    }
}
application.properties
等号右边的值和配置文件的环境标识名一致,可以更改总配置文件的配置,重新运行Application,查看启动的端口及上下文根目录
#激活环境配置
spring.profiles.active=dev
application-dev.properties
#开发环境核心配置文件
server.port=7001
server.servlet.context-path=/001-springboot-first
启动测试 --》页面显示结果 localhost:7001/001-springboot-first/springBoot/say

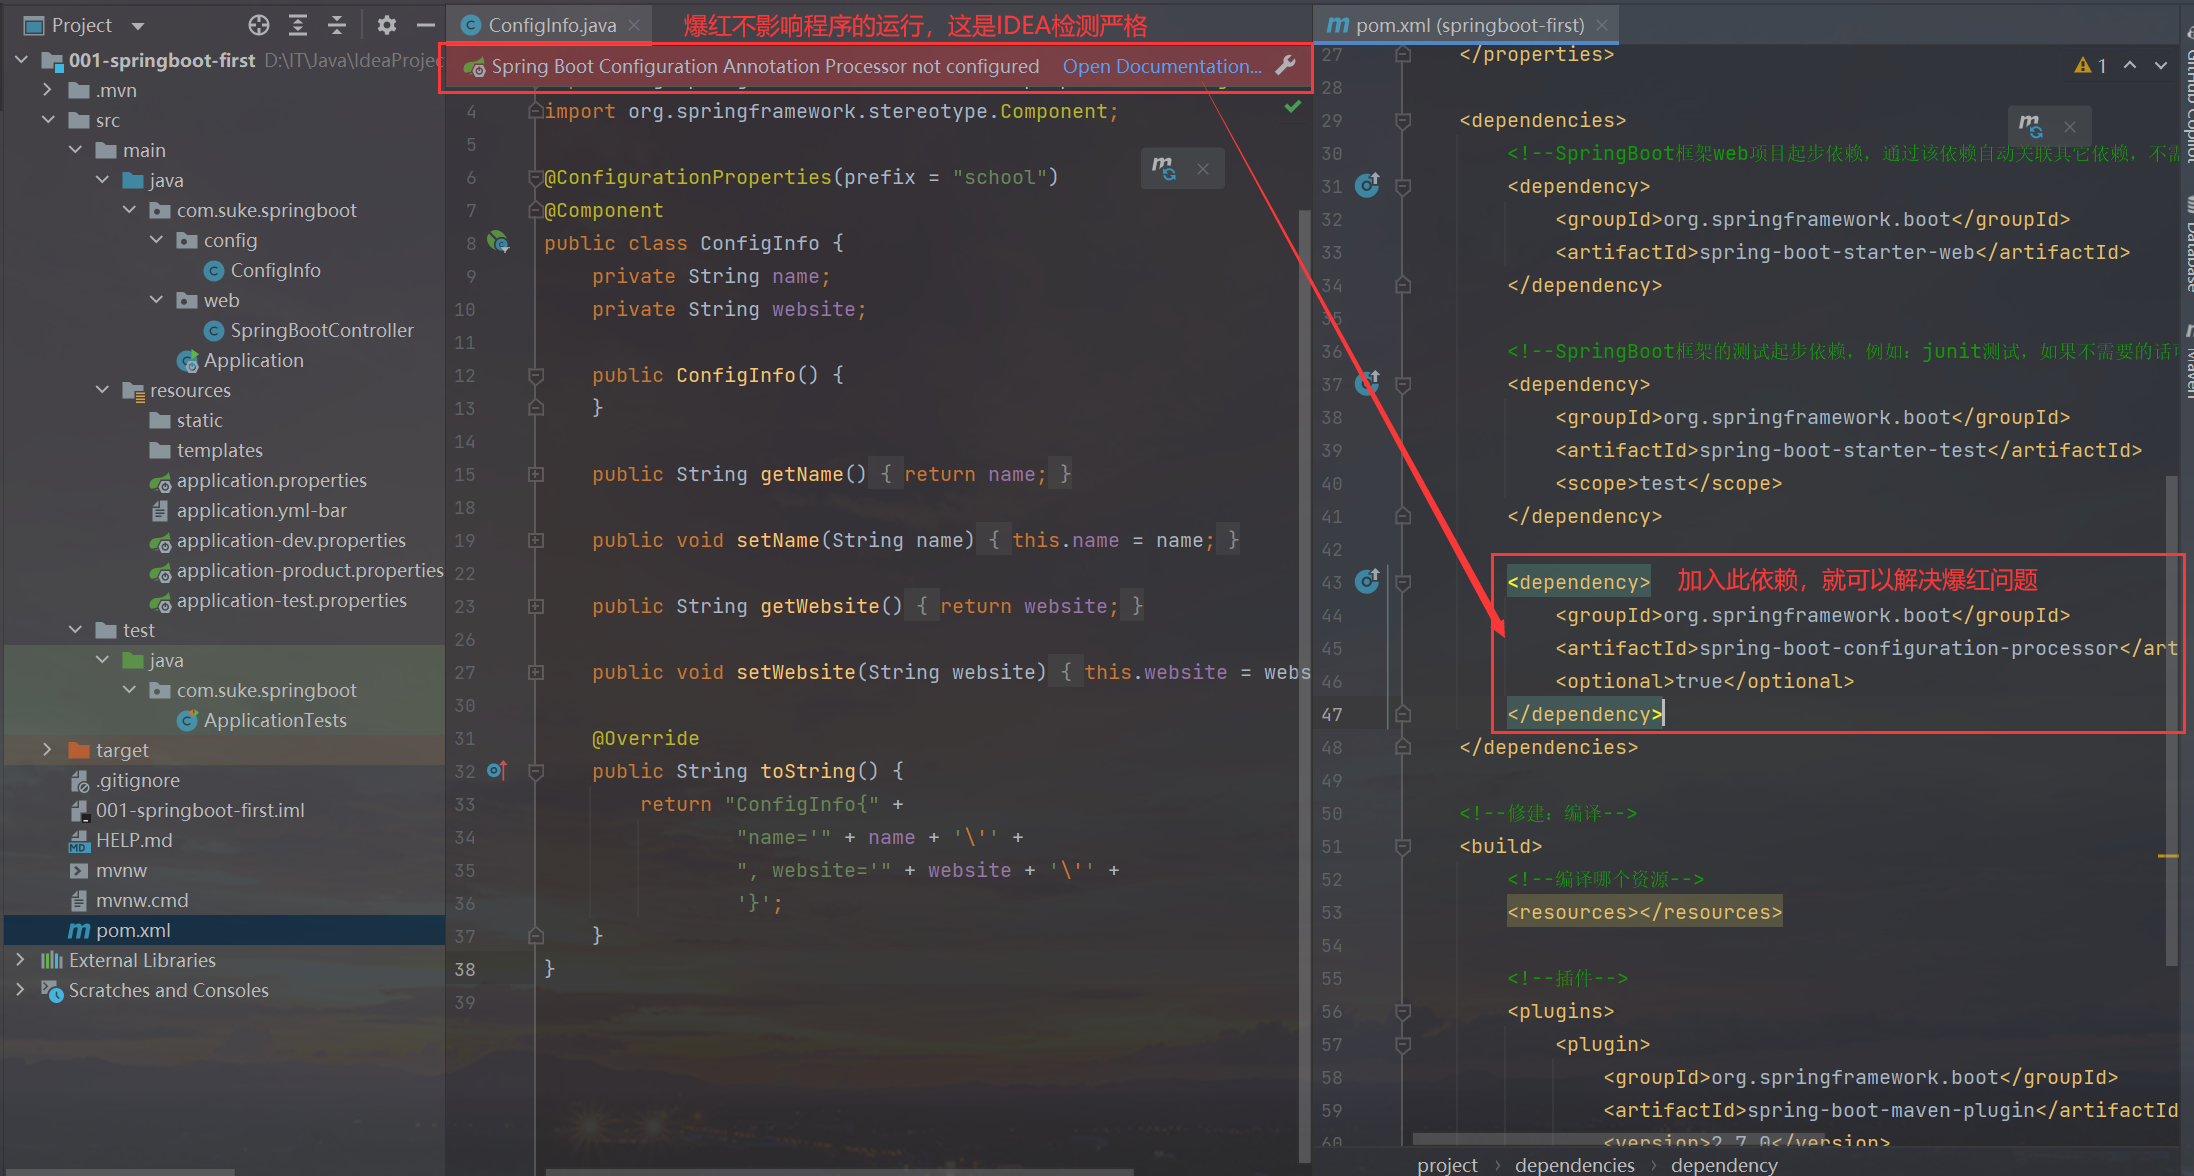
ConfigInfo 爆红问题 解决
<dependency>
    <groupId>org.springframework.boot</groupId>
    <artifactId>spring-boot-configuration-processor</artifactId>
    <optional>true</optional>
</dependency>


