前言:
openwrt是一个软路由软件,具体可以干什么也不用我多说了,大家百度即可知道。那么,想要学习和研究openwrt无疑是使用虚拟技术最方便啦,因此,本文就kvm下运行openwrt系统做一个简单的示例。
正文:
一,kvm环境的搭建
kvm的安装还是比较简单的,按照以上博客可以迅速的搭建好一个kvm环境。
二,
openwrt的镜像文件下载
文件下载完毕后,上传到linux服务器的/opt目录下,备用。
三,
假设前面的步骤都做好了,kvm环境是正常的,那么,现在就可以安装了,安装命令为;
virt-install --name openwrt --ram 1024 --vcpus 2 --disk path=/opt/openwrt-19.07.4-x86-64-combined-ext4.img --network bridge=br0,model=e1000 --force --import --autostart --vnc --vncport=5911 --vnclisten=0.0.0.0这里的model type='e1000'表示虚拟千兆网卡。vnc开启的端口是5911,当然,你也可以随意定义。
也可以直接使用xml配置文件启动,配置文件内容如下:
<!--
WARNING: THIS IS AN AUTO-GENERATED FILE. CHANGES TO IT ARE LIKELY TO BE
OVERWRITTEN AND LOST. Changes to this xml configuration should be made using:
  virsh edit test01
or other application using the libvirt API.
-->

<domain type='kvm'>
  <name>test01</name>
  <uuid>721437b5-7f76-4eed-8168-4d6ce2490dd1</uuid>
  <memory unit='KiB'>1048576</memory>
  <currentMemory unit='KiB'>1048576</currentMemory>
  <vcpu placement='static'>2</vcpu>
  <os>
    <type arch='x86_64' machine='pc-i440fx-rhel7.0.0'>hvm</type>
    <boot dev='hd'/>
  </os>
  <features>
    <acpi/>
    <apic/>
  </features>
  <cpu mode='custom' match='exact' check='partial'>
    <model fallback='allow'>SandyBridge</model>
  </cpu>
  <clock offset='utc'>
    <timer name='rtc' tickpolicy='catchup'/>
    <timer name='pit' tickpolicy='delay'/>
    <timer name='hpet' present='no'/>
  </clock>
  <on_poweroff>destroy</on_poweroff>
  <on_reboot>restart</on_reboot>
  <on_crash>destroy</on_crash>
  <pm>
    <suspend-to-mem enabled='no'/>
    <suspend-to-disk enabled='no'/>
  </pm>
  <devices>
    <emulator>/usr/libexec/qemu-kvm</emulator>
    <disk type='file' device='disk'>
      <driver name='qemu' type='raw'/>
      <source file='/opt/openwrt-19.07.4-x86-64-combined-ext4.img'/>
      <target dev='hda' bus='ide'/>
      <address type='drive' controller='0' bus='0' target='0' unit='0'/>
    </disk>
    <controller type='usb' index='0' model='ich9-ehci1'>
      <address type='pci' domain='0x0000' bus='0x00' slot='0x04' function='0x7'/>
    </controller>
    <controller type='usb' index='0' model='ich9-uhci1'>
      <master startport='0'/>
      <address type='pci' domain='0x0000' bus='0x00' slot='0x04' function='0x0' multifunction='on'/>
    </controller>
    <controller type='usb' index='0' model='ich9-uhci2'>
      <master startport='2'/>
      <address type='pci' domain='0x0000' bus='0x00' slot='0x04' function='0x1'/>
    </controller>
    <controller type='usb' index='0' model='ich9-uhci3'>
      <master startport='4'/>
      <address type='pci' domain='0x0000' bus='0x00' slot='0x04' function='0x2'/>
    </controller>
    <controller type='pci' index='0' model='pci-root'/>
    <controller type='ide' index='0'>
      <address type='pci' domain='0x0000' bus='0x00' slot='0x01' function='0x1'/>
    </controller>
    <interface type='bridge'>
      <mac address='52:54:00:f6:db:1e'/>
      <source bridge='br0'/>
      <model type='e1000'/>
      <address type='pci' domain='0x0000' bus='0x00' slot='0x03' function='0x0'/>
    </interface>
    <serial type='pty'>
      <target type='isa-serial' port='0'>
        <model name='isa-serial'/>
      </target>
    </serial>
    <console type='pty'>
      <target type='serial' port='0'/>
    </console>
    <input type='mouse' bus='ps2'/>
    <input type='keyboard' bus='ps2'/>
    <graphics type='vnc' port='5911' autoport='no' listen='0.0.0.0'>
      <listen type='address' address='0.0.0.0'/>
    </graphics>
    <video>
      <model type='cirrus' vram='16384' heads='1' primary='yes'/>
      <address type='pci' domain='0x0000' bus='0x00' slot='0x02' function='0x0'/>
    </video>
    <memballoon model='virtio'>
      <address type='pci' domain='0x0000' bus='0x00' slot='0x05' function='0x0'/>
    </memballoon>
  </devices>
</domain>
四,
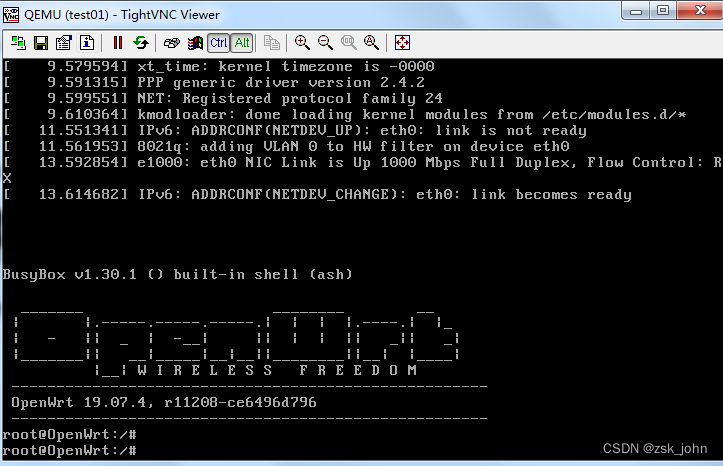
vnc连接openwrt

五,
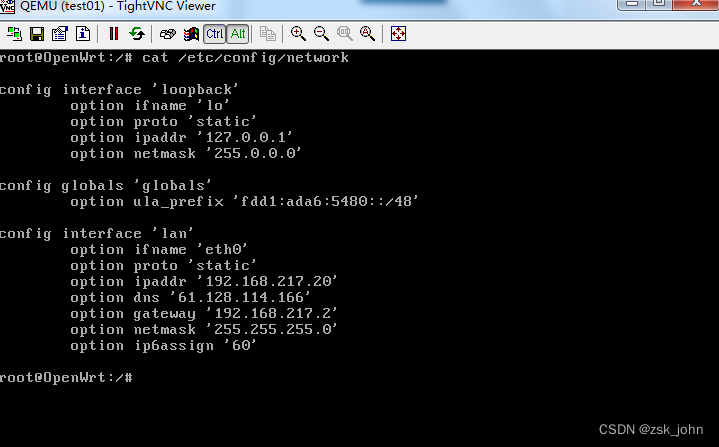
openwrt的网络设置:

添加了dns和gateway,IP地址是和宿主机同一个网段的一个IP,192.168.217.20。
六,
openwrt安装vpn插件:
opkg update
opkg install openvpn-openssl luci-app-openvpn
安装完毕后,在web界面就可以看到openvpn了:


