searchusermenu
  • 发布文章
  • 消息中心
点赞
收藏
评论
分享
原创

使用libvirt命令行工具操作vcpu和内存

2024-10-30 09:19:15
42
0

一、虚拟机CPU操作

(一) 宿主机和虚拟机运行时间状态

$ virsh cpu-stats testwy

(二) vcpu的数量/详细信息

$ virsh vcpucount testwy
$ virsh vcpuinfo testwy

(三) vCPU亲和性绑定

1. 查看vCPU和CPU的对应关系

$ virsh vcpuinfo testwy
v
VCPU:           0
CPU:            2
State:          running
CPU time:       3.5s
CPU Affinity:   yyyy
 
VCPU:           1
CPU:            3
State:          running
CPU time:       1.0s
CPU Affinity:   yyyy

可以发现, vcpu0 绑定到物理 cpu2 上, vcpu1 绑定到物理 cpu3 上。

使用 emulatorpin 命令可以查看虚拟机可以使用哪些物理逻辑 cpu

[root@87 ~]# virsh emulatorpin testwy
emulator: CPU Affinity
----------------------------------
       *: 0-3

宿主机本身有4个 cpu。 意味着 cirros 虚拟机可以随意在这4个cpu上切换

2. 在线绑定虚拟机CPU

2.1 绑定虚拟机的CPU范围

$ virsh emulatorpin testwy 0-7     //===>这样可以绑定虚拟机在0-7cpu区间内切换
$ virsh emulatorpin testwy

2.2 虚拟机CPU一对一绑定

$ virsh emulatorpin testwy  // 查看
$ virsh vcpupin testwy 3 7  //将vcpu3绑定到cpu7
$ virsh vcpuinfo testwy  // 查看绑定关系

绑定前:

绑定后:

  1. cpu 绑定技术原理:cpu绑定实际上是 Libvirt 通过 cgroup 来实现的,通过cgroup直接去绑定KVM 虚拟机进程。cgroup 不仅可以做 cpu 绑定,还可以限制虚拟机磁盘、网络资源控制。
  2. cpu 绑定技术适用的应用场景:
  • 系统的 CPU 压力较大
  • 多核 cpu 压力不平衡,可以通过 cpu vcpupin 技术人工进行调配

(四) 动态调配vCPU个数(只能增大不能减少)

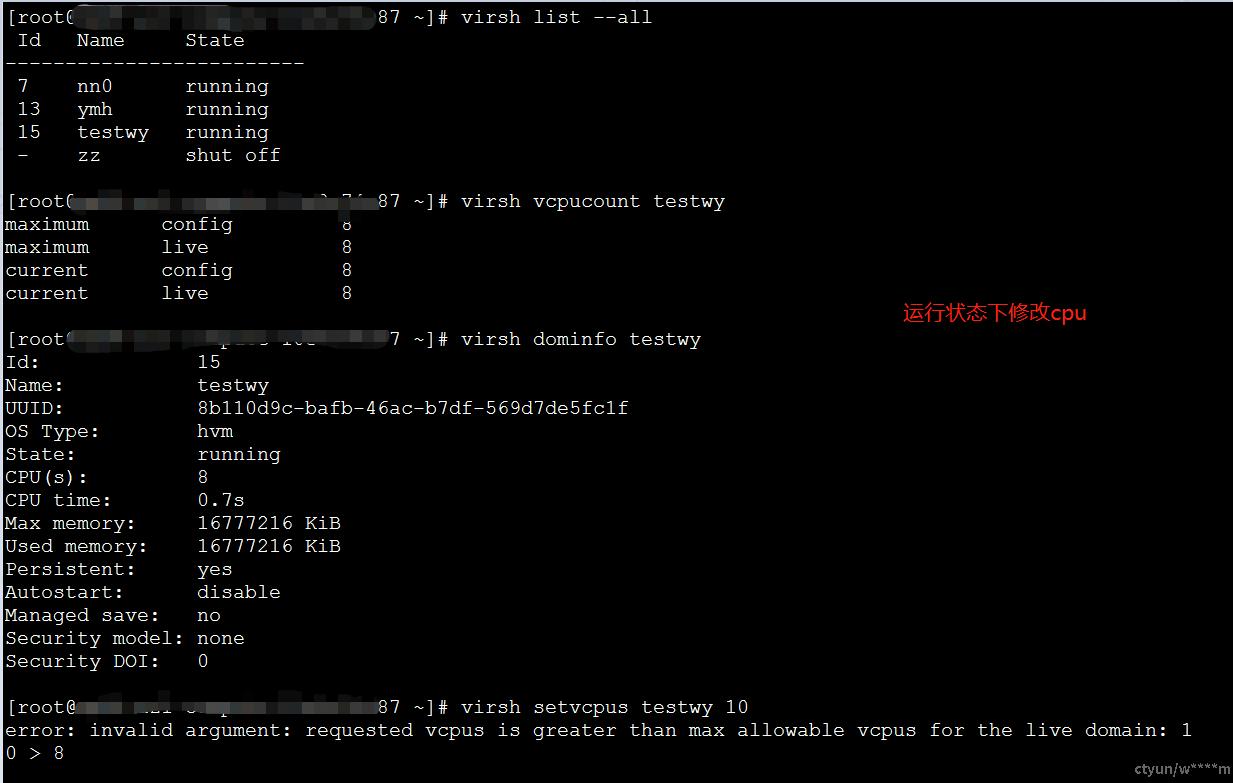
在VM中热添加vCPU,会受到最大数量的限制,因此在修改之前可以先看一下配置文件

<vcpu placement='static'>8</vcpu>
<cpu mode='custom' match='exact' check='full'>
    <topology sockets='8' dies='1' cores='1' threads='1'/>
		<numa>
      <cell id='0' cpus='0-7' memory='16777216' unit='KiB' memAccess='shared'/>
    </numa>
</cpu>


###以上配置显示了CPU和CVPU的对应关系
[root@87 ~]# virsh vcpucount testwy
maximum      config        8        //指定下次重新启动后可用于虚拟服务器的虚拟CPU的最大数量
maximum      live          8				//指定可用于正在运行或暂停的虚拟服务器的最大虚拟CPU数
current      config        8				//指定下次重新启动时可用于虚拟服务器的虚拟CPU的实际数量
current      live          8 				//指定可用于运行或暂停的虚拟服务器的虚拟CPU的实际数量。
//这里当前运行的CPU已经达到设置的最大值了,如果直接进行设置的话会报错
1. 运行状态下调整vcpu==>热添加

一、不大于maxcpu情况下的热添加

<vcpu placement='static'  current="2">8</vcpu>
//以上配置说明此虚拟机最多可以配置8个可用vCPU,current说明启动虚拟机时,只有2个vCPU可以使用。

[root@87 ~]# virsh vcpucount testwy
maximum      config         8
maximum      live           8
current      config         2
current      live           2

//再不大于最大值的情况下,可以通过命令来修改vCPU的数量
[root@87 ~]# virsh setvcpus testwy 4
[root@87 ~]# virsh vcpucount testwy
maximum      config         8
maximum      live           8
current      config         2
current      live           4

二、大于maxcpu情况下的热添加

//如果等于最大值了,再使用命令直接修改会报错,因此需要先修改虚拟机的配置文件XML
//运行状态下也可以进行修改
[root@87 ~]# virst edit testwy

<vcpu placement='static'>12</vcpu>
<cpu mode='custom' match='exact' check='full'>
    <topology sockets='6' dies='1' cores='1' threads='2'/>   # 这里可以是6核双线程
		<topology sockets='12' dies='1' cores='1' threads='1'/>  # 也可以是12核单线程
  	## 需要topology的所有参数乘积为maxcpu数
		<numa>
      <cell id='0' cpus='0-11' memory='16777216' unit='KiB' memAccess='shared'/>
    </numa>
</cpu>   # CPU的个数与Vcpu的个数需要匹配

[root@87 ~]# virsh vcpucount testwy
maximum      config        12
maximum      live          12
current      config         2
current      live           2
[root@87 ~]# virsh setvcpus testwy 4

[root@87 ~]# virsh vcpucount testwy
maximum      config        12
maximum      live          12
current      config         2
current      live           4

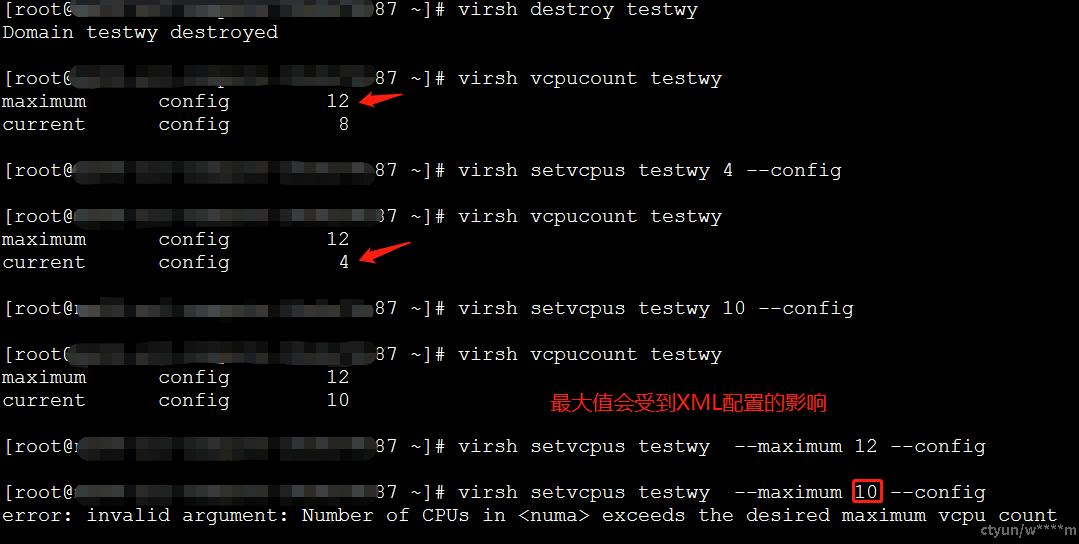
2. 关闭状态下调整vcpu

调整vCPU是调整正在运行的vCPU

$ virsh list --all          // 查看状态
$ virsh vcpucount testwy  	//查看vCPU数量配置
$ virsh setvcpus testwy --maximum 4 --config    //配置vCPU最大个数限制,重启后生效(这里会受到XML配置的限制)
$ virsh  setvcpus testwy --count 4 --config    //配置vcpu个数(配置在运行的vCPU数)

二、vCPU和CPU之间的关系

  1. 一个虚拟机可以分配多少个虚拟CPU,以及如何在服务器上限制虚拟机的数量?

一个物理CPU一般一个内核会支持多个处理线程(英特尔超线程技术)。这就意味着一个六核的Xeon处理器可以提供给服务器六个物理CPU。当超线程开启的时候,每个线程可以作为一个物理CPU,所以如果这个六个核都开启了双线程支持,那么服务器将看到12个物理CPU。 当安装了虚拟化层,每个物理CPU被抽象成每个虚拟CPU,通常情况下,会为每个内核划分可用的CPU资源,并允许多个虚拟机共享一个物理处理器内核。默认情况下,虚拟化层会给每个工作负载分配一个vCPU(一个核)。 一个经验之谈,一般一个虚拟CPU可以支持4到8个虚拟机。

  1. 为了提高缓存命中率,提高虚拟机性能,可以将vCPU绑定到指定的物理CPU去执行。

三、虚拟机内存操作

(一) 与内存相关的配置

##与内存相关的配置:
<memory unit='KiB'>16777216</memory>  # 启动时分配的最大内存
<currentMemory unit='KiB'>16777216</currentMemory> # 实际内存分配。该值可以小于最大分配
<cpu>
	 <numa>
      <cell id='0' cpus='0-7' memory='16777216' unit='KiB' memAccess='shared'/>
    </numa>
</cpu>

//<memory>元素或NUMA单元大小配置指定的初始内存可以通过将内存热插拔到该元素指定的限制来增加。
//请注意,由于通过内存热插拔添加的内存块的对齐,可能无法实现此元素指定的完整大小分配。

(二) 虚拟机内存限制

$ virsh memtune testwy   //1. 查看或设置内存参数

hard_limit: 4194304   (4G)    	//设置虚拟机可用物理内存最大值 (单位KB)
soft_limit: 2097152   (2G)   		//设置虚拟机软限制最大上限(单位KB)
swap_hard_limit:4194304	(4G)	//设置虚拟机 swap 分区硬上限(单位KB)

[root@87 ~]# virsh memtune testwy --hard-limit 5G --config --live
error: Unable to change memory parameters
error: invalid argument: memory hard_limit tunable value must be lower than or equal to swap_hard_limit
//需要先修改

[root@87 ~]# virsh memtune testwy --swap-hard-limit 5G --config --live

[root@87 ~]# virsh memtune testwy --hard-limit 5G --config --live

[root@87 ~]# virsh memtune testwy --soft-limit 4G --config --live

[root@87 ~]# virsh memtune testwy
hard_limit     : 5242880
soft_limit     : 4194304
swap_hard_limit: 5242880

--config  会修改VM的XML配置
--live    当前启动状态配置,在使用--live时,客户机没有启动,系统会报错

(三) 动态修改内存大小(可增大可减小)

1. 不超过maxMemory的情况下

修改<currentMemory的大小

一、关闭状态下修改内存大小

$ virsh list --all       // 查看状态
$ virsh dominfo testwy   // 查看目前的主机信息
$ virsh edit testwy      //直接编辑currentMemory中的数值

二、开机状态下修改内存大小

$ virsh setmem testwy 2G --config --live
$ virsh dominfo testwy 
$ virsh console testwy //进入终端查看Linux的使用情况

$ free -m 查看内存使用情况

2. 修改maxMemory

==与NUMA的设置有关

blog.csdn.net/weijitao/article/details/52884422

一、关机状态下调整maxMemory

<memory unit='KiB'>18874368</memory>  ==>(18G)
<currentMemory unit='KiB'>18874368</currentMemory>
<numa>
  <cell id='0' cpus='0-7' memory='18874368' unit='KiB' memAccess='shared'/>
</numa>
$ virsh edit testwy  //直接修改相关的3个参数即可
$ virsh dominfo testwy  //查看内存大小

$ virsh setmem testwy 14G --config //该命令可以更改<currentMemory>
[root@87 ~]# virsh setmaxmem testwy 16G --config 
error: Unable to change MaxMemorySize
error: Requested operation is not valid: initial memory size of a domain with NUMA nodes cannot be modified with this API

//使用命令行修改时,需要把maxMemory和numa内的值一起修改,但是仅通过命令行无法实现
//如果使用numa配置,修改最大值时,只能自己修改XML文件了。不过一般没有修改最大值的需求

四、NUMA相关

[root@localhost qemu]# virsh start newy
error: Failed to start domain newy
error: unsupported configuration: NUMA node 1 is unavailable


与numa相关的配置有:
<numatune>
  <memory mode='strict' nodeset='0'/>
  <memnode cellid='0' mode='preferred' nodeset='0'/>
</numatune>


0条评论
0 / 1000
w****m
2文章数
0粉丝数
w****m
2 文章 | 0 粉丝
w****m
2文章数
0粉丝数
w****m
2 文章 | 0 粉丝
原创

使用libvirt命令行工具操作vcpu和内存

2024-10-30 09:19:15
42
0

一、虚拟机CPU操作

(一) 宿主机和虚拟机运行时间状态

$ virsh cpu-stats testwy

(二) vcpu的数量/详细信息

$ virsh vcpucount testwy
$ virsh vcpuinfo testwy

(三) vCPU亲和性绑定

1. 查看vCPU和CPU的对应关系

$ virsh vcpuinfo testwy
v
VCPU:           0
CPU:            2
State:          running
CPU time:       3.5s
CPU Affinity:   yyyy
 
VCPU:           1
CPU:            3
State:          running
CPU time:       1.0s
CPU Affinity:   yyyy

可以发现, vcpu0 绑定到物理 cpu2 上, vcpu1 绑定到物理 cpu3 上。

使用 emulatorpin 命令可以查看虚拟机可以使用哪些物理逻辑 cpu

[root@87 ~]# virsh emulatorpin testwy
emulator: CPU Affinity
----------------------------------
       *: 0-3

宿主机本身有4个 cpu。 意味着 cirros 虚拟机可以随意在这4个cpu上切换

2. 在线绑定虚拟机CPU

2.1 绑定虚拟机的CPU范围

$ virsh emulatorpin testwy 0-7     //===>这样可以绑定虚拟机在0-7cpu区间内切换
$ virsh emulatorpin testwy

2.2 虚拟机CPU一对一绑定

$ virsh emulatorpin testwy  // 查看
$ virsh vcpupin testwy 3 7  //将vcpu3绑定到cpu7
$ virsh vcpuinfo testwy  // 查看绑定关系

绑定前:

绑定后:

  1. cpu 绑定技术原理:cpu绑定实际上是 Libvirt 通过 cgroup 来实现的,通过cgroup直接去绑定KVM 虚拟机进程。cgroup 不仅可以做 cpu 绑定,还可以限制虚拟机磁盘、网络资源控制。
  2. cpu 绑定技术适用的应用场景:
  • 系统的 CPU 压力较大
  • 多核 cpu 压力不平衡,可以通过 cpu vcpupin 技术人工进行调配

(四) 动态调配vCPU个数(只能增大不能减少)

在VM中热添加vCPU,会受到最大数量的限制,因此在修改之前可以先看一下配置文件

<vcpu placement='static'>8</vcpu>
<cpu mode='custom' match='exact' check='full'>
    <topology sockets='8' dies='1' cores='1' threads='1'/>
		<numa>
      <cell id='0' cpus='0-7' memory='16777216' unit='KiB' memAccess='shared'/>
    </numa>
</cpu>


###以上配置显示了CPU和CVPU的对应关系
[root@87 ~]# virsh vcpucount testwy
maximum      config        8        //指定下次重新启动后可用于虚拟服务器的虚拟CPU的最大数量
maximum      live          8				//指定可用于正在运行或暂停的虚拟服务器的最大虚拟CPU数
current      config        8				//指定下次重新启动时可用于虚拟服务器的虚拟CPU的实际数量
current      live          8 				//指定可用于运行或暂停的虚拟服务器的虚拟CPU的实际数量。
//这里当前运行的CPU已经达到设置的最大值了,如果直接进行设置的话会报错

1. 运行状态下调整vcpu==>热添加

一、不大于maxcpu情况下的热添加

<vcpu placement='static'  current="2">8</vcpu>
//以上配置说明此虚拟机最多可以配置8个可用vCPU,current说明启动虚拟机时,只有2个vCPU可以使用。

[root@87 ~]# virsh vcpucount testwy
maximum      config         8
maximum      live           8
current      config         2
current      live           2

//再不大于最大值的情况下,可以通过命令来修改vCPU的数量
[root@87 ~]# virsh setvcpus testwy 4
[root@87 ~]# virsh vcpucount testwy
maximum      config         8
maximum      live           8
current      config         2
current      live           4

二、大于maxcpu情况下的热添加

//如果等于最大值了,再使用命令直接修改会报错,因此需要先修改虚拟机的配置文件XML
//运行状态下也可以进行修改
[root@87 ~]# virst edit testwy

<vcpu placement='static'>12</vcpu>
<cpu mode='custom' match='exact' check='full'>
    <topology sockets='6' dies='1' cores='1' threads='2'/>   # 这里可以是6核双线程
		<topology sockets='12' dies='1' cores='1' threads='1'/>  # 也可以是12核单线程
  	## 需要topology的所有参数乘积为maxcpu数
		<numa>
      <cell id='0' cpus='0-11' memory='16777216' unit='KiB' memAccess='shared'/>
    </numa>
</cpu>   # CPU的个数与Vcpu的个数需要匹配

[root@87 ~]# virsh vcpucount testwy
maximum      config        12
maximum      live          12
current      config         2
current      live           2
[root@87 ~]# virsh setvcpus testwy 4

[root@87 ~]# virsh vcpucount testwy
maximum      config        12
maximum      live          12
current      config         2
current      live           4

2. 关闭状态下调整vcpu

调整vCPU是调整正在运行的vCPU

$ virsh list --all          // 查看状态
$ virsh vcpucount testwy  	//查看vCPU数量配置
$ virsh setvcpus testwy --maximum 4 --config    //配置vCPU最大个数限制,重启后生效(这里会受到XML配置的限制)
$ virsh  setvcpus testwy --count 4 --config    //配置vcpu个数(配置在运行的vCPU数)

二、vCPU和CPU之间的关系

  1. 一个虚拟机可以分配多少个虚拟CPU,以及如何在服务器上限制虚拟机的数量?

一个物理CPU一般一个内核会支持多个处理线程(英特尔超线程技术)。这就意味着一个六核的Xeon处理器可以提供给服务器六个物理CPU。当超线程开启的时候,每个线程可以作为一个物理CPU,所以如果这个六个核都开启了双线程支持,那么服务器将看到12个物理CPU。 当安装了虚拟化层,每个物理CPU被抽象成每个虚拟CPU,通常情况下,会为每个内核划分可用的CPU资源,并允许多个虚拟机共享一个物理处理器内核。默认情况下,虚拟化层会给每个工作负载分配一个vCPU(一个核)。 一个经验之谈,一般一个虚拟CPU可以支持4到8个虚拟机。

  1. 为了提高缓存命中率,提高虚拟机性能,可以将vCPU绑定到指定的物理CPU去执行。

三、虚拟机内存操作

(一) 与内存相关的配置

##与内存相关的配置:
<memory unit='KiB'>16777216</memory>  # 启动时分配的最大内存
<currentMemory unit='KiB'>16777216</currentMemory> # 实际内存分配。该值可以小于最大分配
<cpu>
	 <numa>
      <cell id='0' cpus='0-7' memory='16777216' unit='KiB' memAccess='shared'/>
    </numa>
</cpu>

//<memory>元素或NUMA单元大小配置指定的初始内存可以通过将内存热插拔到该元素指定的限制来增加。
//请注意,由于通过内存热插拔添加的内存块的对齐,可能无法实现此元素指定的完整大小分配。

(二) 虚拟机内存限制

$ virsh memtune testwy   //1. 查看或设置内存参数

hard_limit: 4194304   (4G)    	//设置虚拟机可用物理内存最大值 (单位KB)
soft_limit: 2097152   (2G)   		//设置虚拟机软限制最大上限(单位KB)
swap_hard_limit:4194304	(4G)	//设置虚拟机 swap 分区硬上限(单位KB)

[root@87 ~]# virsh memtune testwy --hard-limit 5G --config --live
error: Unable to change memory parameters
error: invalid argument: memory hard_limit tunable value must be lower than or equal to swap_hard_limit
//需要先修改

[root@87 ~]# virsh memtune testwy --swap-hard-limit 5G --config --live

[root@87 ~]# virsh memtune testwy --hard-limit 5G --config --live

[root@87 ~]# virsh memtune testwy --soft-limit 4G --config --live

[root@87 ~]# virsh memtune testwy
hard_limit     : 5242880
soft_limit     : 4194304
swap_hard_limit: 5242880

--config  会修改VM的XML配置
--live    当前启动状态配置,在使用--live时,客户机没有启动,系统会报错

(三) 动态修改内存大小(可增大可减小)

1. 不超过maxMemory的情况下

修改<currentMemory的大小

一、关闭状态下修改内存大小

$ virsh list --all       // 查看状态
$ virsh dominfo testwy   // 查看目前的主机信息
$ virsh edit testwy      //直接编辑currentMemory中的数值

二、开机状态下修改内存大小

$ virsh setmem testwy 2G --config --live
$ virsh dominfo testwy 
$ virsh console testwy //进入终端查看Linux的使用情况

$ free -m 查看内存使用情况

2. 修改maxMemory

==与NUMA的设置有关

blog.csdn.net/weijitao/article/details/52884422

一、关机状态下调整maxMemory

<memory unit='KiB'>18874368</memory>  ==>(18G)
<currentMemory unit='KiB'>18874368</currentMemory>
<numa>
  <cell id='0' cpus='0-7' memory='18874368' unit='KiB' memAccess='shared'/>
</numa>
$ virsh edit testwy  //直接修改相关的3个参数即可
$ virsh dominfo testwy  //查看内存大小

$ virsh setmem testwy 14G --config //该命令可以更改<currentMemory>
[root@87 ~]# virsh setmaxmem testwy 16G --config 
error: Unable to change MaxMemorySize
error: Requested operation is not valid: initial memory size of a domain with NUMA nodes cannot be modified with this API

//使用命令行修改时,需要把maxMemory和numa内的值一起修改,但是仅通过命令行无法实现
//如果使用numa配置,修改最大值时,只能自己修改XML文件了。不过一般没有修改最大值的需求

四、NUMA相关

[root@localhost qemu]# virsh start newy
error: Failed to start domain newy
error: unsupported configuration: NUMA node 1 is unavailable


与numa相关的配置有:
<numatune>
  <memory mode='strict' nodeset='0'/>
  <memnode cellid='0' mode='preferred' nodeset='0'/>
</numatune>


文章来自个人专栏
my虚拟化
2 文章 | 1 订阅
0条评论
0 / 1000
请输入你的评论
0
0