1. 初识MyBatisPlus
1.1 M'y'B'a'tis简介
MyBatis-Plus(简称 MP)是一个 MyBatis的增强工具,在 MyBatis 的基础上只做增强不做改变,为简化开发、提高效率而生。
1.2 MP特性
无侵入:只做增强不做改变,引入它不会对现有工程产生影响,如丝般顺滑
损耗小:启动即会自动注入基本 CURD,性能基本无损耗,直接面向对象操作
强大的 CRUD 操作:内置通用 Mapper、通用 Service,仅仅通过少量配置即可实现单表大部分 CRUD 操作,更有强大的条件构造器,满足各类使用需求
支持 Lambda 形式调用:通过 Lambda 表达式,方便的编写各类查询条件,无需再担心字段写错
支持主键自动生成:支持多达 4 种主键策略(内含分布式唯一 ID 生成器 - Sequence),可自由配置,完美解决主键问题
支持 ActiveRecord 模式:支持 ActiveRecord 形式调用,实体类只需继承 Model 类即可进行强大的 CRUD 操作
支持自定义全局通用操作:支持全局通用方法注入( Write once, use anywhere )
内置代码生成器:采用代码或者 Maven 插件可快速生成 Mapper 、 Model 、 Service 、 Controller 层代码,支持模板引擎,更有超多自定义配置等您来使用
内置分页插件:基于 MyBatis 物理分页,开发者无需关心具体操作,配置好插件之后,写分页等同于普通 List 查询
分页插件支持多种数据库:支持 MySQL、MariaDB、Oracle、DB2、H2、HSQL、SQLite、Postgre、SQLServer 等多种数据库
内置性能分析插件:可输出 SQL 语句以及其执行时间,建议开发测试时启用该功能,能快速揪出慢查询
内置全局拦截插件:提供全表 delete 、 update 操作智能分析阻断,也可自定义拦截规则,预防误操作
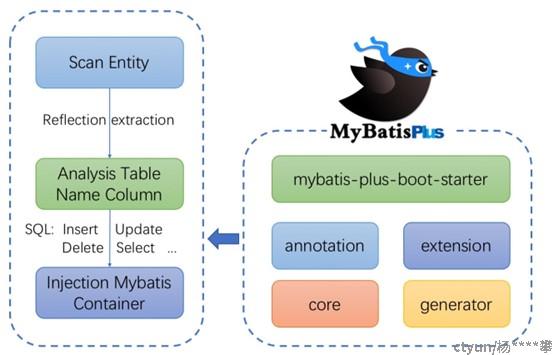
1.3 MP架构

2. MyBatisPuls实战
2.1 数据准备
drop table if exists student;
create table student(
    id bigint primary key auto_increment,
    name varchar(10) not null ,
    student_age int not null ,
    phone varchar(20),
    score int not null
)collate = utf8mb4_bin;
insert into student(name, student_age, phone, score) values ("张三",17,"19999999991",69),("李四",18,"19999999992",85),("王五",16,"19999999993",97);
2.2 引入依赖
<dependencies>
   <dependency>
      <groupId>org.springframework.boot</groupId>
      <artifactId>spring-boot-devtools</artifactId>
      <scope>runtime</scope>
      <optional>true</optional>
   </dependency>
   <dependency>
      <groupId>org.projectlombok</groupId>
      <artifactId>lombok</artifactId>
      <optional>true</optional>
   </dependency>
   <dependency>
      <groupId>org.springframework.boot</groupId>
      <artifactId>spring-boot-starter-test</artifactId>
      <scope>test</scope>
   </dependency>
   <dependency>
      <groupId>com.baomidou</groupId>
      <artifactId>mybatis-plus-boot-starter</artifactId>
      <version>3.3.2</version>
   </dependency>
   <dependency>
      <groupId>mysql</groupId>
      <artifactId>mysql-connector-java</artifactId>
      <version>8.0.26</version>
   </dependency>
</dependencies>
2.3 建立实体类
@Data
@TableName(value = "student")
public class Student {
    @TableId(type = IdType.AUTO)
    Long id;
    String name;
    @TableField(value = "student_age")
    Integer age;
    @TableField(value = "phone")
    String phoneNumber;
    String score;
}
这个实体类对应了数据库中的一张表,类的属性对应了表的列。在类的定义过程中使用了一些注解,他们分别的作用如下:
|
注解 |
作用 |
|
@Data |
Lombok插件提供的注解,可以自动生成set、get、toString等方法。 |
|
@TableName |
MP提供的注解,指定类对应的表名 |
|
@TableId |
指定主键,其中的type制定了组件类型 |
|
@TableField |
指定属性对应的列名,用于属性名和数据库表中列明不一致时使用 |
2.4 数据操作
相比于Mybatis, MP的一大改动是提供了更加方便和灵活的数据库操作方式。其中的BaseMapper和IService类分别在Dao层和Serivce层封装了方便的数据库操作方法。我们可以自定义接口或类继承或实现这些接口来方便的完成数据库操作。以下是一些简单的例子。
2.4.1 Mapper测试
我们定义的测试Mapper如下,通过@Mapper注解StudentMapper类会被加载到容器中。
@Mapper
public interface StudentMapper extends BaseMapper<Student> {
}
2.4.1.1使用Mapper操作数据
接下来我们在测试类中使用这个StudentMapper对象来实现简单的数据库操作:
查询数据:
@Test
void StudentMapperQueryByMapTest() {
   // 查询id为1的学生,利用baseMapper
   HashMap<String,Object> map = new HashMap();
   map.put("id",1);
   List<Student> students = studentMapper.selectByMap(map);
   students.stream().forEach(System.out::println);
}
除了使用id,map等方法完成简单的数据筛选外,BaseMapper还可以传入Wrapper以实现复杂的查询语句,以下是一个示例。
@Test
void StudentMapperQueryByWrapperTest() {
   // 查询id最大的学生的id,利用wrapper
   QueryWrapper wrapper = new QueryWrapper<Student>();
   wrapper.select("id");
   wrapper.orderByDesc("id");
   wrapper.last("limit 1");
   List<Student> students = studentMapper.selectList(wrapper);
   students.stream().forEach(System.out::println);
}
修改数据:
@Test
void StudentMapperUpdateByMapTest() {
   // 查询id为1的学生,利用baseMapper
   HashMap<String,Object> map = new HashMap();
   map.put("name","张三");
   List<Student> students = studentMapper.selectByMap(map);
   Student student = students.get(0);
   student.setScore(30);
   studentMapper.updateById(student);
   Student newStudent = studentMapper.selectById(student.getId());
   System.out.println(newStudent);
}
2.4.1.2 使用Mapper操作数据
我们定义的Service如下,他继承了ServiceImpl,而ServiceImpl 实现了IService。
@Service
public class StudentService extends ServiceImpl<StudentMapper, Student> {

}
MP可以使用 LambdaQueryChainWrapper和LambdaUpdateChainWrapper快速且灵活的构建出我们想要使用的sql,其示例如下:
Service查询:
@Test
void StudentServiceQueryTest() {
   // 找出分数在60-80之间的学生的名字
   List<Student> resultList = studentService.lambdaQuery().select(Student::getName).between(Student::getScore, 60, 80).list();
   System.out.println("分数在60-80之间的学生有:");
resultList.stream().map(Student::getName).forEach(System.out::println);
}
Service 修改
@Test
void StudentServiceUpdateTest(){
   // 将分数在60分以下的同学的分数设置为60分
studentService.lambdaUpdate().set(Student::getScore,60).lt(Student::getScore,60).update();
   List<Student> resultList =  studentService.lambdaQuery().list();
   resultList.stream().forEach(s -> System.out.println(s.getName() + " : " +s.getScore()));
}
3. 总结
以上便是MP的入门分享,利用MP进行简单的CURD操作仅仅是MP最基本的功能,但也是MP最为重要的能力。熟练掌握并使用MP能够帮助我们高效的完成开发目标。希望本文能对你有小小的帮助,再见。