1、实验概述
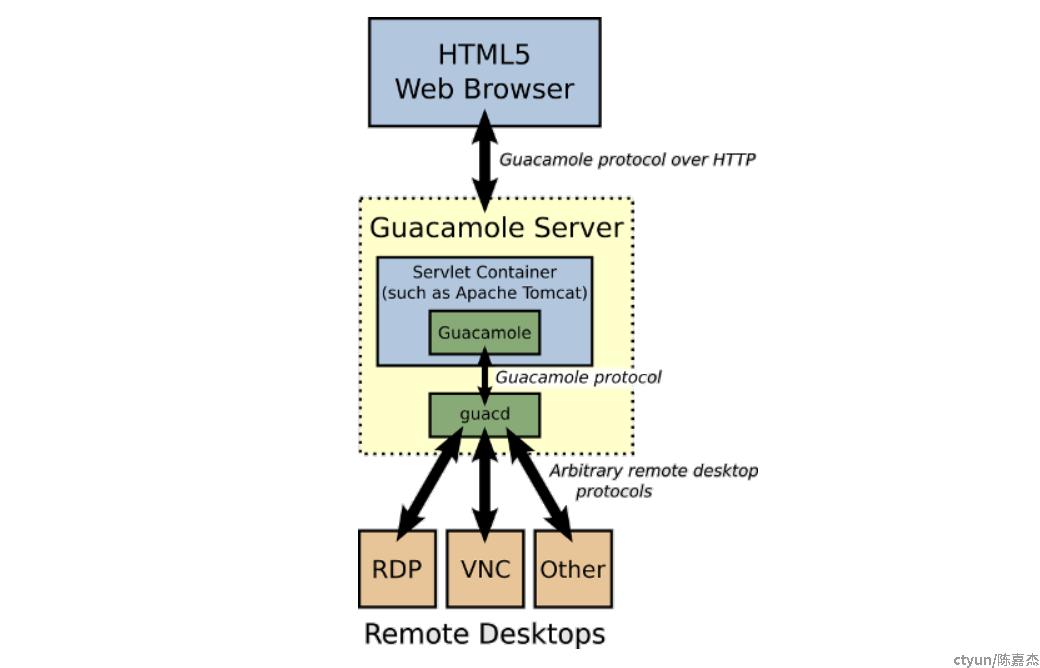
Guacamole 有一个代理守护进程 guacd,它使用远程桌面协议处理通信,将这些通信暴露给使用 Guacamole 协议连接到它的任何东西。从 Web 应用程序的角度来看,只需连接到端口 4822(guacd 默认侦听该端口)并使用 Guacamole 协议,guacd 将负责其余的工作。
Guacamole API 的 Java 端提供了简单的类,这些类已经实现了 Guacamole 协议,目的是在 guacd 和 Web 应用程序的 JavaScript 部分之间建立隧道。利用这些类的典型 Web 应用程序只需要以下内容:
- guacamole-common-js:提供了 Guacamole 客户端的 JavaScript 实现,以及用于从 JavaScript 中获取协议数据并进入 guacd 或 Web 应用程序的服务器端的隧道机制。
- guacamole-common:提供了一种在 guacamole-common-js 提供的 JavaScript 客户端和本机代理守护进程 guacd 之间传输数据的基本方法,并用于处理 Guacamole 协议。
官方提供的架构图:

本次实验目标:基于 guacamole-common 和 guacamole-common-js 构建自己的 Guacamole 驱动的 Web 应用程序 Demo。
2、guacamole-common 的使用
对应架构图上的 Servlet Container,Web 应用的后端模块使用 Maven 进行项目管理,使用 SpringBoot 进行快速构建。
官方使用手册中给出了基于 HTTP 的构建示例,本次实验我们来构建一个 WebSocket 的实例。
2.1、核心代码
项目工程的目录结构:

【文件】pom.xml
引入 SpringBoot WebSocket 和 Guacamole 的依赖。
<!-- SpringBoot WebSocket -->
<dependency>
    <groupId>org.springframework.boot</groupId>
    <artifactId>spring-boot-starter-websocket</artifactId>
</dependency>

<!-- Main Guacamole library -->
<dependency>
    <groupId>org.apache.guacamole</groupId>
    <artifactId>guacamole-common</artifactId>
    <version>1.3.0</version>
    <scope>compile</scope>
</dependency>
【文件】BootApplication.java
启动类。
@SpringBootApplication
@ServletComponentScan
public class BootApplication {
    public static void main(String[] args) {
        SpringApplication.run(BootApplication.class);
    }
}
【文件】WebSocketConfig.java
配置启用 WebSocket。
@Configuration
public class WebSocketConfig {
    @Bean
    public ServerEndpointExporter serverEndpointExporter() {
        return new ServerEndpointExporter();
    }
}
【文件】TunnelEndpoint.java
配置 guacd 以及待连接服务器的相关信息,当接收到 WebSocket 连接请求时,封装请求内容并代理到 guacd 服务器。
// WebSocket 接口地址:/web-socket/tunnel
@Component
@ServerEndpoint(value = "/web-socket/tunnel", subprotocols = "guacamole")
public class TunnelEndpoint extends GuacamoleWebSocketTunnelEndpoint {
    @Override
    protected GuacamoleTunnel createTunnel(
            Session session, EndpointConfig endpointConfig) throws GuacamoleException {

        GuacamoleConfiguration config = new GuacamoleConfiguration();
        // 配置连接方式为 ssh,也可以配置成 vnc/rdp
        config.setProtocol("ssh");

        // 待连接服务器的 IP、端口、账号密码
        config.setParameter("hostname", "127.0.0.1");
        config.setParameter("port", "22");
        config.setParameter("username", "root");
        config.setParameter("password", "password");

        // SSH 连接的可选配置:设置显示的颜色方案,设置字体大小
        config.setParameter("color-scheme", "white-black");
        config.setParameter("font-size", "14");

        // 设置启动 SFTP:支持 web 页面对服务器进行文件的上传/下载
        config.setParameter("enable-sftp", "true");

        GuacamoleSocket socket = new ConfiguredGuacamoleSocket(
                // guacd 服务的 IP 和端口
                new InetGuacamoleSocket("127.0.0.1", 4822),
                config
        );

        // 使用 guacamole-common 中封装好的 Tunnel 进行连接
        return new SimpleGuacamoleTunnel(socket);
    }
}
以上就是 Web 应用后端的代码实现,如果投入实际使用,可以扩展更多功能:
- 接口鉴权:可以利用在 WebSocket 请求携带 URL 参数(例如携带 Token),或者单点登录后请求中携带的 cookie 进行功能扩展
- guacd 以及待连接服务器的相关信息:可以扩展成从配置文件、数据库或远端接口动态获取;另外就是连接配置里面还有上述代码没有演示了,例如 SSH 记录用户输入、VNC/RDP 进行录屏等
- GuacamoleTunnel 类重写:对 Tunnel close() 之后进行一些清理操作
- GuacamoleTunnel 连接管理:建立连接池,限制一台服务器同一时间只允许建立一个 Tunnel
扩展功能暂时只联想到这些,具体实现就不赘述了。
2.2、guacamole-common-js 的使用
前段代码的目录结构:

2.2.1、核心代码
【文件】index.html 的 JavaScript 部分:
var scale = 1;
var tunnel = null;
var client = null;
var fileSystem = null;

function init() {
    client = new Guacamole.Client(
        // 第一种为 HTTP 请求,第二种为 WebSocket 请求
        // new Guacamole.HTTPTunnel("https://172.4.32.40:8080/http/tunnel")
        new Guacamole.WebSocketTunnel("ws://172.4.32.40:8080/web-socket/tunnel")
    );

    var display = document.getElementById("display");
    display.appendChild(client.getDisplay().getElement());

    client.onerror = function () {
        // 异常
    };

    client.onsync = function () {
        // 建立连接
    };

    client.onstatechange = function (state) {
        if (state === 3) {
            // 页面大小发生变化,可按需调整 display 大小
        }
    };

    // 初始化文件系统
    client.onfilesystem = function (object) {
        fileSystem = object;
    };

    window.onunload = function () {
        client.disconnect();
    };

    initMouse();
    initKeyboard();

    client.connect();
}

// 鼠标初始化
function initMouse() {
    var mouse = new Guacamole.Mouse(client.getDisplay().getElement());
    mouse.onmousedown =
        mouse.onmouseup =
            mouse.onmousemove = function (mouseState) {
                var x = mouseState.x;
                var y = mouseState.y;

                // 如果调用过 scale() 方法,需要对鼠标坐标进行处理
                // 不然鼠标位置会发生偏移
                mouseState.x = x / scale;
                mouseState.y = y / scale;
                client.sendMouseState(mouseState);

                mouseState.x = x;
                mouseState.y = y;
            };
}

// 键盘初始化
function initKeyboard() {
    var keyboard = new Guacamole.Keyboard(document);
    keyboard.onkeydown = function (keyEvent) {
        client.sendKeyEvent(1, keyEvent);
    };
    keyboard.onkeyup = function (keyEvent) {
        client.sendKeyEvent(0, keyEvent);
    };
}

// 发送文本内容到远程环境的 clipboard
function setClipboard(data) {
    var stream = client.createClipboardStream("text/plain");
    var writer = new Guacamole.StringWriter(stream);
    var STREAM_BLOB_SIZE = 4096;
    for (var i = 0; i < data.length; i += STREAM_BLOB_SIZE) {
        writer.sendText(data.substring(i, i + STREAM_BLOB_SIZE));
    }
    writer.sendEnd();
}

// 修改 display 缩放比例
function changeScale(value) {
    scale = value;
    client.getDisplay().scale(scale);
}

// 修改 display 大小
function changeSize(width, height) {
    client.sendSize(width, height);
}

// 文件上传
function doUpload(id) {
    var file = document.getElementById(id).files[0];
    if (file == null) {
        return;
    }

    var STREAM_BLOB_SIZE = 4096;
    var reader = new FileReader();
    reader.onload = function fileContentsLoaded() {
        // 设置上传到远端服务器的 /opt 目录
        var stream = fileSystem.createOutputStream(file.type, '/opt/' + file.name);
        var bytes = new Uint8Array(reader.result);
        var offset = 0;

        stream.onack = function (status) {
            if (status.isError()) {
                console.log(status.message);
                return;
            }

            var slice = bytes.subarray(offset, offset + STREAM_BLOB_SIZE);
            var base64 = buffer2Base64(slice);
            stream.sendBlob(base64);
            offset += STREAM_BLOB_SIZE;

            if (offset >= bytes.length) {
                stream.sendEnd();
                return;
            }
        };
    };

    reader.readAsArrayBuffer(file);
}

function buffer2Base64(buf) {
    var binstr = Array.prototype.map.call(buf, function (ch) {
        return String.fromCharCode(ch);
    }).join('');
    return btoa(binstr);
}
【文件】index.html 的 HTML 代码:
<body onload="init()">
    <p>文件上传:</p>
    <input type="file" id="fileUpload" />
    <button onclick="doUpload('fileUpload')">upload</button>
    <br>
    <p>调整比例:</p>
    <button onclick="changeScale(0.5)">scale 50%</button>
    <button onclick="changeScale(1)">scale 100%</button>
    <button onclick="changeScale(1.2)">scale 120%</button>
    <br>
    <p>调整大小:</p>
    <button onclick="changeSize(400, 400)">size(400, 400)</button>
    <button onclick="changeSize(800, 400)">size(800, 400)</button>
    <button onclick="changeSize(1000, 400)">size(1000, 400)</button>
    <br>
    <p>Display:</p>
    <div id="display"></div>
</body>
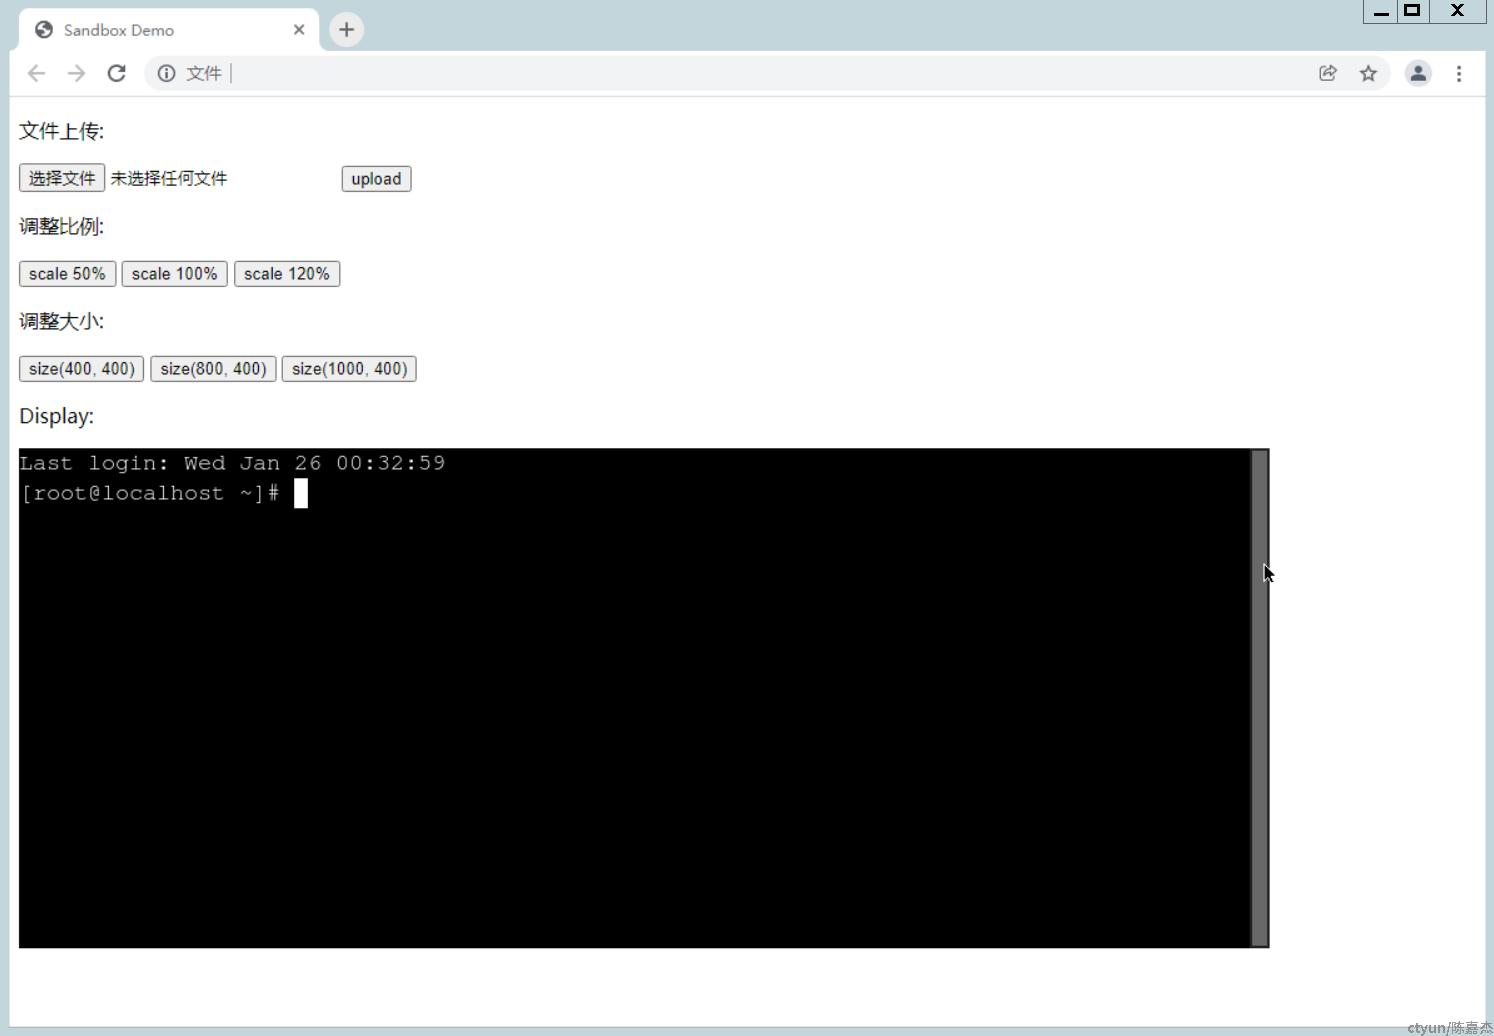
页面展示:

3、总结
以上是对 guacamole-common 和 guacamole-common-js 的使用实验过程,最小化地实现 Web 应用的后端逻辑并分析后续的扩展实现,针对 Web 前端验证了连接、缩放、调整大小、上传文件和粘贴板几个基本功能。更多的信息请见官方的使用手册。