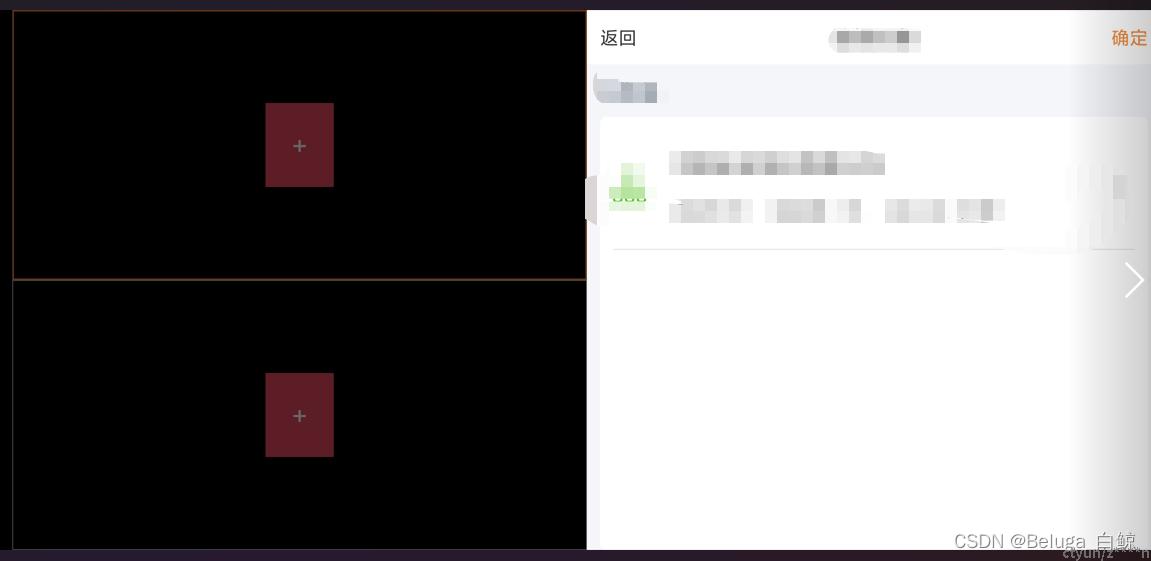
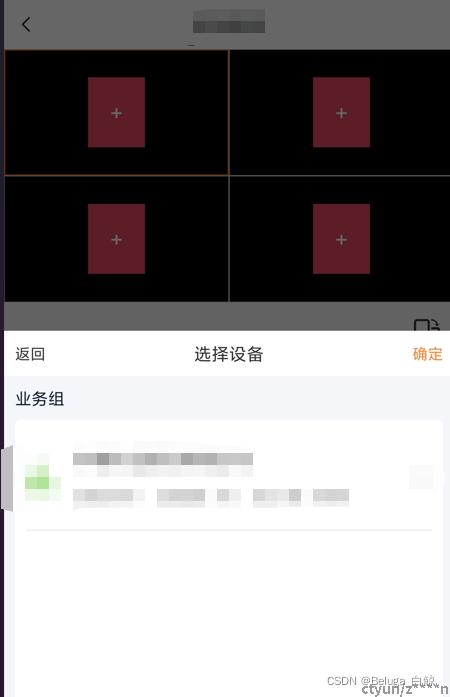
一、效果图


二、使用DialogFragment注意事项。
1. Dialog不可加载Fragment,因为使用的是Activity的FragmentManager,所以是找不到Dialog布局中的Fragment的id。
2. 如果想用Dialog加载Fragment,则可以使用新的组件DialogFragment。
3. DialogFragment,则可以认知为是Fragment和Dialog的结合体,有双方的特性。
4. DialogFragment,其中Fragment特性,可以使用其getChildFragmentManager()特性加载Fragment。
5. DialogFragment,其中Dialog特性,可以使用getDialog().hide();getDialog().show();控制其显示特性。
6. 调用DialogFragment.dismiss会销毁所有对象(包括Fragment和dialog),再次调用DialogFragment.show会重新走生命周期。
7. 仅仅调用getDialog().hide();getDialog().show();,不会重新走DialogFragment的生命周期,所以可以让弹框保留之前的操作数据。
三、自定义一个参考示例
1. 调用代码
PreviewDeviceDialog previewDeviceDialog;

 if (previewDeviceDialog == null) {
      previewDeviceDialog = new PreviewDeviceDialog();
 }

//由于不想Dialog内容被销毁,所以重写show和dismiss
previewDeviceDialog.show(getSupportFragmentManager(), getRequestedOrientation());
2.DialogFragment自定义
- 竖屏,从底部向上弹出弹框(带动画)
- 横屏,从右侧往左侧弹出弹框(带动画)
- 其中的Fragment子页面,引入自己的子页面就可以了
package com.vss.ui.dialog;

import android.content.DialogInterface;
import android.content.pm.ActivityInfo;
import android.graphics.drawable.ColorDrawable;
import android.os.Bundle;
import android.view.Gravity;
import android.view.LayoutInflater;
import android.view.View;
import android.view.ViewGroup;
import android.view.Window;
import android.view.WindowManager;
import android.widget.TextView;

import androidx.annotation.NonNull;
import androidx.annotation.Nullable;
import androidx.fragment.app.DialogFragment;
import androidx.fragment.app.FragmentManager;

import com.orhanobut.logger.Logger;
import com.vss.R;
import com.vss.fragment.device.DeviceFragment;
import com.vss.listener.DeviceFragmentListener;

/**
 * 设备选择弹框
 *
 * 使用DialogFragment
 *  DialogFragment可以加载Fragment
 *  PopupWindow不可以加载Fragment
 */
public class PreviewDeviceDialog extends DialogFragment implements View.OnClickListener {

    private DeviceFragment deviceFragment;
    private int orientation = ActivityInfo.SCREEN_ORIENTATION_PORTRAIT; //默认竖屏

    @Override
    public void onCreate(@Nullable Bundle savedInstanceState) {
        super.onCreate(savedInstanceState);

        Logger.d("---------------" + 3);

        //设置对话框的风格和各种属性
        setCancelable(true);
        //setStyle();
    }

    @Nullable
    @Override
    public View onCreateView(@NonNull LayoutInflater inflater, @Nullable ViewGroup container, @Nullable Bundle savedInstanceState) {
        //设置布局相关
        getDialog().requestWindowFeature(Window.FEATURE_NO_TITLE); //不显示弹框title

        //设置默认布局位置
        Window window = this.getDialog().getWindow();
        window.getDecorView().setPadding(0, 0, 0, 0); //去掉dialog默认的padding
        window.setBackgroundDrawable(new ColorDrawable());

        //layout
        View view = inflater.inflate(R.layout.dialog_preview_device, container, false);
        view.findViewById(R.id.tv_back).setOnClickListener(this);
        view.findViewById(R.id.tv_confirm).setOnClickListener(this);

        Logger.d("---------------" + 4);

        initData();
        return view;
    }

    public void initData() {
        //加载子Fragment
        deviceFragment = new DeviceFragment("", new DeviceFragmentListener() {
            @Override
            public void setTitle(String title) {
                //wsToolbarTitle.setText(title);
            }

            @Override
            public void backLast() {
                dismiss();
            }
        });
        getChildFragmentManager()
                .beginTransaction()
                .replace(R.id.container, deviceFragment, "Sub")
                .commit();
    }

    @Override
    public void onClick(View view) {
        switch (view.getId()) {
            case R.id.tv_back:
                deviceFragment.onBackPressed();
                break;
            case R.id.tv_confirm:
                break;
        }
    }

    @Override
    public void onResume() {
        super.onResume();
        //必须在onResume时候重绘高度和动画才可以实现效果

        Logger.d("---------------" + 5);

        if (orientation == ActivityInfo.SCREEN_ORIENTATION_PORTRAIT) { //竖屏
            Window window = this.getDialog().getWindow();
            WindowManager.LayoutParams lp = window.getAttributes();
            lp.width = WindowManager.LayoutParams.MATCH_PARENT;
            int screenHeight = getResources().getDisplayMetrics().heightPixels;
            lp.height = Math.round(screenHeight * 2 / 3);
            lp.gravity = Gravity.BOTTOM; //设置dialog的位置在底部
            lp.windowAnimations = R.style.AnimDownToTop; //设置底部动画
            window.setAttributes(lp);
        } else {//横屏
            Window window = this.getDialog().getWindow();
            WindowManager.LayoutParams lp = window.getAttributes();
            int screenWidth = getResources().getDisplayMetrics().widthPixels;
            lp.width = Math.round(screenWidth / 2);
            lp.height = WindowManager.LayoutParams.MATCH_PARENT;
            lp.gravity = Gravity.RIGHT; //设置dialog的位置在底部
            lp.windowAnimations = R.style.AnimRightToLeft; //设置右侧动画
            window.setAttributes(lp);
        }
    }

    public void show(FragmentManager fragmentManager, int orientation) {
        if(this.orientation == orientation) { //相同方向,重新打开,直接展示弹框(getDialog().show()),不重走生命周期(show)
            if(this.isAdded()) {
                getDialog().show(); //如果是显示,则说明目前状态是hide,直接显示
            } else {
                show(fragmentManager, "DeviceSelect");
            }
        } else { //不同方向,则重新走生命周期
            //设置新方向
            this.orientation = orientation;
            //调用dismiss后,再次调用show生命周期会重新走一遍
            dismiss();
        }
    }

    //直接调用onDismiss,整个弹框会被销毁,再次调用show会重新走生命周期
    @Override
    public void onDismiss(@NonNull DialogInterface dialog) {
        //仅调用hide,不销毁,仅隐藏
         getDialog().hide();
    }
}
四、布局
<?xml version="1.0" encoding="utf-8"?>
<LinearLayout xmlns:android="http://schemas.android.com/apk/res/android"
    xmlns:tools="http://schemas.android.com/tools"
    android:layout_width="match_parent"
    android:layout_height="wrap_content"
    android:orientation="vertical"
    android:background="@color/bg_page">

    <RelativeLayout
        android:layout_width="match_parent"
        android:layout_height="wrap_content"
        android:background="@color/bg_page_white">

        <TextView
            android:id="@+id/tv_back"
            android:layout_width="wrap_content"
            android:layout_height="wrap_content"
            android:text="返回"
            android:textSize="14sp"
            android:textColor="@color/text_title"
            android:layout_centerVertical="true"
            android:padding="10dp"/>

        <TextView
            android:layout_width="wrap_content"
            android:layout_height="wrap_content"
            android:text="选择设备"
            android:textSize="16sp"
            android:textColor="@color/text_title"
            android:layout_centerInParent="true"
            android:padding="10dp"/>

        <TextView
            android:id="@+id/tv_confirm"
            android:layout_width="wrap_content"
            android:layout_height="wrap_content"
            android:text="确定"
            android:textSize="14sp"
            android:textColor="@color/text_title_yellow"
            android:layout_centerVertical="true"
            android:layout_alignParentRight="true"
            android:padding="10dp"/>
    </RelativeLayout>

    <FrameLayout
        android:id="@+id/container"
        android:layout_width="match_parent"
        android:layout_height="match_parent"
        android:layout_weight="1" />
</LinearLayout>
五、动画styles.xml
    <!-- 弹框动画 - 底部开始,往上弹出 -->
    <style name="AnimDownToTop" parent="@android:style/Animation">
        <item name="android:windowEnterAnimation">@anim/anim_bottom_to_top_in</item>
        <item name="android:windowExitAnimation">@anim/anim_bottom_to_top_out</item>
    </style>

    <!-- 弹框动画 - 右侧往左侧弹出,左侧往右侧消失 -->
    <style name="AnimRightToLeft" parent="@android:style/Animation">
        <item name="android:windowEnterAnimation">@anim/anim_right_to_left_in</item>
        <item name="android:windowExitAnimation">@anim/anim_right_to_left_out</item>
    </style>
六、动画资源文件
anim_right_to_left_in.xml
<?xml version="1.0" encoding="utf-8"?>
<set xmlns:android="http://schemas.android.com/apk/res/android">

    <!-- y的起始值,从1000%跑到0 -->
    <translate
        android:duration="300"
        android:fromYDelta="100%p"
        android:toYDelta="0" />

    <alpha
        android:duration="300"
        android:fromAlpha="0.0"
        android:toAlpha="1.0" />
</set>
anim_right_to_left_out.xml
<?xml version="1.0" encoding="utf-8"?>
<set xmlns:android="http://schemas.android.com/apk/res/android">
    <!-- y的起始值,从0跑到100% -->
    <translate
        android:duration="50"
        android:fromXDelta="0"
        android:toXDelta="100%p" />
    <alpha
        android:duration="300"
        android:fromAlpha="1.0"
        android:toAlpha="0.0" />
</set>
anim_bottom_to_top_in.xml
<?xml version="1.0" encoding="utf-8"?>
<set xmlns:android="http://schemas.android.com/apk/res/android">

    <!-- y的起始值,从1000%跑到0 -->
    <translate
        android:duration="300"
        android:fromYDelta="100%p"
        android:toYDelta="0" />

    <alpha
        android:duration="300"
        android:fromAlpha="0.0"
        android:toAlpha="1.0" />
</set>
anim_bottom_to_top_out.xml
<?xml version="1.0" encoding="utf-8"?>
<set xmlns:android="http://schemas.android.com/apk/res/android">
    <!-- y的起始值,从0跑到100% -->
    <translate
        android:duration="50"
        android:fromYDelta="0"
        android:toYDelta="100%p" />
    <alpha
        android:duration="300"
        android:fromAlpha="1.0"
        android:toAlpha="0.0" />
</set>