


Redis主从部署
有A、B、C三台主机,以redis3.2.12为例:
-
安装指定版本:sudo yum install -y redis-3.2.12。
- 调整系统设置:在/etc/sysctl.conf中添加overcommit_memory = 1和net.core.somaxconn = 4096后,
通过命令sudo sysctl -p生效。
-
创建并填写配置文件:sudo mkdir -p /etc/redis && sudo vi /etc/redis/redis.conf
- 配置文件如下,其中port为redis服务的端口,daemonize使redis后台运行,需要填入requirepass作为redis认证密码,三台主机的requirepass完全相同,三台主机的masterauth与requirepass保持一致。假设A为指定的master,则无需配置最后一个slaveof,而对于另外两台主机,需要配置slaveof A.IP A.port属性(对于不同的redis版本,配置存在差异,redis后续已替换所有“slave”):
bind 0.0.0.0
protected-mode no
port 16379
tcp-backlog 511
timeout 0
tcp-keepalive 300
daemonize yes
supervised no
pidfile "/var/run/redis_16379.pid"
loglevel notice
logfile "/var/tmp/redis.log"
databases 16
save 900 1
save 300 10
save 60 10000
stop-writes-on-bgsave-error yes
rdbcompression yes
rdbchecksum yes
dbfilename "dump.rdb"
dir "/var/lib/redis"
slave-serve-stale-data yes
slave-read-only yes
repl-diskless-sync no
repl-diskless-sync-delay 5
repl-disable-tcp-nodelay no
slave-priority 100
requirepass "{{redis_pass}}"
rename-command FLUSHALL ""
rename-command FLUSHDB ""
appendonly yes
appendfilename "appendonly.aof"
appendfsync everysec
no-appendfsync-on-rewrite no
auto-aof-rewrite-percentage 100
auto-aof-rewrite-min-size 64mb
aof-load-truncated yes
slowlog-log-slower-than 10000
slowlog-max-len 128
latency-monitor-threshold 0
notify-keyspace-events ""
hash-max-ziplist-entries 512
hash-max-ziplist-value 64
list-max-ziplist-size -2
list-compress-depth 0
set-max-intset-entries 512
zset-max-ziplist-entries 128
zset-max-ziplist-value 64
hll-sparse-max-bytes 3000
activerehashing yes
client-output-buffer-limit normal 0 0 0
client-output-buffer-limit slave 256mb 64mb 60
client-output-buffer-limit pubsub 32mb 8mb 60
hz 10
aof-rewrite-incremental-fsync yes
maxclients 4064
masterauth "{{master_pass}}"
slaveof "{{master_ip}}" "{{master_port}}"- redis启动:先主后从,启动命令为:sudo redis-server /etc/redis/redis.conf
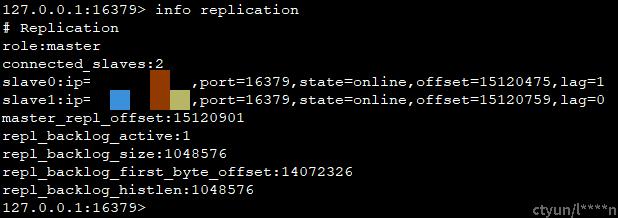
- 测试:在master所在的主机上,连接redis:redis-cli -p {{port} -a {{requirepass}} 后,输入info replication得到redis的主从信息。
Redis主从集群存在的问题:当Redis主节点发生故障时,需要手动将一个从节点提升为新的主节点,以确保集群的持续可用性。
